9.2 Review of Anatomy & Physiology of the Nervous System
Open Resources for Nursing (Open RN)
The nervous system is divided into two main parts called the central nervous system and the peripheral nervous system. See Figure 9.1[1] for an illustration of the nervous system.

The central nervous system (CNS) includes the brain and the spinal cord. The brain can be described as the interpretation center, and the spinal cord can be described as the transmission pathway.[2]
Brain
The major regions of the brain are the cerebrum, cerebral cortex, hypothalamus, thalamus, brain stem, and the cerebellum.
The largest portion of our brain is called the cerebrum. The cerebrum is covered by a wrinkled outer layer of gray matter called the cerebral cortex. The cerebral cortex is involved in complex brain functions, including memory, attention, perceptual awareness, thought, language, and consciousness. The cerebral cortex is divided into four lobes named the frontal, parietal, occipital, and temporal lobes. Each lobe has the following specific functions:
- Frontal Lobe: The frontal lobe is associated with movement. It contains neurons that instruct cells in the spinal cord to move skeletal muscles. The anterior portion of the frontal lobe is called the prefrontal lobe. The prefrontal lobe provides cognitive functions such as planning and problem-solving that contribute to our personality, short-term memory, and consciousness. Broca’s area is located in the frontal lobe and is responsible for the production of language and controlling movements responsible for speech.
- Parietal Lobe: The parietal lobe processes general sensations, including touch, pressure, tickle, pain, itch, and vibration.
- Temporal Lobe: The temporal lobe processes auditory information. Wernicke’s area is located in the temporal lobe and is responsible for the comprehension of written and spoken language. Because regions of the temporal lobe are part of the limbic system, memory is also an important function associated with the temporal lobe. The limbic system is involved with our behavioral and emotional responses needed for survival, such as feeding, reproduction, and the fight-or-flight responses.
- Occipital Lobe: The occipital lobe primarily processes visual information.
The cerebellum is the posterior part of the brain that controls fine motor skills. See Figure 9.2[3] for an illustration of the cerebellum and the lobes of the cerebral cortex.
![“Cerebrum lobes.svg” by Jkwchui is licensed under CC BY-SA 3.0[/footnote] Illustration showing Cerebellum and Lobes of the Cerebrum with text labels for major structures](https://opencontent.ccbcmd.edu/app/uploads/sites/32/2024/09/Cerebrum_lobes.svg.png)
Deep within the cerebrum are the hypothalamus and the thalamus. The hypothalamus coordinates the autonomic nervous system and the activity of the pituitary, controlling body temperature, thirst, hunger, and other homeostatic systems. The thalamus is the relay center for sensory and motor signals to the cerebral cortex. See Figure 9.3[4] for an illustration of the hypothalamus and the thalamus.
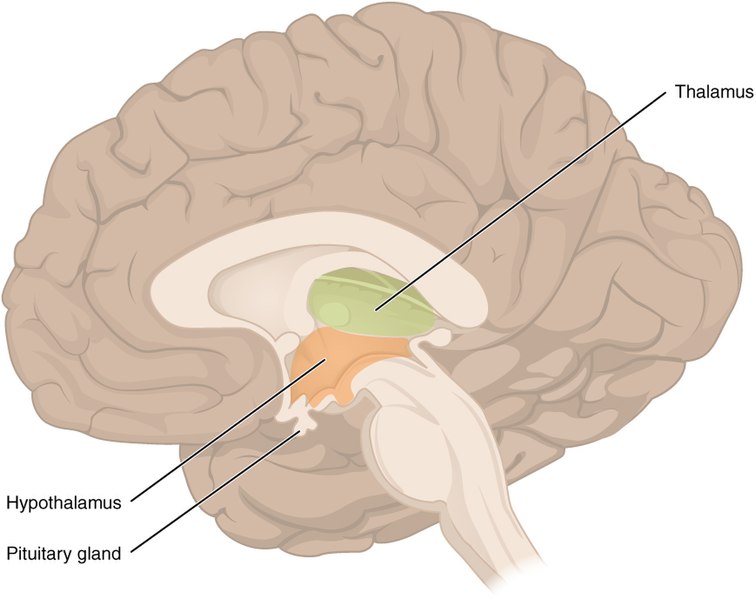
The ventricles are a group of interconnected, fluid-filled cavities within the brain. The purpose of the ventricles is to produce cerebrospinal fluid to cushion and protect the brain.
Meninges are three membranes that protect the brain and spinal cord called the pia mater, arachnoid, and dura mater. The pia mater is the delicate inner layer. The arachnoid is the middle layer filled with fluid that cushions the brain. The dura mater is the tough outermost membrane enveloping the brain and spinal cord. The meningeal spaces are the spaces between the meningeal layers. There are three clinically significant meningeal spaces called the epidural, subdural, and subarachnoid.
The brain stem connects the spinal cord with the brain. It regulates several crucial autonomic functions in the body, including involuntary functions in the cardiovascular and respiratory systems and reflexes like vomiting, coughing, sneezing, and swallowing.
Spinal Cord
The spinal cord is a bundle of nerve fibers enclosed in the spine that connects nearly all parts of the body to the brain. It is a continuation of the brain stem that transmits sensory information to the brain and motor impulses to the muscles.
Peripheral Nervous System
The peripheral nervous system (PNS) consists of the remaining parts of the nervous system outside of the brain and spinal cord, including the cranial nerves that branch out from the brain and the spinal nerves that branch out from the spinal cord. The peripheral nervous system is the communication network between the brain and the body.[5]
Cranial Nerves
Cranial nerves are directly connected from the brain to the periphery. They are primarily responsible for the sensory and motor functions of the head and neck. There are twelve cranial nerves that are designated by Roman numerals I through XII. A popular mnemonic for memorizing the names of the cranial nerves is “Oh Once One Takes The Anatomy Final Some Good Vacations Are Heavenly,” in which the initial letter of each word corresponds to the initial letter in the name of each nerve. The cranial nerves include the following nerves[6]:
- O: The olfactory nerve is responsible for the sense of smell.
- O: The optic nerve is responsible for the sense of vision.
- O: The oculomotor nerve regulates eye movements by controlling four of the extraocular muscles, lifting the upper eyelid when the eyes point up and constricting the pupils.
- T: The trochlear nerve and the abducens nerve are both responsible for eye movement but do so by controlling different extraocular muscles.
- T: The trigeminal nerve regulates skin sensations of the face and controls the muscles used for chewing.
- A: The auditory/vestibulocochlear nerve manages hearing and balance.
- F: The facial nerve is responsible for the muscles involved in facial expressions, as well as part of the sense of taste and the production of saliva.
- S: The spinal (accessory) nerve controls movements of the neck, along with cervical spinal nerves.
- G: The glossopharyngeal nerve regulates the controlling muscles in the oral cavity and upper throat, as well as part of the sense of taste and the production of saliva.
- V: The vagus nerve is responsible for contributing to homeostatic control of the organs of the thoracic and upper abdominal cavities.
- A: The abducens nerve supplies the muscles involved with the lateral eye movement.
- H: The hypoglossal nerve manages the muscles of the lower throat and tongue.
Spinal Nerves
Spinal nerves are named based on the level of the spinal cord where they emerge. See Figure 9.4[7] for an illustration of spinal nerves. There are eight pairs of cervical nerves designated C1 to C8, twelve thoracic nerves designated T1 to T12, five pairs of lumbar nerves designated L1 to L5, five pairs of sacral nerves designated S1 to S5, and one pair of coccygeal nerves. All spinal nerves are sensory and motor nerves. Spinal nerves extend outward from the vertebral column to innervate the periphery while also transmitting sensory information back to the brain.

Each spinal nerve innervates a specific region of the body[8]:
- C1 provides motor innervation to muscles at the base of the skull.
- C2 and C3 provide both sensory and motor control to the back of the head and behind the ears.
- The phrenic nerve from C3, C4, and C5 innervates the diaphragm to enable breathing. This is vital because if a client has an injury where the spinal cord is cut above C3, then spontaneous breathing is not possible.
- C5 through C8 and T1 combine to form the brachial plexus, a tangled array of nerves that serve the upper limbs and upper back.
- The lumbar plexus arises from L1-L5 and innervates the pelvic region and the anterior legs.
- The sacral plexus comes from the lower lumbar nerves L4 and L5 and the sacral nerves S1 to S4. The sciatic nerve is a part of the sacral plexus. If the sciatic nerve becomes compressed due to degeneration of an intervertebral disc, a medical condition called sciatica occurs that causes pain in the back, hip, and outer side of the leg.
- S5 and the coccygeal nerves leave the sacral canal and provide partial innervation to several pelvic organs, including the uterus, fallopian tubes, bladder, and prostate.
If a client experiences a spinal cord injury, the degree of paralysis can be predicted by the location of the spinal cord injury. The higher up on the spinal cord an injury occurs, the greater loss of function. For example, a spinal cord injury higher on the spinal cord can cause paralysis in most of the body and affect all limbs (tetraplegia or quadriplegia). An injury that occurs lower on the spinal cord may only affect a person’s lower body and legs (paraplegia).
It is also important to remember when a client has a spinal cord injury and motor nerves are damaged, their sensory nerves may still be intact. If this occurs, the client can still feel sensation even if they can’t move the extremity.
Neurons
Nervous tissue in the CNS and PNS contains two basic types of cells: neurons and glial cells. Neurons are responsible for the communication that the nervous system provides. They are electrically active and release chemical signals called neurotransmitters. Glial cells play a supporting role for nervous tissue.[9]
Neurons provide electrical signals that communicate information about sensations and, in response, stimulate movements. The three-dimensional shape of neurons makes massive numbers of connections within the nervous system. The main part of a neuron is the cell body. A fiber that emerges from the cell body and projects to target cells is called the axon. A single axon can branch repeatedly to communicate with many target cells by sending nerve impulses. Dendrites conduct information received from other neurons at contact areas called a synapse. A synapse is a junction between two nerve cells, consisting of a tiny gap through which neurotransmitters pass. See Figure 9.5[10] for an illustration of a neuron.
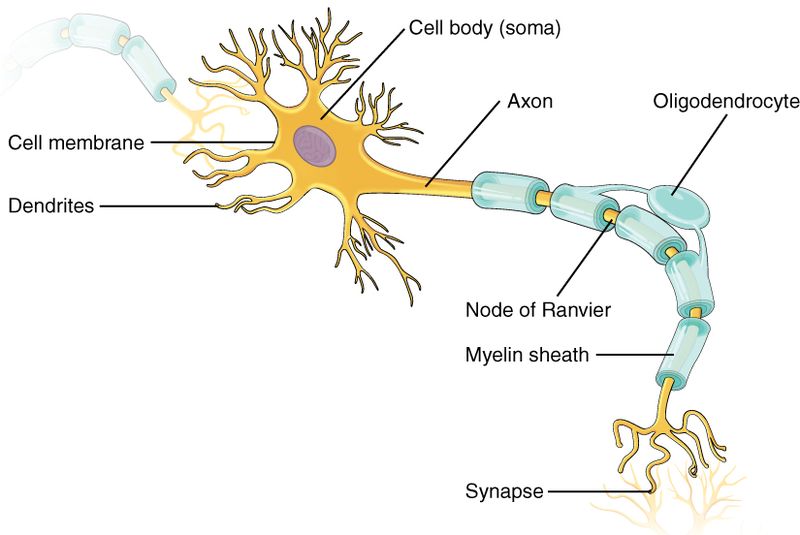
Many axons are wrapped by an insulating substance called myelin, which is made from glial cells. The myelin sheath acts as insulation much like the plastic or rubber that is used to insulate electrical wires.
Neurotransmitters and Neuroreceptors
Electrical impulses from neurons signal the release of a neurotransmitter into a synapse. Neurotransmitters cause the impulse to be transferred to a neuroreceptor on another neuron, muscle fiber, or other structure. Neuroreceptors are specific for certain neurotransmitters, and the two fit together like a key and lock. See Figure 9.6[11] for an illustration of neuron communication.
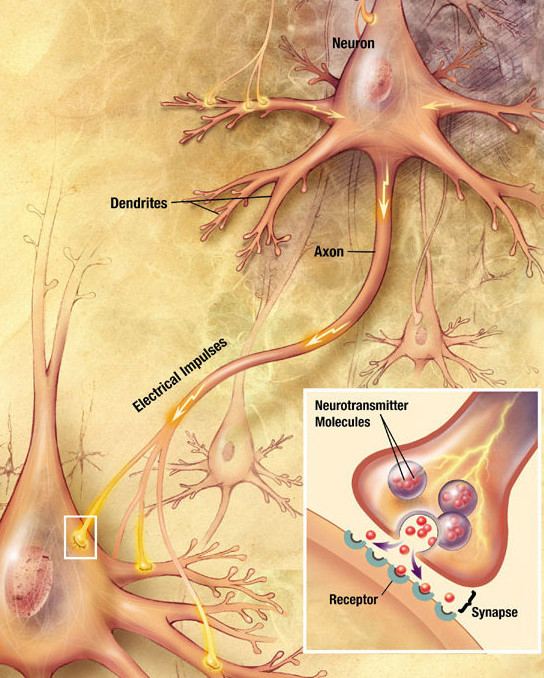
Several nervous system diseases and mental health disorders are related to abnormal impulse transmission and/or imbalanced levels of neurotransmitters. See Table 9.1 for a list of major neurotransmitters. In this chapter, many of the alterations presented include a dysfunction in neurotransmission. It is helpful to understand the common neurotransmitters and their function to better understand neurological alterations. For example, dopamine is a neurotransmitter that influences movement and cognition. Dopamine imbalances are associated with Parkinson’s disease.[12]
Table 9.1. Major Neurotransmitters
| Neurotransmitter | Source | Action | Example of Dysfunction |
|---|---|---|---|
| Acetylcholine (major transmitter of the parasympathetic nervous system) | Autonomic nervous system; includes numerous areas of the brain | Excitatory; parasympathetic effects but can be inhibitory such as stimulation of heart by the vagus nerve. | Decreased levels lead to myasthenia gravis. |
| Dopamine | Substantia nigra and basal ganglia | Typically inhibits and affects behavior such as attention, emotions, and fine movement. | Decreased levels lead to Parkinson’s disease. |
| Serotonin | Hypothalamus, brain stem, and dorsal horn of the spinal cord | Inhibitory effects and helps to control sleep and mood; inhibits pain pathways. | Decreased levels lead to depression. |
| Gamma-aminobutyric acid (GABA) | Spinal cord, basal ganglia, cerebellum, and some cortical areas | Inhibitory effect. | Decreased levels lead to seizures. |
| Norepinephrine (major transmitter of the sympathetic nervous system) | Brain stem, hypothalamus, and postganglionic neurons of the sympathetic nervous system | Typically excitatory; affects mood and overall activity levels. | Dysfunction is rarely seen. |
| Glutamate | Several types of receptors found through the CNS | Excitatory; its metabolism is important to maintaining optimal levels within the extracellular space. As such, it is important for memory, cognition, and mood regulation. | Dysfunction interferes with brain processing of information. Excess amounts can damage nerve cells. |
- “Nervous_system_diagram-en.svg” by Medium69, Jmarchn is licensed under CC BY-SA 4.0 ↵
- This work is a derivative of Anatomy & Physiology by OpenStax and is licensed under CC BY 4.0. Access for free at https://openstax.org/books/anatomy-and-physiology/pages/1-introduction ↵
- “Cerebrum lobes.svg” by Jkwchui is licensed under CC BY-SA 3.0 ↵
- “1310_Diencephalon.jpg” by OpenStax is licensed under CC BY 4.0 ↵
- This work is a derivative of Anatomy & Physiology by OpenStax and is licensed under CC BY 4.0. Access for free at https://openstax.org/books/anatomy-and-physiology/pages/1-introduction ↵
- This work is a derivative of Open RN Nursing Skills 2e ↵
- “Spinal_Cord_Segments_and_body_representation.png” by David Nascari and Alan Sved is licensed under CC BY-SA 4.0 ↵
- This work is a derivative of Anatomy and Physiology by Boundless.com and is licensed under CC BY-SA 4.0 ↵
- This work is a derivative of Anatomy & Physiology by OpenStax and is licensed under CC BY 4.0. Access for free at https://openstax.org/books/anatomy-and-physiology/pages/1-introduction ↵
- “1206_The_Neuron-1.jpg” by OpenStax is licensed under CC BY 4.0 ↵
- “Chemical synapse schema cropped.jpg” by Looie496 is licensed under Public Domain. ↵
- This work is a derivative of Open RN Nursing Pharmacology 2e and Open RN Nursing Skills 2e ↵
Personal values, character, or conduct of individuals or groups within communities and societies.
Syringes
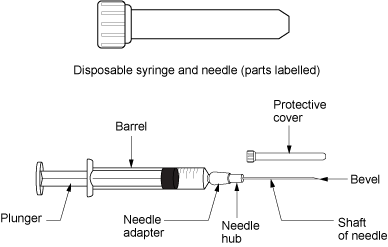
Syringes are used to administer parenteral medications. A disposable syringe is a sterile device that is available in various sizes ranging from 0.5 mL to 60 mL. A syringe consists of a plunger, a barrel, and a needle hub. Syringes may be supplied individually or with a needle and protective cover attached. See Figure 18.1[1] for an illustration of the parts of a syringe.
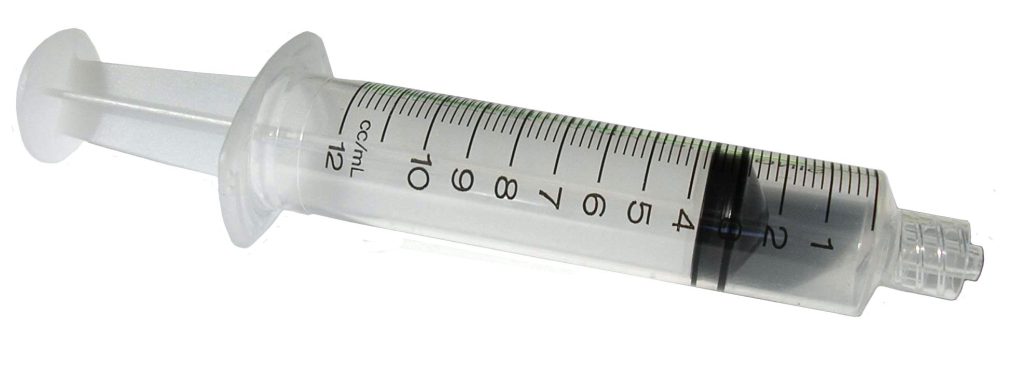
Luer lock syringes have threads in the needle hub that provide a secure connection of needles, tubing, or other devices. See Figure 18.2[2] for an image of a Luer lock syringe with a barrel and a readable scale. This image shows a syringe that holds 12 cc, also referred to as 12 mL. When withdrawing medication, match up the top of the plunger and the line on the barrel scale with the amount of medication you need to administer. In this image, 3 mL of medication is contained in the syringe. Luer slip (or Slip Tip) syringes allow a needle to be quickly and conveniently pushed straight on to the end of the tip (if a needle is required). Luer slip syringes are common in Foley catheterization kits.
View a supplementary YouTube video on How to Read a Syringe[3]
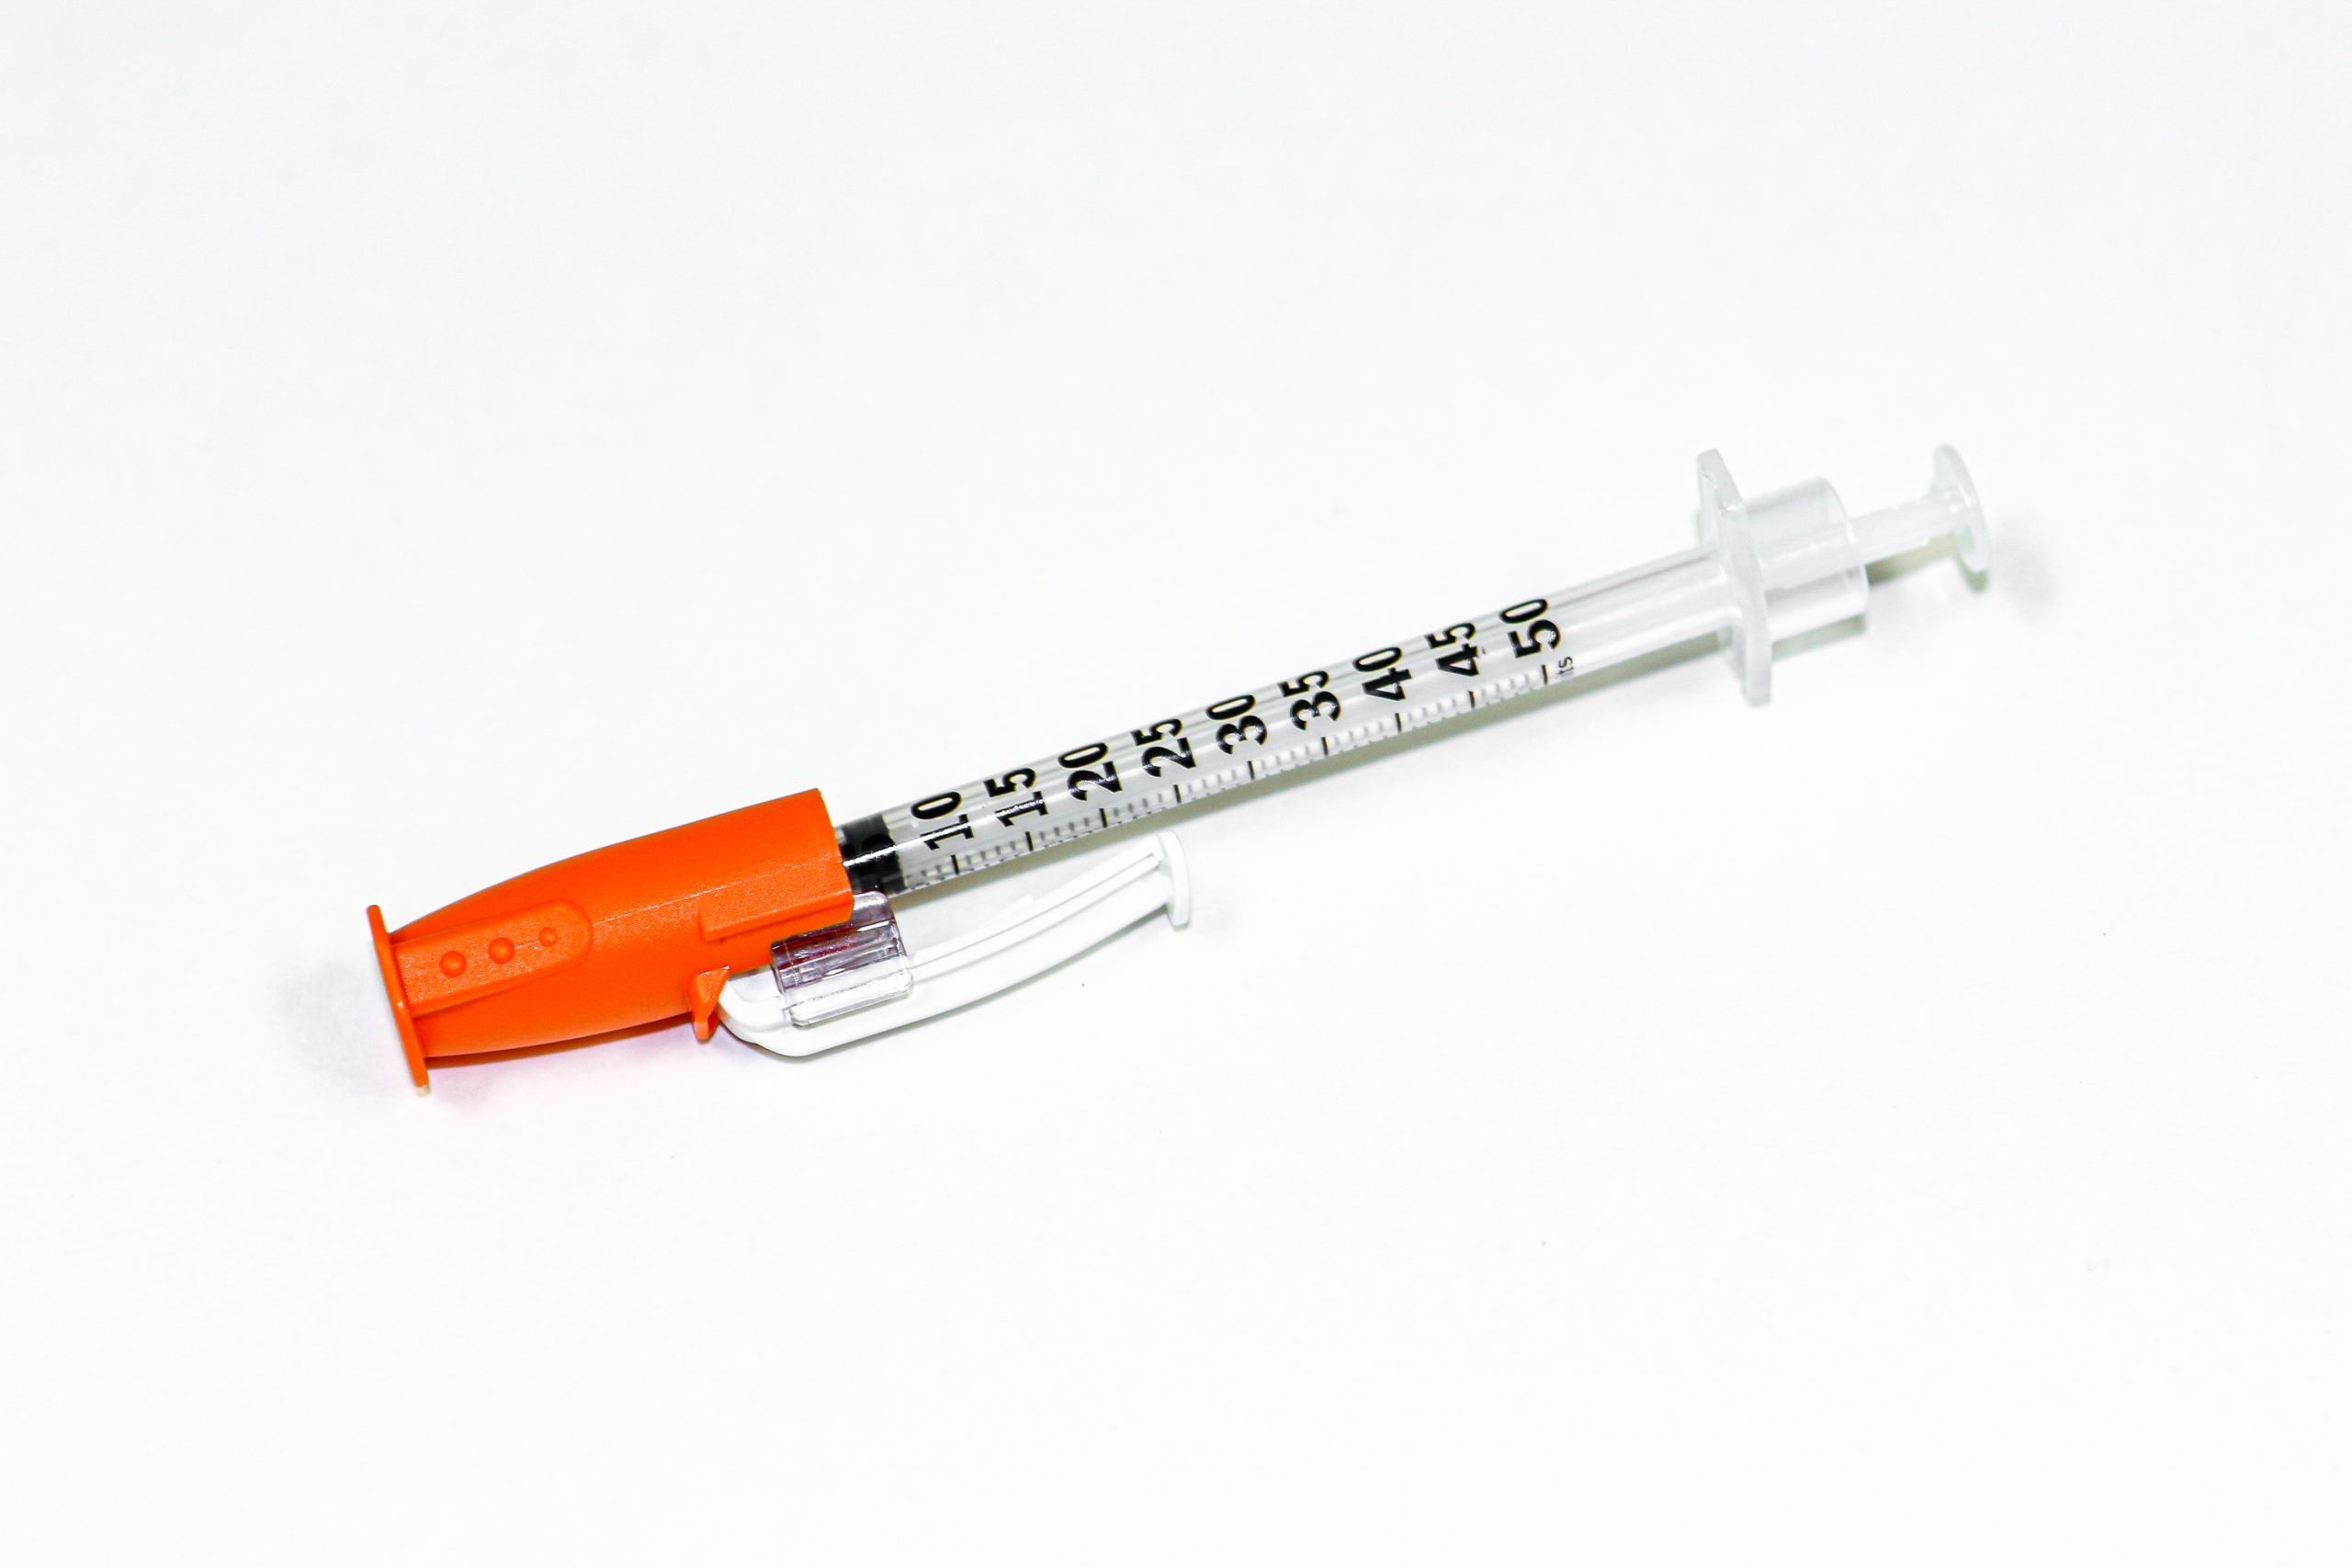
Insulin is administered using a specific insulin syringe. Insulin syringes are marked in units, not milliliters (mL), because insulin is prescribed by providers in units, not mLs. Insulin syringes are available in two different sizes, one of which can hold 50 units and one which can hold 100 units. A regular syringe marked in milliliters should never be used to administer insulin. All insulin syringes have orange caps for quick identification, but verify the markings are in units to prevent a medication error. See Figure 18.3[4] for an image of a 50-unit insulin syringe with a white safety shield attached.
Needles
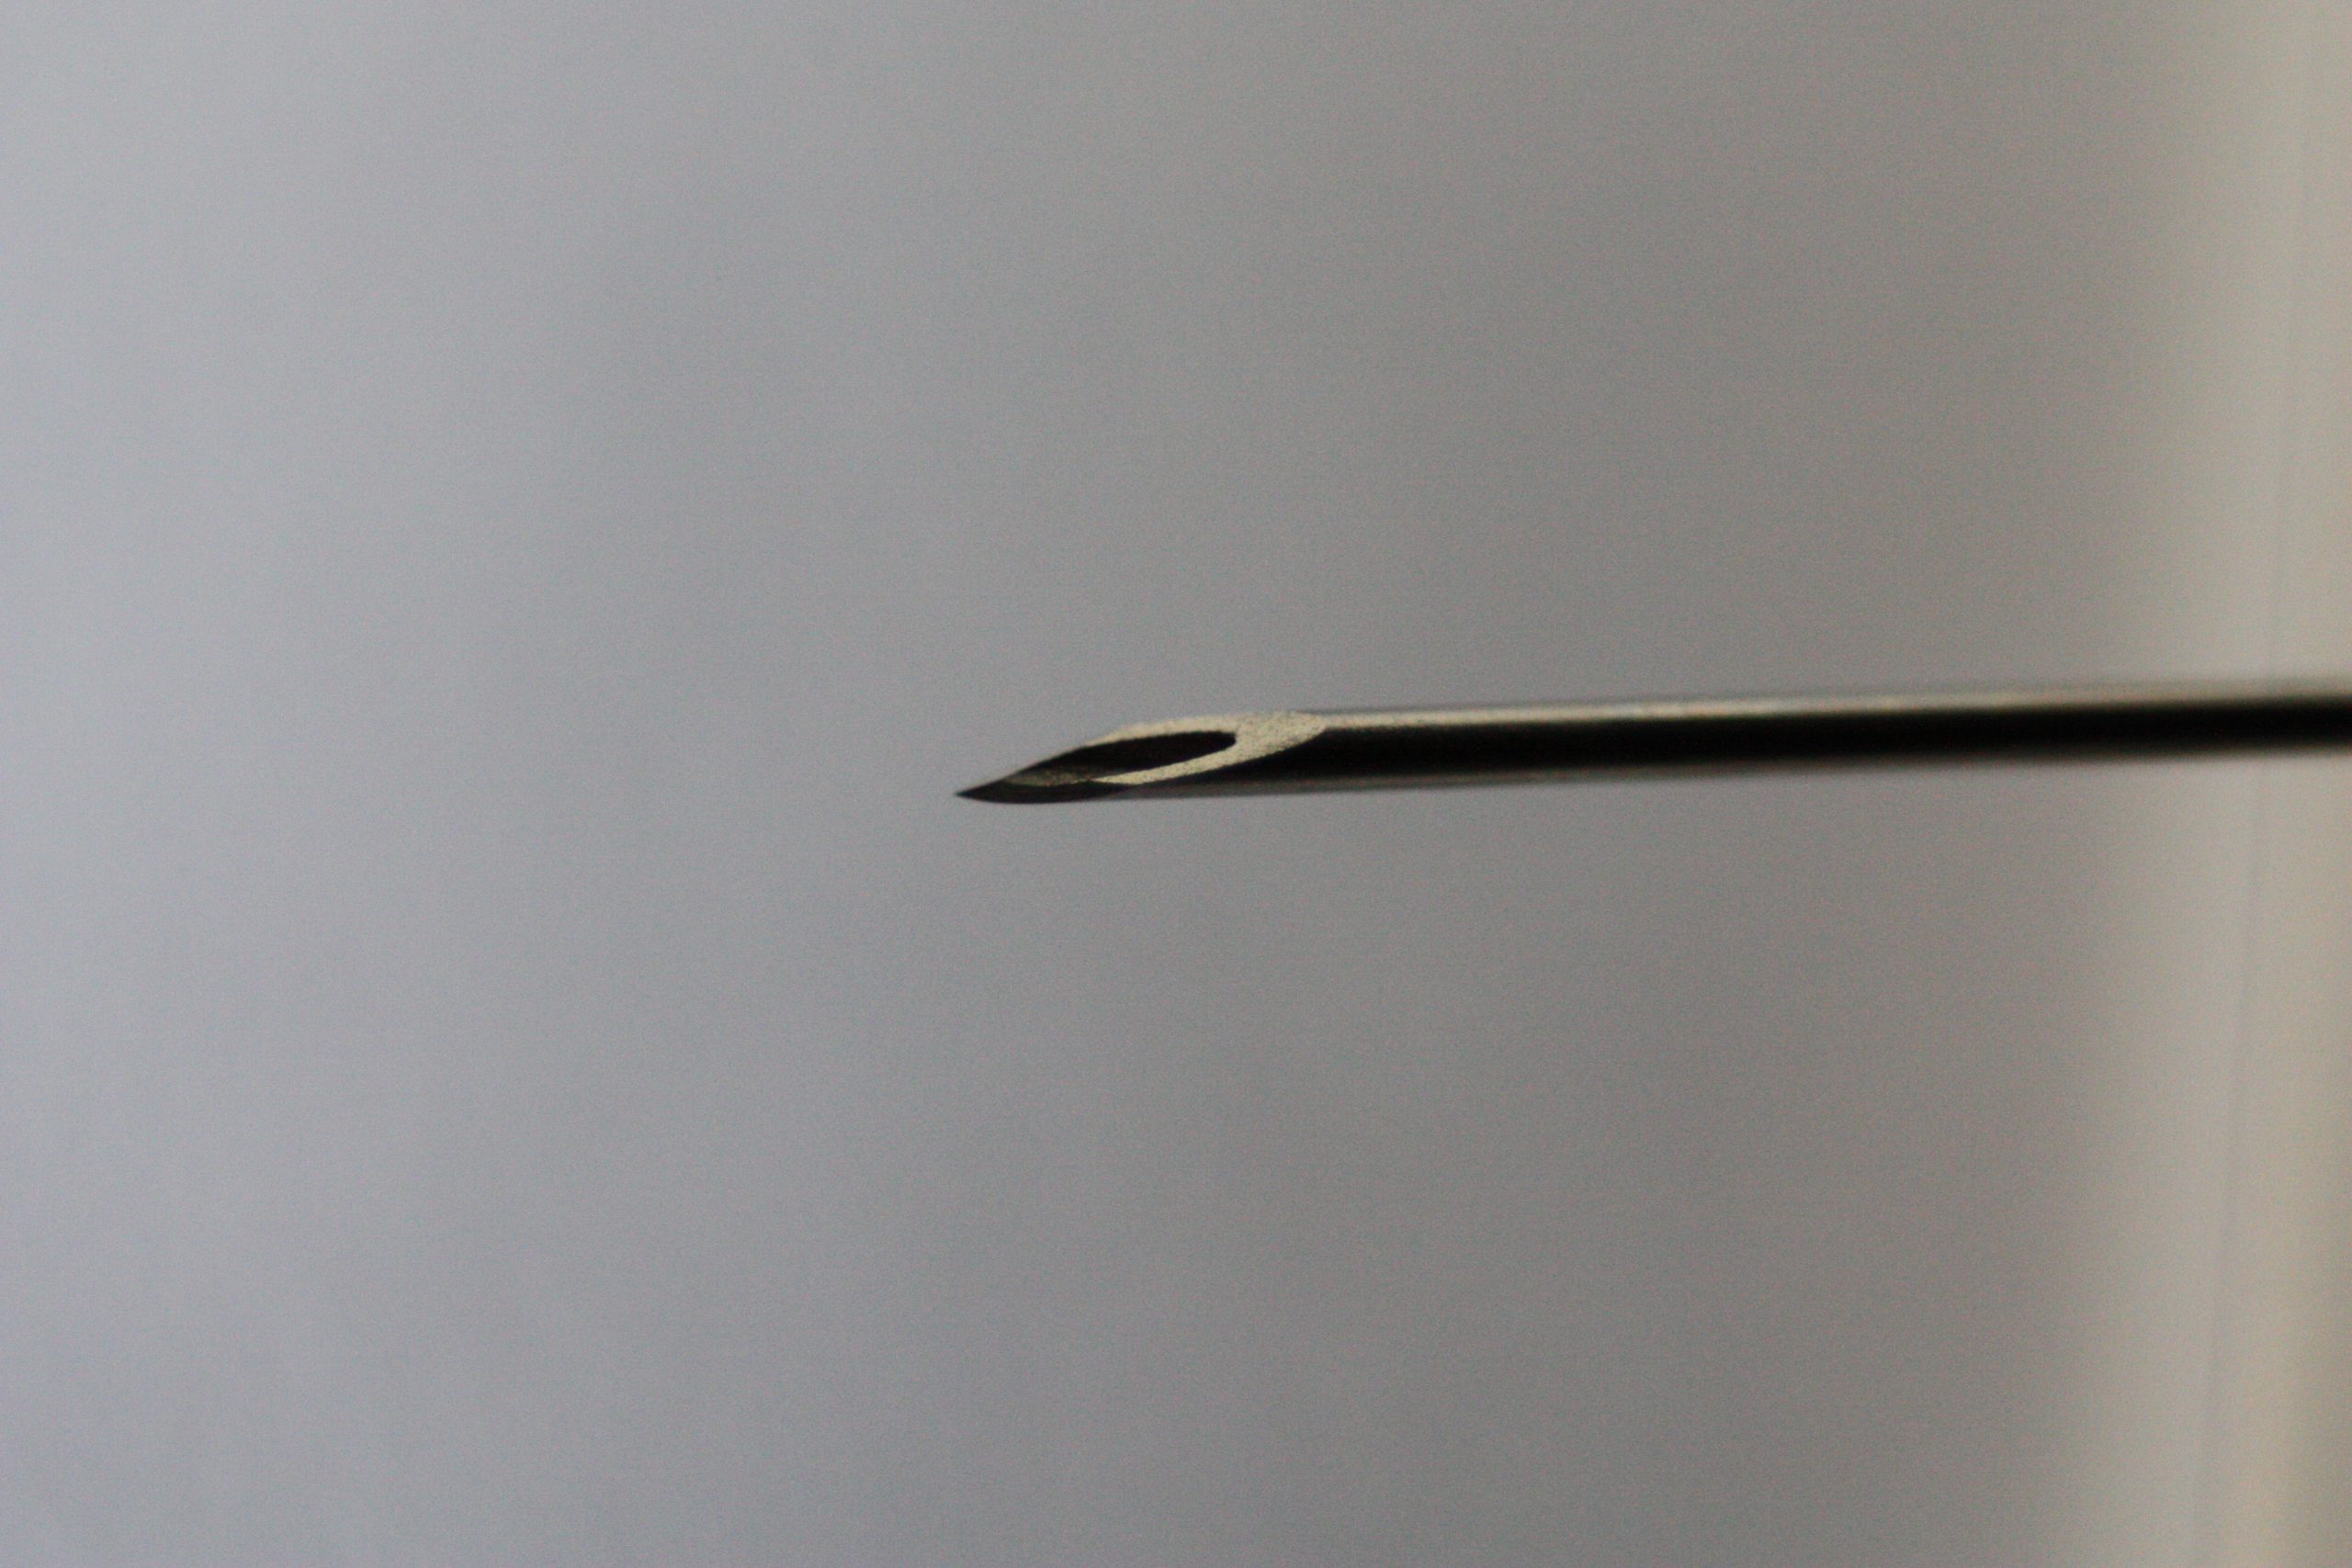
Needles are made out of stainless steel. They are sterile and disposable and are available in various lengths and sizes. A needle is made up of the hub, shaft, and bevel. The hub fits onto the tip of the syringe. All three parts must remain sterile at all times. The bevel is the tip of the needle that is slanted to create a slit into the skin. See Figure 18.4[5] for an image of a bevel.
Gauge and Length
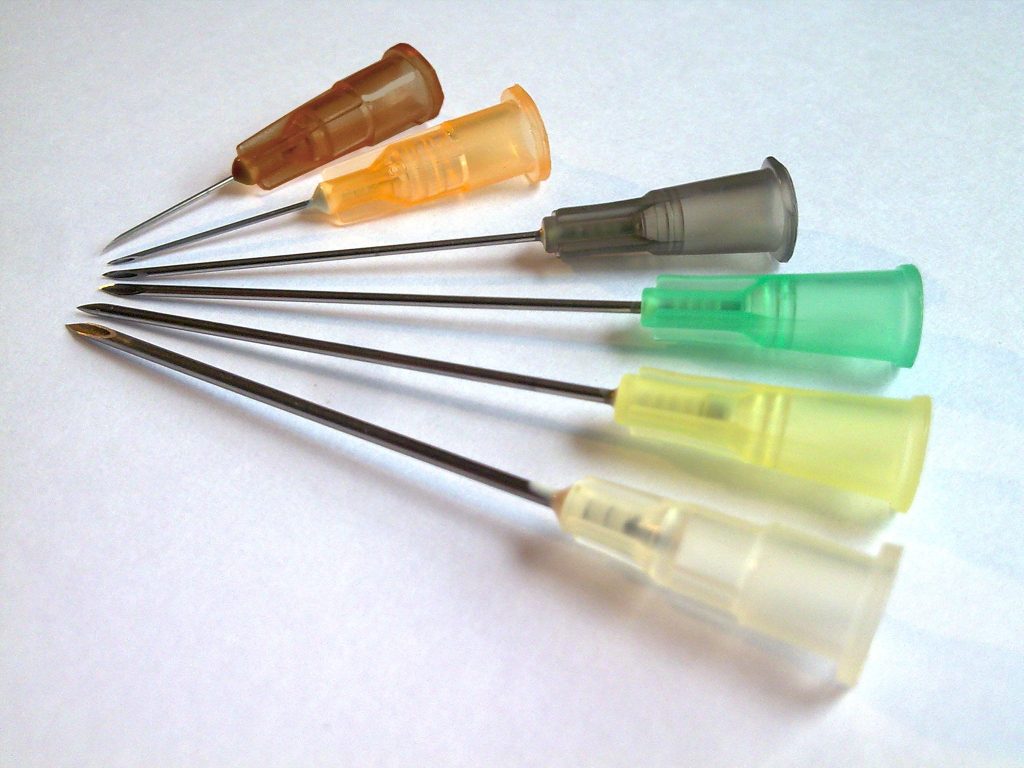
The gauge of a needle refers to its diameter. Needles range in various sized gauges from small diameter (25 to 29 gauge) to large diameter (18 to 22 gauge). Note that the larger the diameter of a needle, the smaller the gauge number. Larger diameter needles (18-22 gauge) are typically used to administer thicker medications or blood products. See Figure 18.5[6] for an image comparing various needle lengths and gauges. Read more about needle gauges according to type of injection in Table 18.2 in the "Anatomic Location" subsection.
Gauge and length are marked on the outer packaging of needles. Needle length varies from 1/8 inches to 3 inches and is selected based on the type of injection. Nurses select the appropriate gauge and length according to the medication ordered, the anatomical location selected, and the patient’s body mass and age. For example, an intramuscular injection requires a longer needle to reach muscle tissue than an intradermal injection that is inserted just under the epidermis. Read more about needle length according to type of injection in Table 18.2 in the "Anatomic Location" subsection.
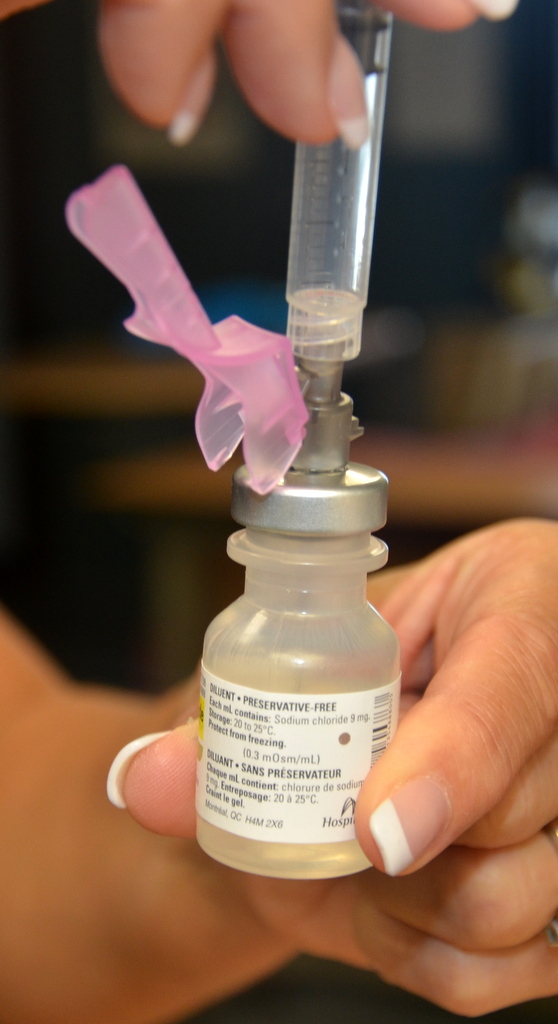
Many needles have safety shields attached to prevent needlestick injuries. See Figure 18.6[7] for an image of a syringe inserted into a vial of medication with a needle and a type of safety shield attached.
Needle Insertion Angle and Removal
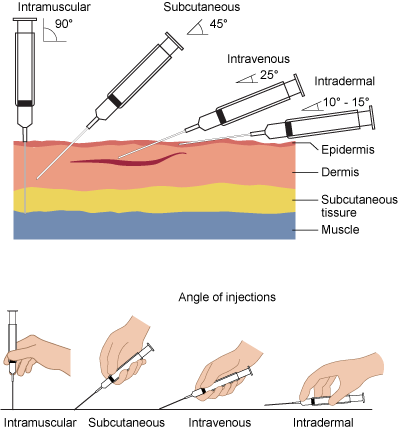
When administering an injection, the syringe should be held like a dart to prevent inadvertent release of medication as the needle is inserted. The needle should be inserted at the proper angle depending on the type of injection. See Table 18.2 for additional details regarding angles of insertion for each type of injection. The needle should be inserted all the way to the hub smoothly and quickly to reduce discomfort of the injection. See Figure 18.7[8] for an illustration of angles of insertion for each type of injection. After the needle is inserted, it is important to hold the syringe steady to prevent tissue damage. The needle should be removed at the same angle used for insertion.[9]
Anatomical Location
It is important for the nurse to select the correct anatomical location for parenteral medication administration according to the type of injection prescribed and for optimal absorption of the medications. Injection of medication into the correct location also prevents injury to the tissues, nerves, blood vessels, and bones. Table 18.2 summarizes anatomical locations, needle sizes, amount of fluid, and the degree of angle of the needle insertion for each type of parenteral injection with life span and other considerations provided. Additional details regarding each type of injection are discussed later in this chapter.
Table 18.2 Summarized Injection Information
| Injection Types | Locations | Needle Gauge and Length | Total Amount of Injectable Fluid | Degree of Angle When Injecting | Considerations |
|---|---|---|---|---|---|
| Intradermal | ● Upper third of the forearm
● Outer aspects upper arms ● Between scapula |
●25-27G
●3/8” to 5/8” |
0.1 mL | 5-15 degrees | The forearm is the recommended site for tuberculosis (TB) testing for all ages.
Allergy testing may be performed between the scapulae. Older adults have decreased skin elasticity, so the skin should be held taut to ensure the medication is administered properly. |
| Subcutaneous | ●Outer upper arms
●Anterior thighs ●Upper outer gluteal area ●Upper back ●Abdomen
|
●25-31G
●1/2” to 5/8” |
Up to 1 mL
Up to 0.5 mL in infants and small children |
45-90 degrees | The older patient’s skin is less elastic, and subcutaneous tissue may be reduced in the skinfolds.
The upper abdomen should be used for patients with less subcutaneous tissue. |
| Intramuscular | ●Ventrogluteal
●Vastus lateralis ●Deltoid |
●18 to 25G
●1/2” to 1 1/2” (based on age/size of patient and site used) |
0.5-1 mL (infants and children)
2-3 mL (adults) |
90 degrees | The vastus lateralis site is preferred for infants because that muscle is most developed.
The ventrogluteal site is recommended in adults. The deltoid site is recommended for vaccinations in adults. |
Preparing Medications
Ampules
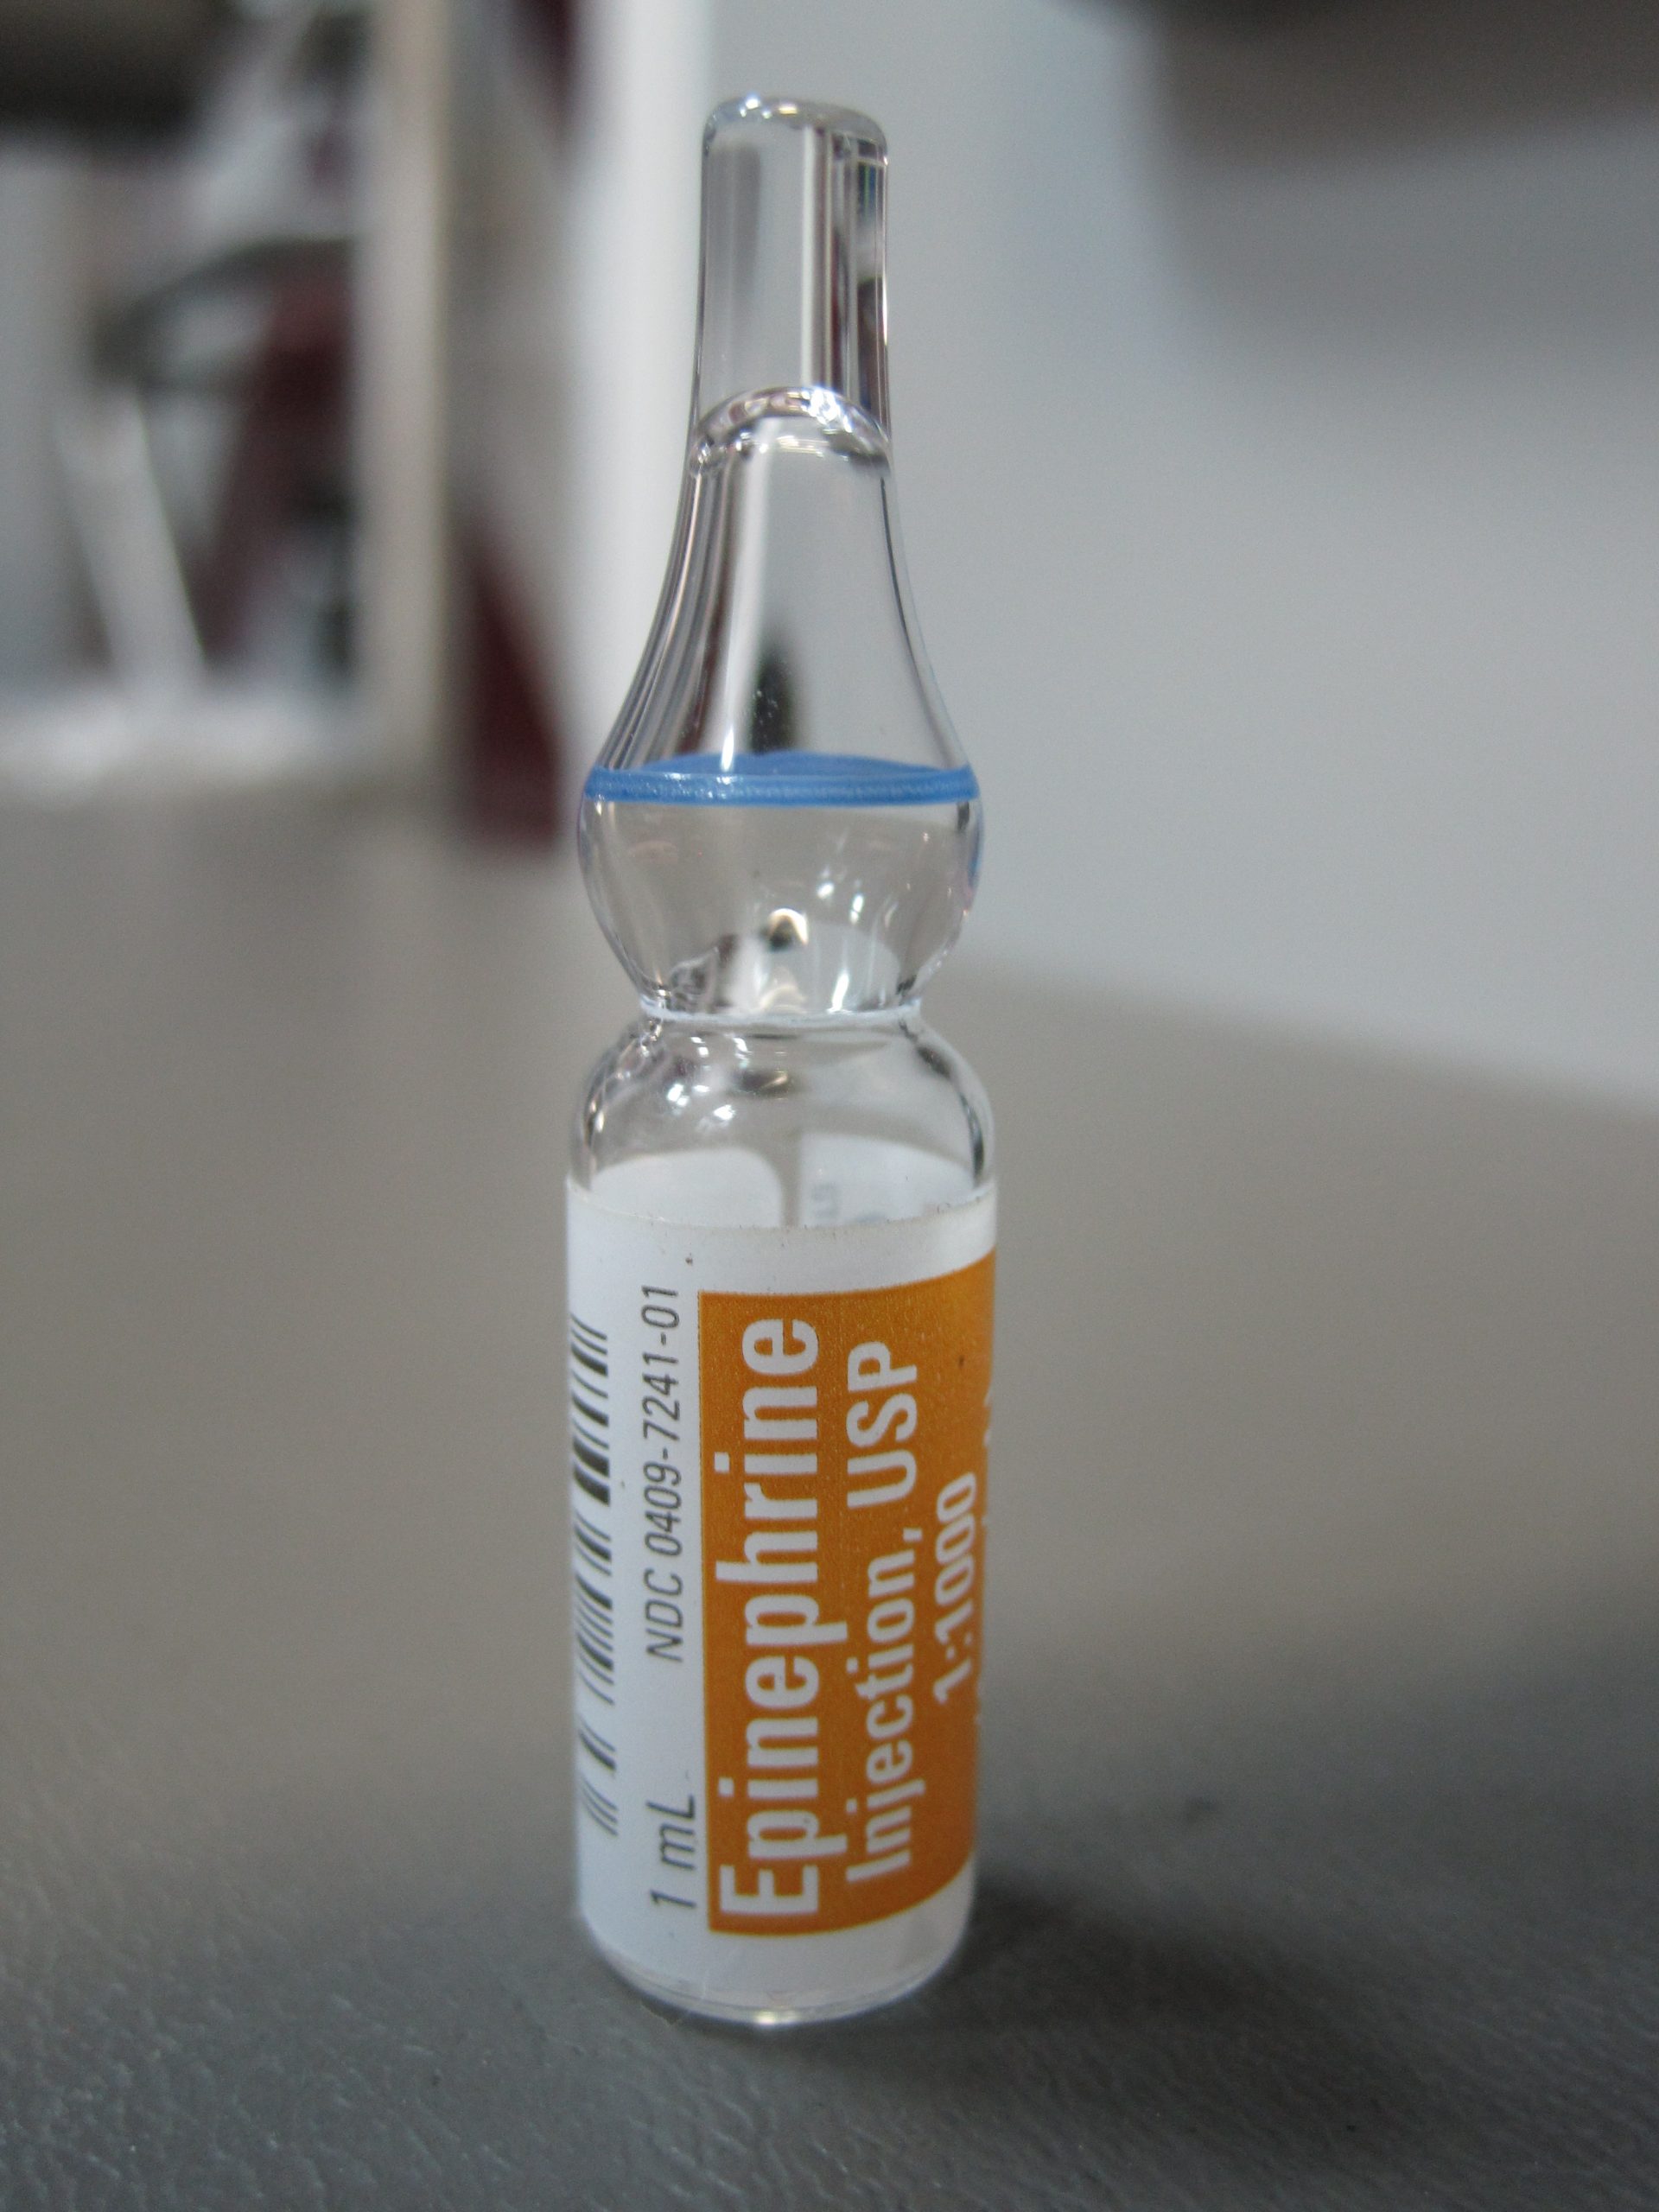
Parenteral medications are supplied in sterile vials, ampules, and prefilled syringes. Ampules are small glass containers containing liquid medication ranging from 1 mL to 10 mL sizes. They have a scored neck to indicate where to break the ampule. See Figure 18.8[10] for an image of an ampule of epinephrine.
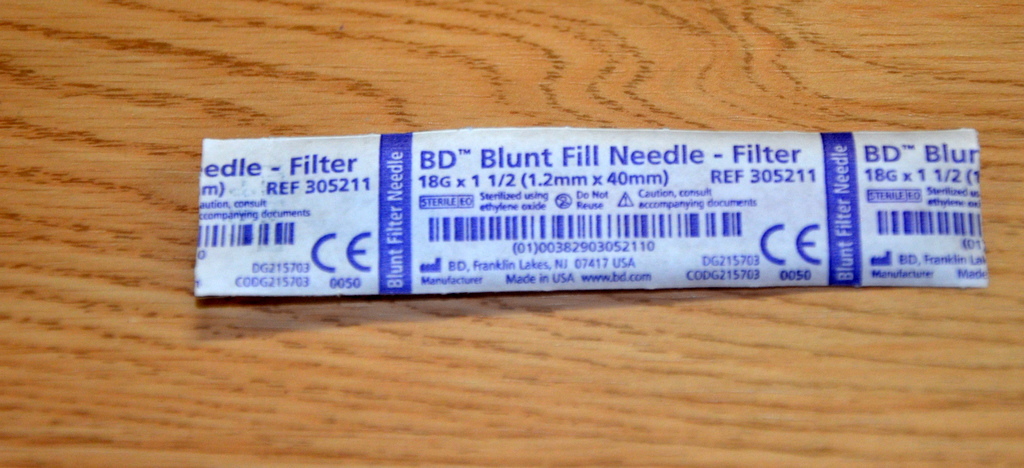
Medication is withdrawn from an ampule using a syringe with a special needle called a blunt fill filter needle. These needles have a blunt end to prevent needlestick injuries and a filter to prevent glass particles from being drawn up into the syringe. See Figure 18.9[11] for an image of a blunt fill filter needle. Filter needles should never be used to inject medication into a patient. The filter needle should be removed and replaced with a needle appropriate in size and gauge for the type of injection and the anatomical location of the patient.
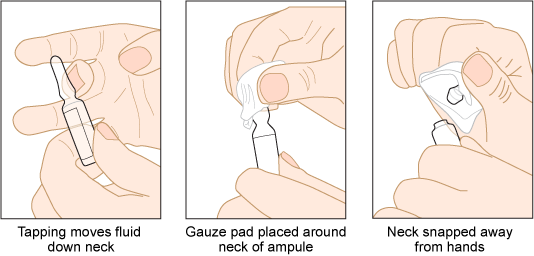
When breaking open an ampule, it is important to use appropriate steps to avoid injury. First, tap the ampule while holding it upright to move fluid down out of the neck. Place a piece of gauze around the neck, and then snap the neck away from your hands. See Figure 18.10[12] for an illustration of how to safely open an ampule.
View a supplementary YouTube video on Withdrawing Medication from an Ampule[13]
Vials
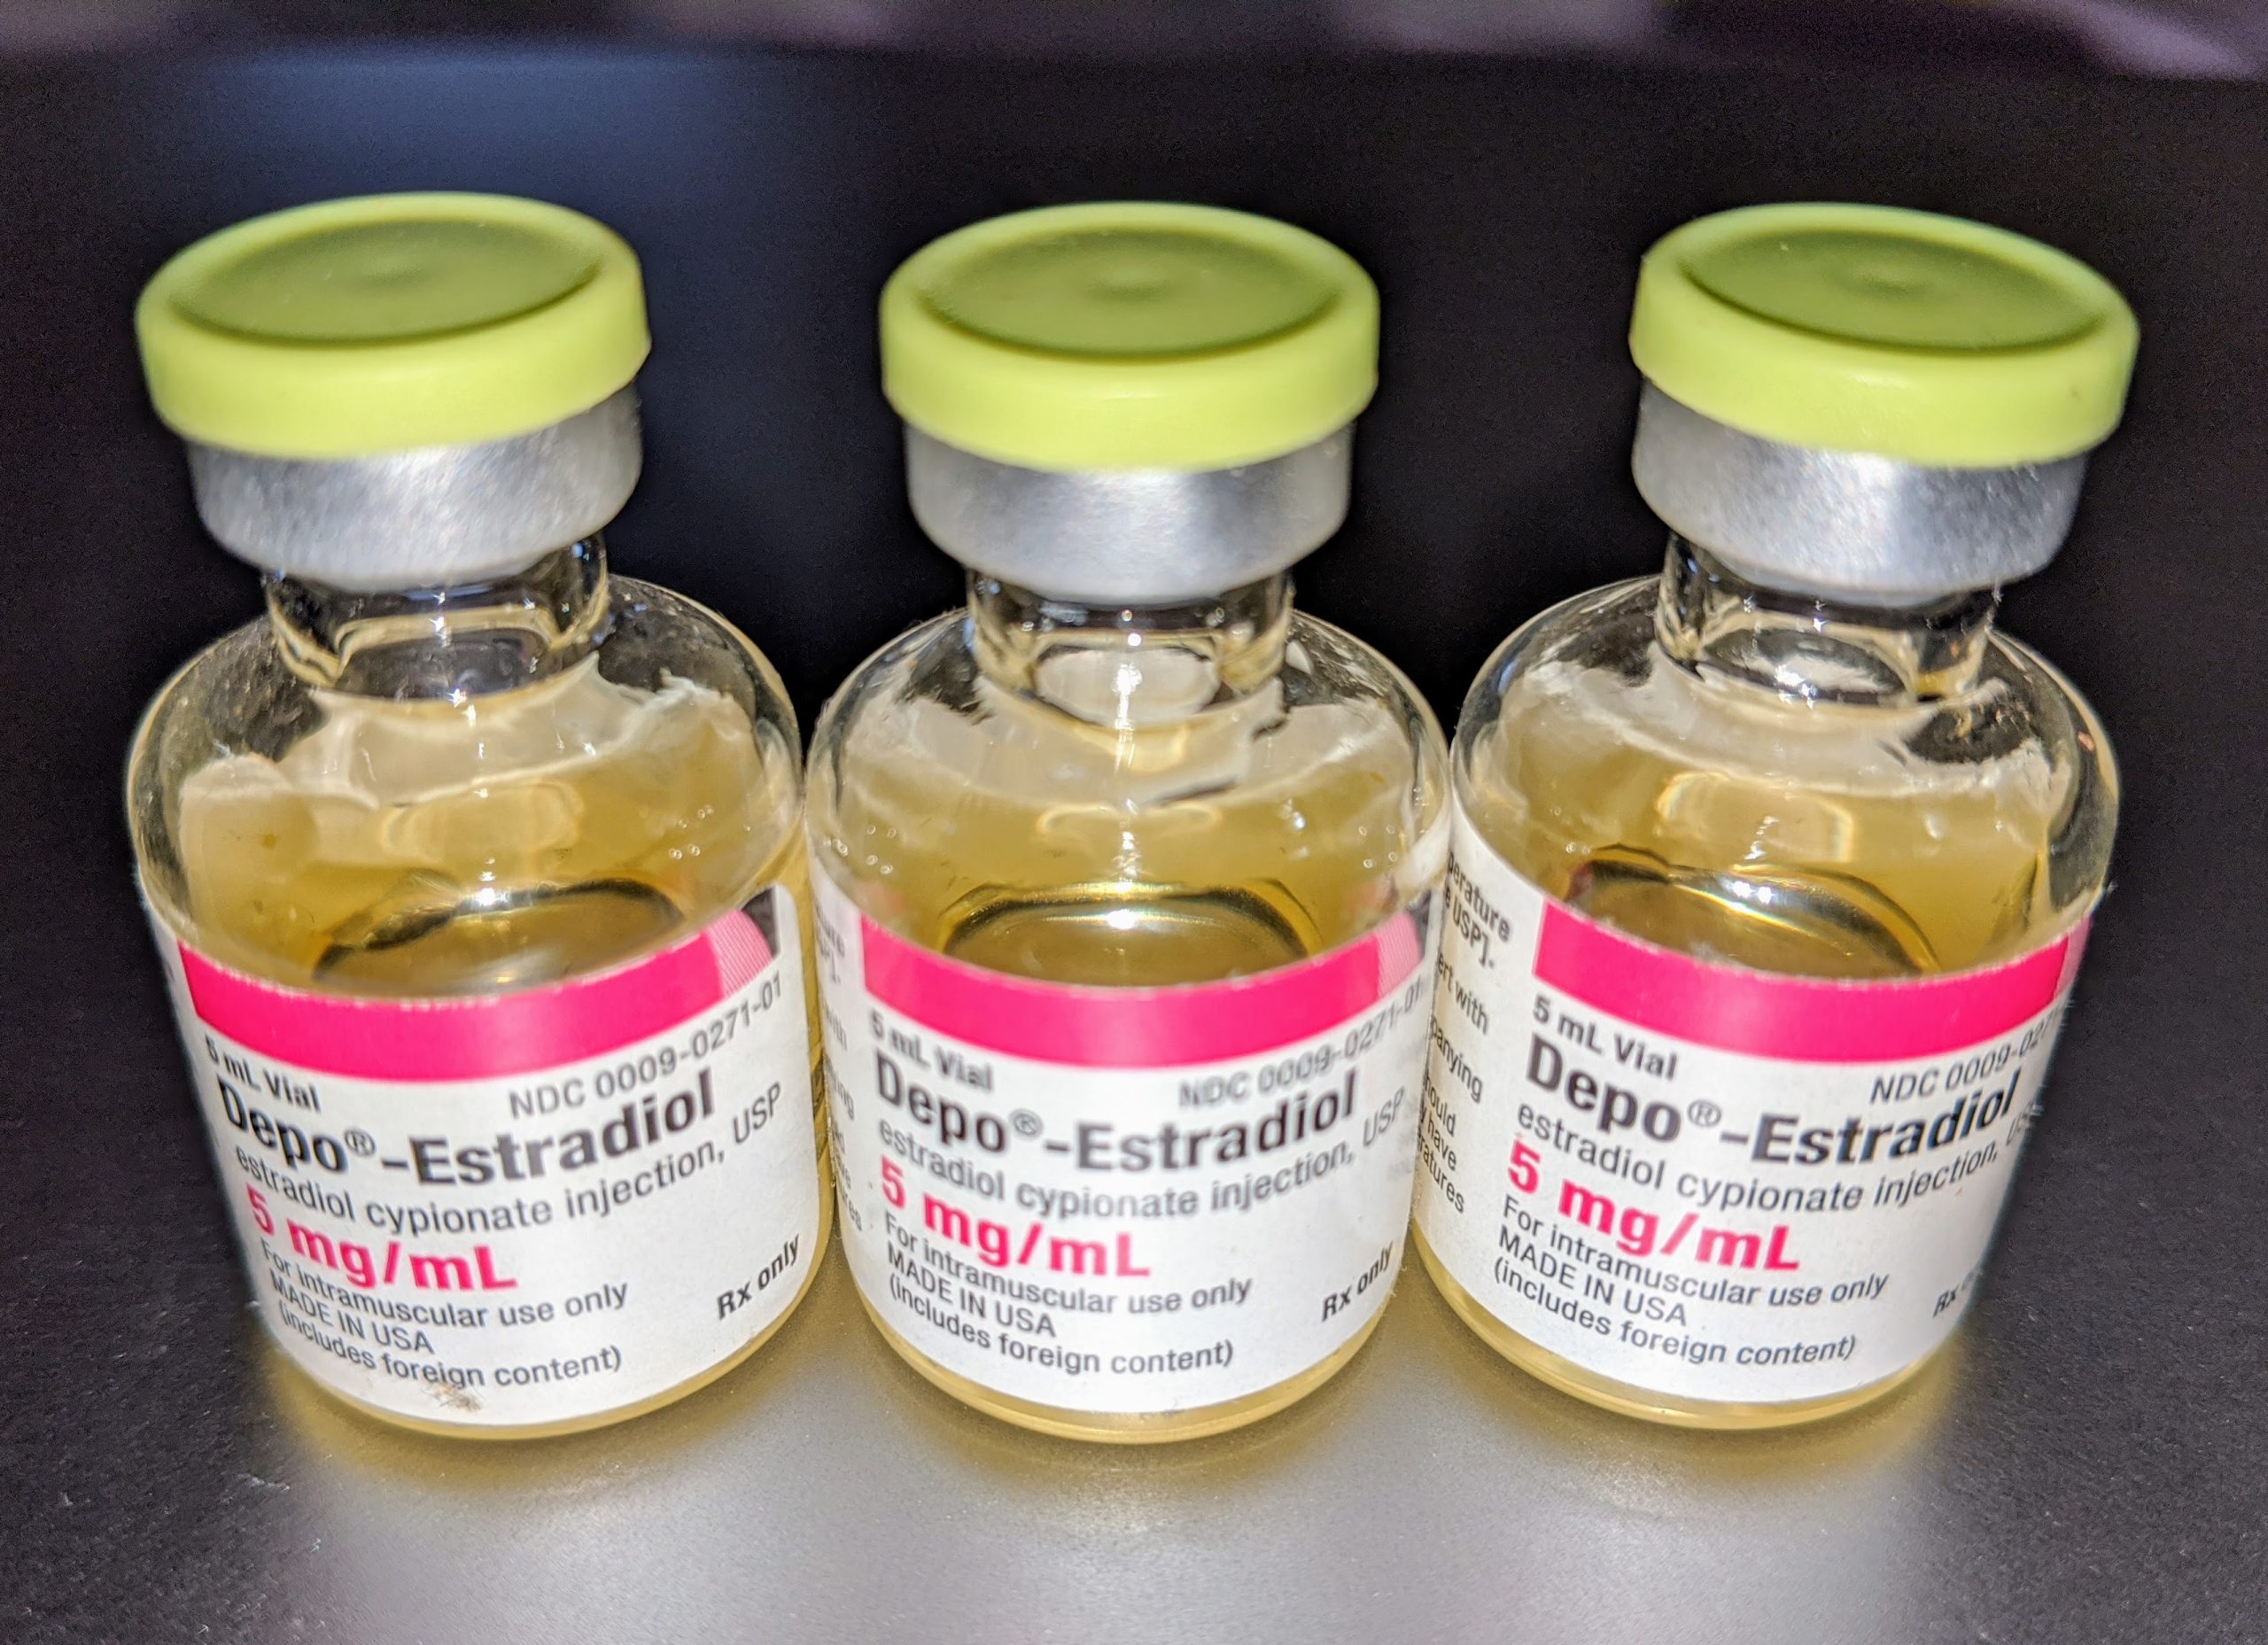
A vial is a single- or multi-dose plastic or glass container with a rubber seal top. Most rubber seals are covered by a plastic cap. See Figure 18.11[14] for an image of a medication dispensed in a vial. A single-use vial must be discarded after one use. Multi-dose vials are used for medications like insulin and must be labelled with the date it was opened. Refer to agency policy regarding how long an open vial may be used and how it should be stored. For example, insulin is typically refrigerated until the vial is opened, and then it can be stored at room temperature for 28 days.
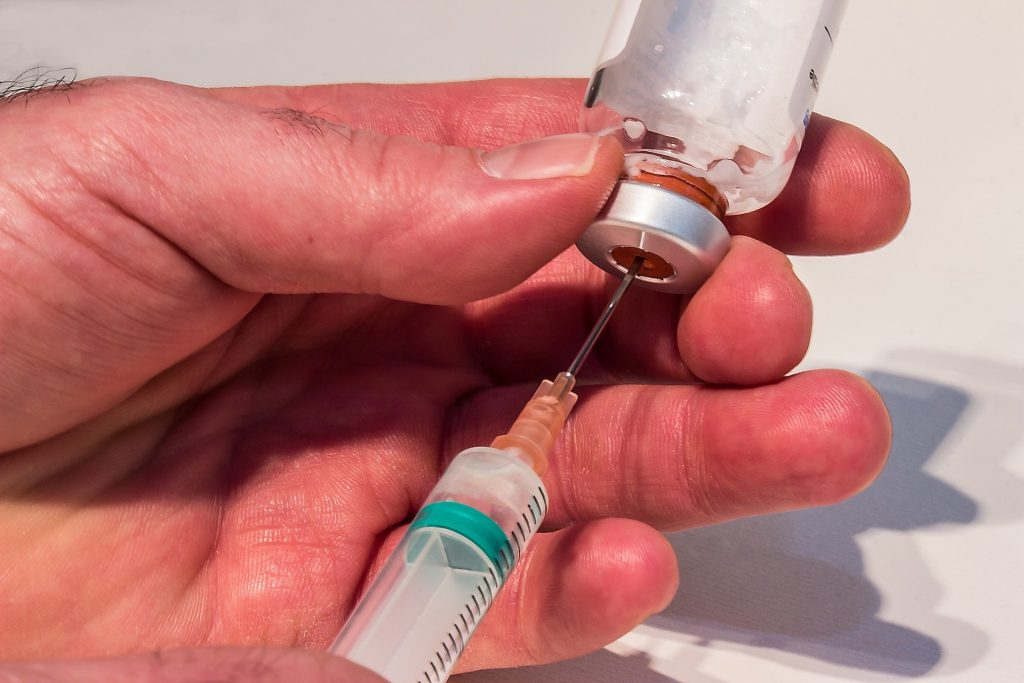
A vial is a closed system. Air must be injected prior to medication withdrawal to maintain a pressure gradient so that solution can be removed from the vial. It is also important to closely observe and maintain the tip of the needle within the level of medication inside the vial as it is removed. See Figure 18.12[15] for an image of removing medication from a vial.
To remove medication from a vial, pull air into the syringe to match the amount of medication you plan to remove. Clean the top of the vial by scrubbing with an alcohol wipe and allow to dry. Hold the syringe like a pencil and insert the needle into the rubber stopper on the top of the vial. Push the plunger down until all of the air is in the bottle. This helps to keep the right amount of pressure in the bottle and makes it easier to draw up the medication. With the needle still in the vial, turn the bottle and syringe upside down (vial above syringe). Pull the plunger to fill the syringe to the desired amount. Check the syringe for air bubbles. If you see any large bubbles, push the plunger until the air is purged out of the syringe. Pull the plunger back down to the desired dose. Remove the needle from the bottle. Be careful to not let the needle touch anything until you are ready to inject.[16]
Prefilled Syringes
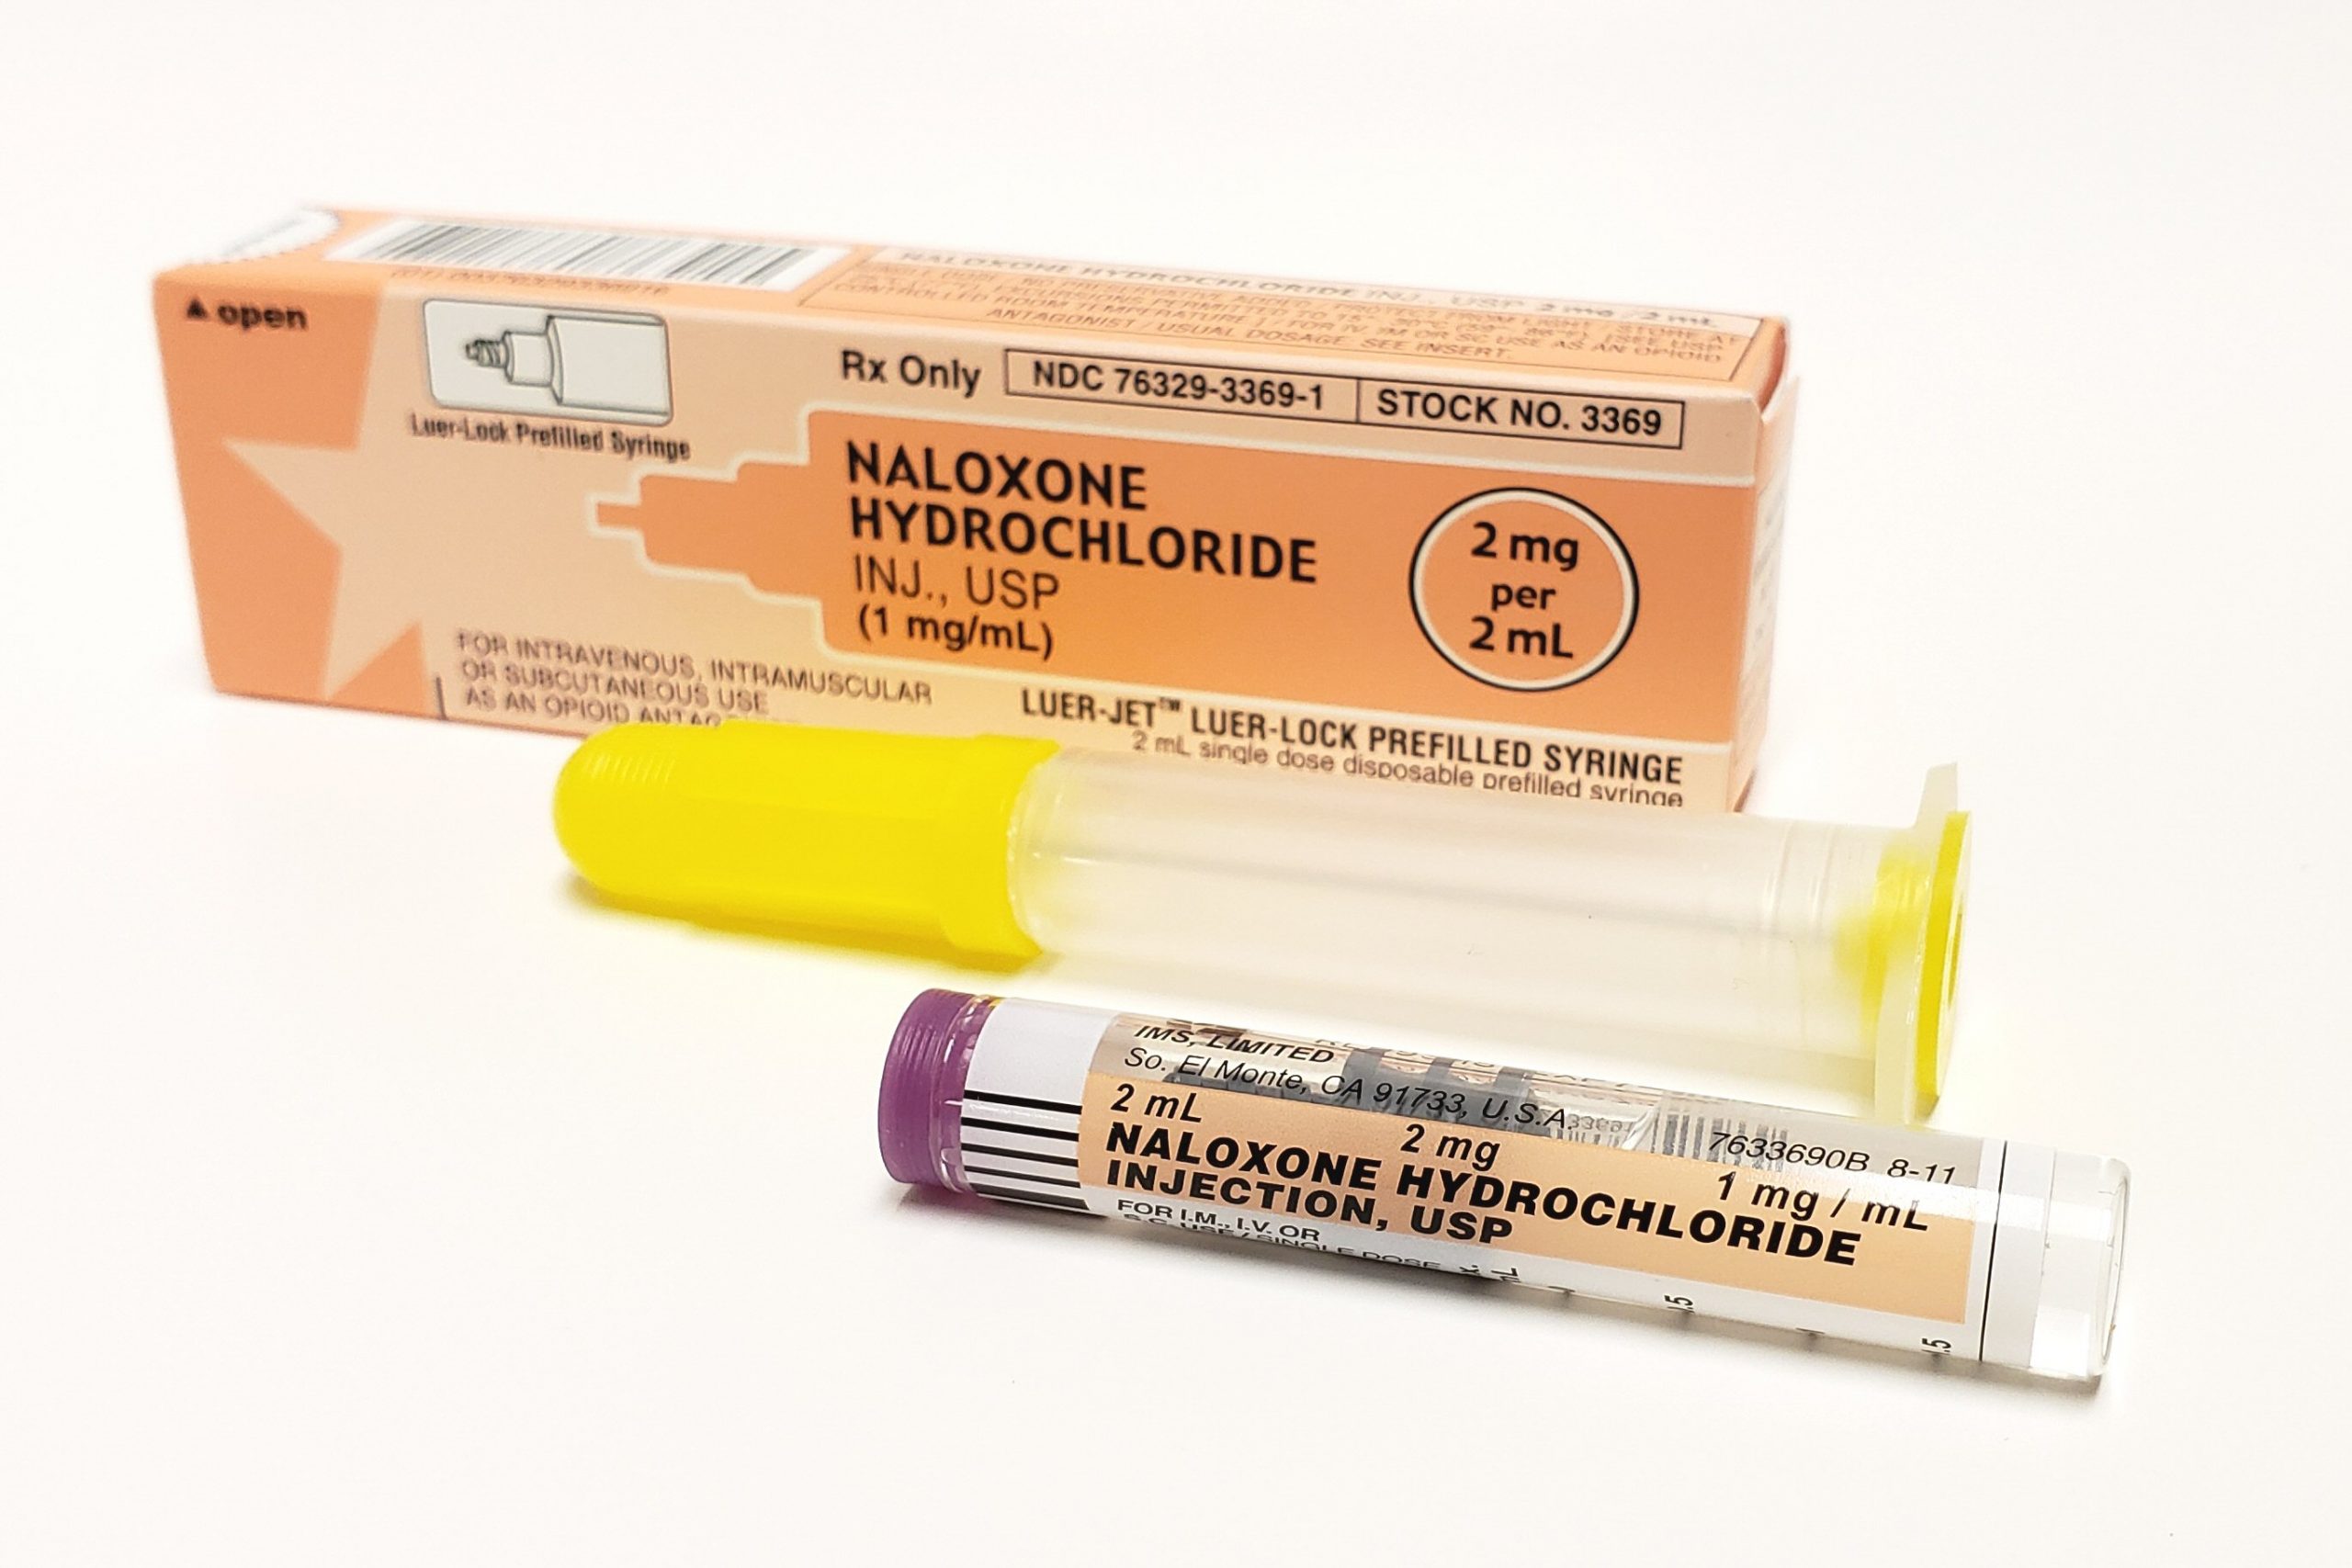
Prefilled syringes can provide greater patient safety by reducing the potential for inadvertent needlesticks and exposure to toxic products that can occur while withdrawing medication from vials. Prefilled syringes, with pre-measured dosage, can reduce dosing errors and waste. They are especially useful during emergent situations that require rapid administration of medication. See Figure 18.13[17] for an image of a prefilled syringe.
Syringes
Syringes are used to administer parenteral medications. A disposable syringe is a sterile device that is available in various sizes ranging from 0.5 mL to 60 mL. A syringe consists of a plunger, a barrel, and a needle hub. Syringes may be supplied individually or with a needle and protective cover attached. See Figure 18.1[18] for an illustration of the parts of a syringe.

Luer lock syringes have threads in the needle hub that provide a secure connection of needles, tubing, or other devices. See Figure 18.2[19] for an image of a Luer lock syringe with a barrel and a readable scale. This image shows a syringe that holds 12 cc, also referred to as 12 mL. When withdrawing medication, match up the top of the plunger and the line on the barrel scale with the amount of medication you need to administer. In this image, 3 mL of medication is contained in the syringe. Luer slip (or Slip Tip) syringes allow a needle to be quickly and conveniently pushed straight on to the end of the tip (if a needle is required). Luer slip syringes are common in Foley catheterization kits.

View a supplementary YouTube video on How to Read a Syringe[20]
Insulin is administered using a specific insulin syringe. Insulin syringes are marked in units, not milliliters (mL), because insulin is prescribed by providers in units, not mLs. Insulin syringes are available in two different sizes, one of which can hold 50 units and one which can hold 100 units. A regular syringe marked in milliliters should never be used to administer insulin. All insulin syringes have orange caps for quick identification, but verify the markings are in units to prevent a medication error. See Figure 18.3[21] for an image of a 50-unit insulin syringe with a white safety shield attached.

Needles
Needles are made out of stainless steel. They are sterile and disposable and are available in various lengths and sizes. A needle is made up of the hub, shaft, and bevel. The hub fits onto the tip of the syringe. All three parts must remain sterile at all times. The bevel is the tip of the needle that is slanted to create a slit into the skin. See Figure 18.4[22] for an image of a bevel.

Gauge and Length
The gauge of a needle refers to its diameter. Needles range in various sized gauges from small diameter (25 to 29 gauge) to large diameter (18 to 22 gauge). Note that the larger the diameter of a needle, the smaller the gauge number. Larger diameter needles (18-22 gauge) are typically used to administer thicker medications or blood products. See Figure 18.5[23] for an image comparing various needle lengths and gauges. Read more about needle gauges according to type of injection in Table 18.2 in the "Anatomic Location" subsection.

Gauge and length are marked on the outer packaging of needles. Needle length varies from 1/8 inches to 3 inches and is selected based on the type of injection. Nurses select the appropriate gauge and length according to the medication ordered, the anatomical location selected, and the patient’s body mass and age. For example, an intramuscular injection requires a longer needle to reach muscle tissue than an intradermal injection that is inserted just under the epidermis. Read more about needle length according to type of injection in Table 18.2 in the "Anatomic Location" subsection.
Many needles have safety shields attached to prevent needlestick injuries. See Figure 18.6[24] for an image of a syringe inserted into a vial of medication with a needle and a type of safety shield attached.

Needle Insertion Angle and Removal
When administering an injection, the syringe should be held like a dart to prevent inadvertent release of medication as the needle is inserted. The needle should be inserted at the proper angle depending on the type of injection. See Table 18.2 for additional details regarding angles of insertion for each type of injection. The needle should be inserted all the way to the hub smoothly and quickly to reduce discomfort of the injection. See Figure 18.7[25] for an illustration of angles of insertion for each type of injection. After the needle is inserted, it is important to hold the syringe steady to prevent tissue damage. The needle should be removed at the same angle used for insertion.[26]

Anatomical Location
It is important for the nurse to select the correct anatomical location for parenteral medication administration according to the type of injection prescribed and for optimal absorption of the medications. Injection of medication into the correct location also prevents injury to the tissues, nerves, blood vessels, and bones. Table 18.2 summarizes anatomical locations, needle sizes, amount of fluid, and the degree of angle of the needle insertion for each type of parenteral injection with life span and other considerations provided. Additional details regarding each type of injection are discussed later in this chapter.
Table 18.2 Summarized Injection Information
| Injection Types | Locations | Needle Gauge and Length | Total Amount of Injectable Fluid | Degree of Angle When Injecting | Considerations |
|---|---|---|---|---|---|
| Intradermal | ● Upper third of the forearm
● Outer aspects upper arms ● Between scapula |
●25-27G
●3/8” to 5/8” |
0.1 mL | 5-15 degrees | The forearm is the recommended site for tuberculosis (TB) testing for all ages.
Allergy testing may be performed between the scapulae. Older adults have decreased skin elasticity, so the skin should be held taut to ensure the medication is administered properly. |
| Subcutaneous | ●Outer upper arms
●Anterior thighs ●Upper outer gluteal area ●Upper back ●Abdomen
|
●25-31G
●1/2” to 5/8” |
Up to 1 mL
Up to 0.5 mL in infants and small children |
45-90 degrees | The older patient’s skin is less elastic, and subcutaneous tissue may be reduced in the skinfolds.
The upper abdomen should be used for patients with less subcutaneous tissue. |
| Intramuscular | ●Ventrogluteal
●Vastus lateralis ●Deltoid |
●18 to 25G
●1/2” to 1 1/2” (based on age/size of patient and site used) |
0.5-1 mL (infants and children)
2-3 mL (adults) |
90 degrees | The vastus lateralis site is preferred for infants because that muscle is most developed.
The ventrogluteal site is recommended in adults. The deltoid site is recommended for vaccinations in adults. |
Preparing Medications
Ampules
Parenteral medications are supplied in sterile vials, ampules, and prefilled syringes. Ampules are small glass containers containing liquid medication ranging from 1 mL to 10 mL sizes. They have a scored neck to indicate where to break the ampule. See Figure 18.8[27] for an image of an ampule of epinephrine.

Medication is withdrawn from an ampule using a syringe with a special needle called a blunt fill filter needle. These needles have a blunt end to prevent needlestick injuries and a filter to prevent glass particles from being drawn up into the syringe. See Figure 18.9[28] for an image of a blunt fill filter needle. Filter needles should never be used to inject medication into a patient. The filter needle should be removed and replaced with a needle appropriate in size and gauge for the type of injection and the anatomical location of the patient.

When breaking open an ampule, it is important to use appropriate steps to avoid injury. First, tap the ampule while holding it upright to move fluid down out of the neck. Place a piece of gauze around the neck, and then snap the neck away from your hands. See Figure 18.10[29] for an illustration of how to safely open an ampule.

View a supplementary YouTube video on Withdrawing Medication from an Ampule[30]
Vials
A vial is a single- or multi-dose plastic or glass container with a rubber seal top. Most rubber seals are covered by a plastic cap. See Figure 18.11[31] for an image of a medication dispensed in a vial. A single-use vial must be discarded after one use. Multi-dose vials are used for medications like insulin and must be labelled with the date it was opened. Refer to agency policy regarding how long an open vial may be used and how it should be stored. For example, insulin is typically refrigerated until the vial is opened, and then it can be stored at room temperature for 28 days.

A vial is a closed system. Air must be injected prior to medication withdrawal to maintain a pressure gradient so that solution can be removed from the vial. It is also important to closely observe and maintain the tip of the needle within the level of medication inside the vial as it is removed. See Figure 18.12[32] for an image of removing medication from a vial.
To remove medication from a vial, pull air into the syringe to match the amount of medication you plan to remove. Clean the top of the vial by scrubbing with an alcohol wipe and allow to dry. Hold the syringe like a pencil and insert the needle into the rubber stopper on the top of the vial. Push the plunger down until all of the air is in the bottle. This helps to keep the right amount of pressure in the bottle and makes it easier to draw up the medication. With the needle still in the vial, turn the bottle and syringe upside down (vial above syringe). Pull the plunger to fill the syringe to the desired amount. Check the syringe for air bubbles. If you see any large bubbles, push the plunger until the air is purged out of the syringe. Pull the plunger back down to the desired dose. Remove the needle from the bottle. Be careful to not let the needle touch anything until you are ready to inject.[33]

Prefilled Syringes
Prefilled syringes can provide greater patient safety by reducing the potential for inadvertent needlesticks and exposure to toxic products that can occur while withdrawing medication from vials. Prefilled syringes, with pre-measured dosage, can reduce dosing errors and waste. They are especially useful during emergent situations that require rapid administration of medication. See Figure 18.13[34] for an image of a prefilled syringe.

It is important to follow evidence-based practices regarding parenteral medication administration to provide safe and effective care. Evidence-based practices include the following:
- Guidelines for preventing medication errors
- Recommendations to prevent infection from injections
- Guidelines for patient safety and comfort
- Recommendations to prevent needlestick injuries
Each of these practices is further described in the following sections.
Guidelines for Preventing Medication Errors
Medication errors can occur at various steps of the medication administration process. It is important to follow a standardized method for parenteral medication administration. Agency policies on medication preparation, administration, and documentation may vary, so it is important to receive agency training on using their medication system to avoid errors. See Table 18.3a for a summary of guidelines for safe medication administration.[35]
Additional details about preventing medication errors can be found in the “Administration of Enteral Medications” chapter.
Table 18.3a Summary of Safe Medication Administration Guidelines
| Guidelines | Additional Information |
|---|---|
| Be cautious and focused when preparing medications. | Avoid distractions. Some agencies have a no-interruption zone (NIZ) where health care providers can prepare medications without interruptions.[36] |
| Check and verify allergies. | Always ask the patient about their medication allergies, types of reactions, and severity of reactions. Verify the patient’s medical record for documented allergies. |
| Use two patient identifiers and follow agency policy for patient identification. | Use at least two patient identifiers before administration and compare information against the medication administration record (MAR).[37] |
| Perform appropriate patient assessments before medication administration. | Assess the patient prior to administering medications to ensure the patient is receiving the correct medication, for the correct reason, and at the correct time. For example, a nurse reviews lab values and performs a cardiac assessment prior to administering cardiac medication. See more information regarding specific patient assessments during parenteral medication administration in the “Applying the Nursing Process” section. |
| Be diligent and perform medication calculations accurately. | Double-check and verify medication calculations. Incorrect calculation of medication dosages causes medication errors that can compromise patient safety. |
| Use standard procedures and evidence-based references. | Follow a standardized procedure when administering medication for every patient. Look up current medication information in evidence-based sources because information changes frequently. |
| Communicate with the patient before and after administration. | Provide information to the patient about the medication before administering it. Answer their questions regarding usage, dose, and special considerations. Give the patient an opportunity to ask questions and include family members if appropriate. |
| Follow agency policies and procedures regarding medication administration. | Avoid work-arounds. A work-around is a process that bypasses a procedure or policy in a system. For example, a nurse may “borrow” medication from one patient’s drawer to give to another patient while waiting for an order to be filled by the pharmacy. Although performed with a good intention to prevent delay, these work-arounds fail to follow policies in place that ensure safe medication administration and often result in medication errors. |
| Ensure medication has not expired. | Check all medications’ expiration dates before administering them. Medications can become inactive after their expiration date. |
| Always clarify an order or procedure that is unclear. | Always verify information whenever you are uncertain or unclear about an order. Consult with the pharmacist, charge nurse, or health care provider, and be sure to resolve all questions before proceeding with medication administration. |
| Use available technology to administer medications. | Use available technology, such as barcode scanning, when administering medications. Barcode scanning is linked to the patient’s eMAR and provides an extra level of patient safety to prevent wrong medications, incorrect doses, or wrong timing of administration. If error messages occur, it is important to follow up appropriately according to agency policy and not override them. Additionally, it is important to remember that this technology provides an additional layer of safety and should not be substituted for checking the five rights of medication administration. |
| Be a part of the safety culture. | Report all errors, near misses, and adverse reactions according to agency policy. Incident reports improve patient care through quality improvement identification, analysis, and problem-solving. |
| Be alert. | Be alert to error-prone situations and high-alert medications. High-alert medications are those that can cause significant harm. The most common high-alert medications are anticoagulants, opiates, insulins, and sedatives. Read more about high-alert medications in the “Administration of Enteral Medications" chapter. |
| Address patient concerns. | If a patient questions or expresses concern regarding a medication, stop the procedure and do not administer it. Explore the patient’s concerns, review the provider’s order, and, if necessary, notify the provider. |
Preventing Infection
Administering parenteral medications is considered an invasive procedure. It is imperative to take additional measures when administering parenteral medications to prevent health care associated infections. The Centers for Disease Control and Prevention provides several recommendations for safe injection practices to prevent contamination and spread of pathogens. These recommendations include hand hygiene, prevention of needle/syringe contamination, preparation of the patient’s skin, prevention of contamination of the solution, and use of new, sterile equipment for each injection.[38],[39],[40] Each of these recommendations is discussed below.
Perform Hand Hygiene
Always perform hand hygiene before and after preparing and before and after administering the injection with facility-approved, alcohol-based hand sanitizer or soap and water. See more information about performing effective hand hygiene in the “Aseptic Technique” chapter.
Prevent Needle/Syringe Contamination
Keep the parts of the needle and syringe sterile. Keep the tip of the syringe sterile and keep it covered with a cap or needle. Avoid letting the needle touch unsterile surfaces, such as the outer edges of the ampule or vial, the surface of the needle cap, or the counter. Always keep the needle covered with a cap when not in use and avoid touching the length of the plunger.
After drawing up the medication from the vial, use the scoop-cap method to recap the needle to avoid needlestick injuries. After administration of the medication, activate the safety and place the used syringe/needle immediately in the sharps container.
View a supplementary YouTube video on Scoop-Cap Technique[41]
Prepare Patient’s Skin
Wash the patient’s skin with soap and water if it is soiled. Follow agency policy for skin preparation. When using an alcohol swab, use a circular motion to rub the area for 30 seconds, and then let the area dry for 30 seconds. If cleaning a site, move from the center of the site outward in a 5-cm (2 in) radius.
Prevent Contamination of Solution
Use single-dose vials or ampules whenever possible. Do not keep multi-dose vials in patient treatment areas. Discard a container if sterility is compromised or questionable. Medications from ampules should be used immediately and then discarded appropriately. Additional information about ampules is provided in the "Basic Concepts" section.
Use New Sterile Equipment
Use a new, sterile syringe and needle with each patient. Inspect packaging for intactness and discard if there are rips or torn corners. If single-use equipment is not available, use syringes and needles designed for steam sterilization.
Guidelines for Patient Safety and Comfort During Injections
With proper preparation and technique, injections can be given safely and effectively to patients to prevent harm. It is essential to use correct needle sizes and angles of insertion and select appropriate anatomical locations based on patient age, size, and type of injection to avoid complications.[42] For example, for intramuscular injections the ventrogluteal site is preferred in adults because it has the greatest muscle thickness, is free of nerves and blood vessels, and has a small layer of fat, resulting in less painful administration and optimal absorption of the medication.
Use the correct needle length according to the type of injection to ensure delivery of medication into the correct layer of tissue and to reduce complications such as abscesses, pain, and bruising. Needle selection should be based on the patient’s size, gender, and injection site. Be aware that women tend to have more adipose tissue around the buttocks and deltoid fat pad, which means a longer needle is required. Larger diameter (smaller gauge) needles have been found to reduce pain, swelling, and redness after an injection because less pressure is required to depress the plunger.
Removing medication residue on the tip of the needle has been shown to reduce pain and discomfort of the injection. To remove residue from the needle, change needles after medication is removed from a vial and before it is administered to the patient. Additionally, place the bevel side of the needle up on the patient’s skin for quick and smooth injection of the needle into the tissue.
Proper positioning of the patient will facilitate proper landmarking of the site and may reduce perception of pain from the injection. Position the patient’s limbs in a relaxed, comfortable position to reduce muscle tension. For example, when giving an intramuscular injection in the deltoid, have the patient relax their arm by placing their hand in their lap.
The nurse can also encourage relaxation techniques to help decrease the patient’s anxiety-heightened pain. For example, divert the patient’s attention away from the injection procedure by chatting about other topics.[43]
Recommendations for Preventing Needlestick Injuries
Nurses are at high risk for needlestick injuries when administering injections. Needlestick injuries can result in the transmission of blood-borne pathogens and should always be reported according to agency policy for appropriate follow-up. Table 18.3b outlines guidelines for preventing needlestick injuries.[44]
Table 18.3b Guidelines for Preventing Needlestick Injuries
| Practice Guidelines | Additional Information |
|---|---|
| Do not recap needles with both hands. | Recapping needles with two hands creates high risk for needlestick injuries. Use the scoop-cap method by laying the cap on a hard surface and using one hand to hold the syringe and scoop up the cap from the surface. Whenever possible, use devices with safety features such as a safety shield on needles so that recapping is not necessary. |
| Dispose of the needle immediately after injection. | Immediately dispose of used needles in an approved sharps disposal container that is puncture-proof and leakproof. |
| Reduce or eliminate all hazards related to needles. | Use a needleless system and engineered safety devices for prevention of needlestick injuries when preparing injectable medications whenever possible. |
| Plan disposal of sharps before injection. | Plan for the safe handling and disposal of needles and other sharp objects before beginning the procedure. Locate the sharps container before administration, so that you can quickly dispose of the sharps after injection. |
| Follow all standard policies related to prevention or treatment of injury. | Follow all agency policies regarding infection control, hand hygiene, standard precautions, and blood and body fluid exposure management. |
| Report all injuries. | Report all needlestick injuries and sharp-related injuries immediately. Know how to manage needlestick injuries and follow agency policy regarding exposure to blood-borne pathogens. These policies help decrease the risk of contracting a blood-borne illness. |
| Participate in required training and education. | Attend training on injury-prevention strategies related to needles and safety devices per agency policy. |
It is important to follow evidence-based practices regarding parenteral medication administration to provide safe and effective care. Evidence-based practices include the following:
- Guidelines for preventing medication errors
- Recommendations to prevent infection from injections
- Guidelines for patient safety and comfort
- Recommendations to prevent needlestick injuries
Each of these practices is further described in the following sections.
Guidelines for Preventing Medication Errors
Medication errors can occur at various steps of the medication administration process. It is important to follow a standardized method for parenteral medication administration. Agency policies on medication preparation, administration, and documentation may vary, so it is important to receive agency training on using their medication system to avoid errors. See Table 18.3a for a summary of guidelines for safe medication administration.[45]
Additional details about preventing medication errors can be found in the “Administration of Enteral Medications” chapter.
Table 18.3a Summary of Safe Medication Administration Guidelines
| Guidelines | Additional Information |
|---|---|
| Be cautious and focused when preparing medications. | Avoid distractions. Some agencies have a no-interruption zone (NIZ) where health care providers can prepare medications without interruptions.[46] |
| Check and verify allergies. | Always ask the patient about their medication allergies, types of reactions, and severity of reactions. Verify the patient’s medical record for documented allergies. |
| Use two patient identifiers and follow agency policy for patient identification. | Use at least two patient identifiers before administration and compare information against the medication administration record (MAR).[47] |
| Perform appropriate patient assessments before medication administration. | Assess the patient prior to administering medications to ensure the patient is receiving the correct medication, for the correct reason, and at the correct time. For example, a nurse reviews lab values and performs a cardiac assessment prior to administering cardiac medication. See more information regarding specific patient assessments during parenteral medication administration in the “Applying the Nursing Process” section. |
| Be diligent and perform medication calculations accurately. | Double-check and verify medication calculations. Incorrect calculation of medication dosages causes medication errors that can compromise patient safety. |
| Use standard procedures and evidence-based references. | Follow a standardized procedure when administering medication for every patient. Look up current medication information in evidence-based sources because information changes frequently. |
| Communicate with the patient before and after administration. | Provide information to the patient about the medication before administering it. Answer their questions regarding usage, dose, and special considerations. Give the patient an opportunity to ask questions and include family members if appropriate. |
| Follow agency policies and procedures regarding medication administration. | Avoid work-arounds. A work-around is a process that bypasses a procedure or policy in a system. For example, a nurse may “borrow” medication from one patient’s drawer to give to another patient while waiting for an order to be filled by the pharmacy. Although performed with a good intention to prevent delay, these work-arounds fail to follow policies in place that ensure safe medication administration and often result in medication errors. |
| Ensure medication has not expired. | Check all medications’ expiration dates before administering them. Medications can become inactive after their expiration date. |
| Always clarify an order or procedure that is unclear. | Always verify information whenever you are uncertain or unclear about an order. Consult with the pharmacist, charge nurse, or health care provider, and be sure to resolve all questions before proceeding with medication administration. |
| Use available technology to administer medications. | Use available technology, such as barcode scanning, when administering medications. Barcode scanning is linked to the patient’s eMAR and provides an extra level of patient safety to prevent wrong medications, incorrect doses, or wrong timing of administration. If error messages occur, it is important to follow up appropriately according to agency policy and not override them. Additionally, it is important to remember that this technology provides an additional layer of safety and should not be substituted for checking the five rights of medication administration. |
| Be a part of the safety culture. | Report all errors, near misses, and adverse reactions according to agency policy. Incident reports improve patient care through quality improvement identification, analysis, and problem-solving. |
| Be alert. | Be alert to error-prone situations and high-alert medications. High-alert medications are those that can cause significant harm. The most common high-alert medications are anticoagulants, opiates, insulins, and sedatives. Read more about high-alert medications in the “Administration of Enteral Medications" chapter. |
| Address patient concerns. | If a patient questions or expresses concern regarding a medication, stop the procedure and do not administer it. Explore the patient’s concerns, review the provider’s order, and, if necessary, notify the provider. |
Preventing Infection
Administering parenteral medications is considered an invasive procedure. It is imperative to take additional measures when administering parenteral medications to prevent health care associated infections. The Centers for Disease Control and Prevention provides several recommendations for safe injection practices to prevent contamination and spread of pathogens. These recommendations include hand hygiene, prevention of needle/syringe contamination, preparation of the patient’s skin, prevention of contamination of the solution, and use of new, sterile equipment for each injection.[48],[49],[50] Each of these recommendations is discussed below.
Perform Hand Hygiene
Always perform hand hygiene before and after preparing and before and after administering the injection with facility-approved, alcohol-based hand sanitizer or soap and water. See more information about performing effective hand hygiene in the “Aseptic Technique” chapter.
Prevent Needle/Syringe Contamination
Keep the parts of the needle and syringe sterile. Keep the tip of the syringe sterile and keep it covered with a cap or needle. Avoid letting the needle touch unsterile surfaces, such as the outer edges of the ampule or vial, the surface of the needle cap, or the counter. Always keep the needle covered with a cap when not in use and avoid touching the length of the plunger.
After drawing up the medication from the vial, use the scoop-cap method to recap the needle to avoid needlestick injuries. After administration of the medication, activate the safety and place the used syringe/needle immediately in the sharps container.
View a supplementary YouTube video on Scoop-Cap Technique[51]
Prepare Patient’s Skin
Wash the patient’s skin with soap and water if it is soiled. Follow agency policy for skin preparation. When using an alcohol swab, use a circular motion to rub the area for 30 seconds, and then let the area dry for 30 seconds. If cleaning a site, move from the center of the site outward in a 5-cm (2 in) radius.
Prevent Contamination of Solution
Use single-dose vials or ampules whenever possible. Do not keep multi-dose vials in patient treatment areas. Discard a container if sterility is compromised or questionable. Medications from ampules should be used immediately and then discarded appropriately. Additional information about ampules is provided in the "Basic Concepts" section.
Use New Sterile Equipment
Use a new, sterile syringe and needle with each patient. Inspect packaging for intactness and discard if there are rips or torn corners. If single-use equipment is not available, use syringes and needles designed for steam sterilization.
Guidelines for Patient Safety and Comfort During Injections
With proper preparation and technique, injections can be given safely and effectively to patients to prevent harm. It is essential to use correct needle sizes and angles of insertion and select appropriate anatomical locations based on patient age, size, and type of injection to avoid complications.[52] For example, for intramuscular injections the ventrogluteal site is preferred in adults because it has the greatest muscle thickness, is free of nerves and blood vessels, and has a small layer of fat, resulting in less painful administration and optimal absorption of the medication.
Use the correct needle length according to the type of injection to ensure delivery of medication into the correct layer of tissue and to reduce complications such as abscesses, pain, and bruising. Needle selection should be based on the patient’s size, gender, and injection site. Be aware that women tend to have more adipose tissue around the buttocks and deltoid fat pad, which means a longer needle is required. Larger diameter (smaller gauge) needles have been found to reduce pain, swelling, and redness after an injection because less pressure is required to depress the plunger.
Removing medication residue on the tip of the needle has been shown to reduce pain and discomfort of the injection. To remove residue from the needle, change needles after medication is removed from a vial and before it is administered to the patient. Additionally, place the bevel side of the needle up on the patient’s skin for quick and smooth injection of the needle into the tissue.
Proper positioning of the patient will facilitate proper landmarking of the site and may reduce perception of pain from the injection. Position the patient’s limbs in a relaxed, comfortable position to reduce muscle tension. For example, when giving an intramuscular injection in the deltoid, have the patient relax their arm by placing their hand in their lap.
The nurse can also encourage relaxation techniques to help decrease the patient’s anxiety-heightened pain. For example, divert the patient’s attention away from the injection procedure by chatting about other topics.[53]
Recommendations for Preventing Needlestick Injuries
Nurses are at high risk for needlestick injuries when administering injections. Needlestick injuries can result in the transmission of blood-borne pathogens and should always be reported according to agency policy for appropriate follow-up. Table 18.3b outlines guidelines for preventing needlestick injuries.[54]
Table 18.3b Guidelines for Preventing Needlestick Injuries
| Practice Guidelines | Additional Information |
|---|---|
| Do not recap needles with both hands. | Recapping needles with two hands creates high risk for needlestick injuries. Use the scoop-cap method by laying the cap on a hard surface and using one hand to hold the syringe and scoop up the cap from the surface. Whenever possible, use devices with safety features such as a safety shield on needles so that recapping is not necessary. |
| Dispose of the needle immediately after injection. | Immediately dispose of used needles in an approved sharps disposal container that is puncture-proof and leakproof. |
| Reduce or eliminate all hazards related to needles. | Use a needleless system and engineered safety devices for prevention of needlestick injuries when preparing injectable medications whenever possible. |
| Plan disposal of sharps before injection. | Plan for the safe handling and disposal of needles and other sharp objects before beginning the procedure. Locate the sharps container before administration, so that you can quickly dispose of the sharps after injection. |
| Follow all standard policies related to prevention or treatment of injury. | Follow all agency policies regarding infection control, hand hygiene, standard precautions, and blood and body fluid exposure management. |
| Report all injuries. | Report all needlestick injuries and sharp-related injuries immediately. Know how to manage needlestick injuries and follow agency policy regarding exposure to blood-borne pathogens. These policies help decrease the risk of contracting a blood-borne illness. |
| Participate in required training and education. | Attend training on injury-prevention strategies related to needles and safety devices per agency policy. |
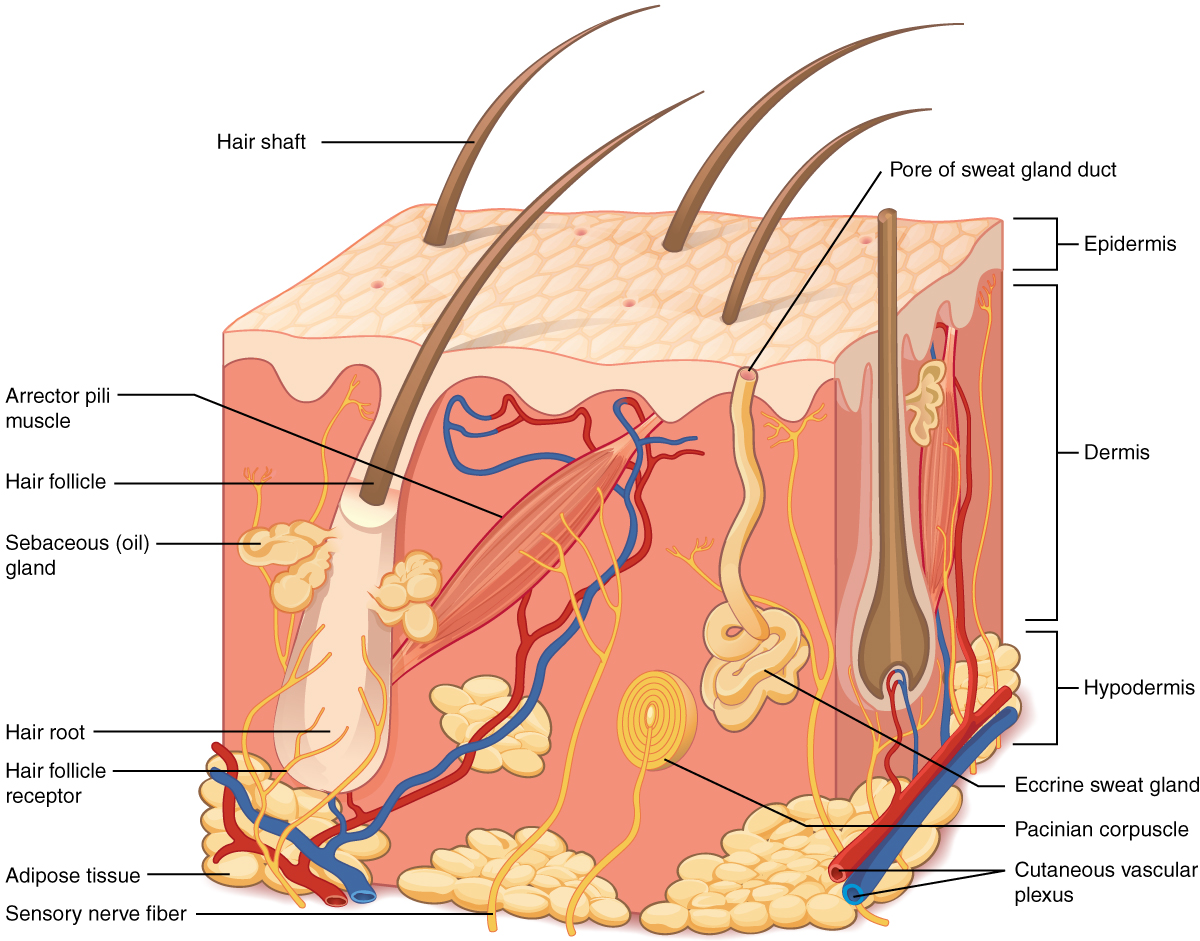
Intradermal injections (ID) are administered into the dermis just below the epidermis. See Figure 18.14[55] for an image of the layers of the skin. Intradermal (ID) injections have the longest absorption time of all parenteral routes because there are fewer blood vessels and no muscle tissue. These types of injections are used for sensitivity testing because the patient’s reaction is easy to visualize, and the degree of reaction can be assessed. Examples of intradermal injections include tuberculosis (TB) and allergy testing.[56]
Anatomic Sites
The most common anatomical sites used for intradermal injections are the inner surface of the forearm and the upper back below the scapula. The nurse should select an injection site that is free from lesions, rashes, moles, or scars that may alter the visual inspection of the test results. See Figure 18.15[57] for an image of the nurse inspecting a patient’s forearm site prior to injection.

Description of Procedure
Clean the site with an alcohol swab or antiseptic swab for 30 seconds using a firm, circular motion. Allow the site to dry. Allowing the skin to dry prevents introducing alcohol into the tissue, which can be irritating and uncomfortable.[58]
Use a tuberculin syringe, calibrated in tenths and hundredths of a milliliter, with a needle length of 3/8 inches to 5/8 inches and a gauge of 25 or 27.[59] See Figure 18.16[60] for an image of a tuberculin syringe. Remove the cap from the needle by pulling it off in a straight motion. A straight motion helps prevent needlestick injury.

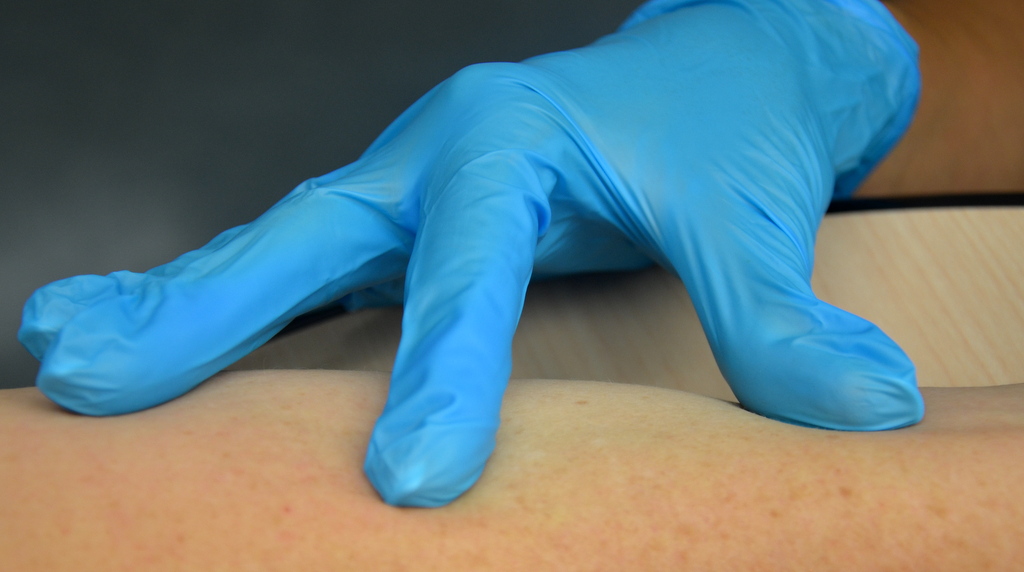
The dosage of an intradermal injection is usually under 0.1 mL, and the angle of administration for an ID injection is 5 to 15 degrees. Using your nondominant hand, spread the skin taut over the injection site. Taut skin provides easy entrance for the needle and is also important to do for older adults, whose skin is less elastic. See Figure 18.17[61] of an image of a nurse holding the skin taut prior to injection.[62]
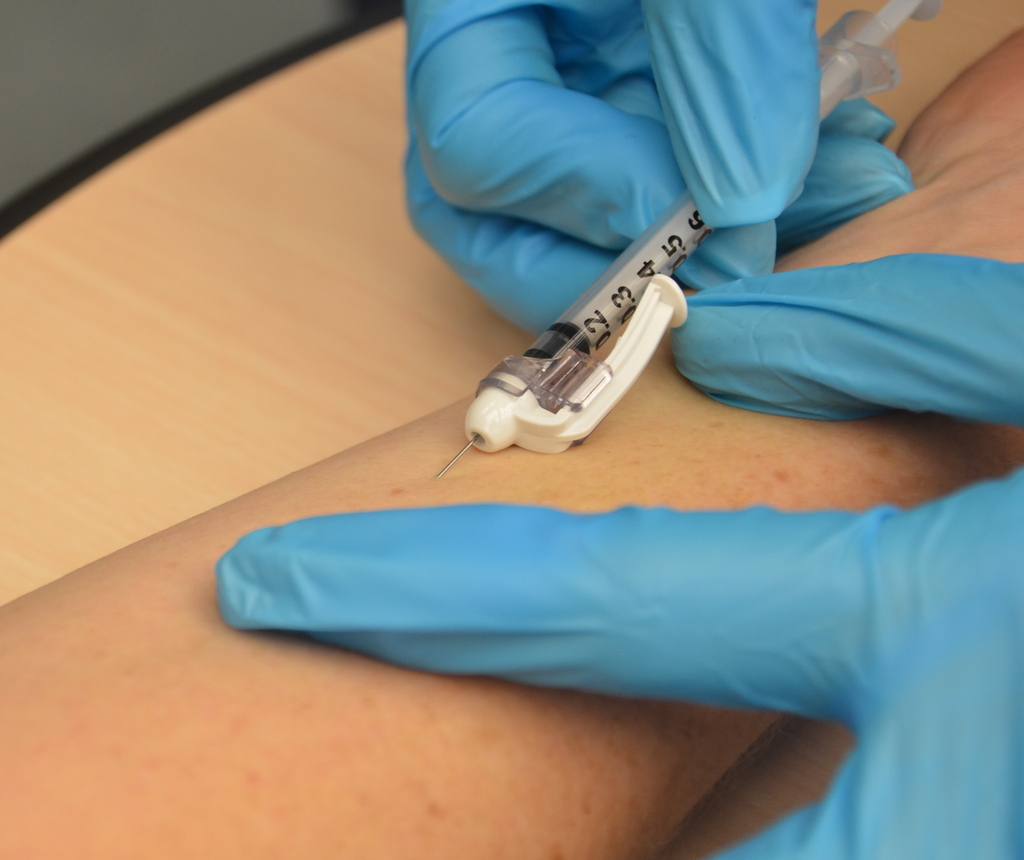
Hold the syringe in the dominant hand between the thumb and forefinger, with the bevel of the needle up at a 5- to 15-degree angle at the selected site. Place the needle almost flat against the patient’s skin, bevel side up, and insert the needle into the skin. Keeping the bevel side up allows for smooth piercing of the skin and induction of the medication into the dermis. Advance the needle no more than an eighth of an inch to cover the bevel. Once the syringe is in place, push on the plunger to slowly inject the medication.[63] See Figure 18.18[64] for an image of a nurse administering an intradermal injection.
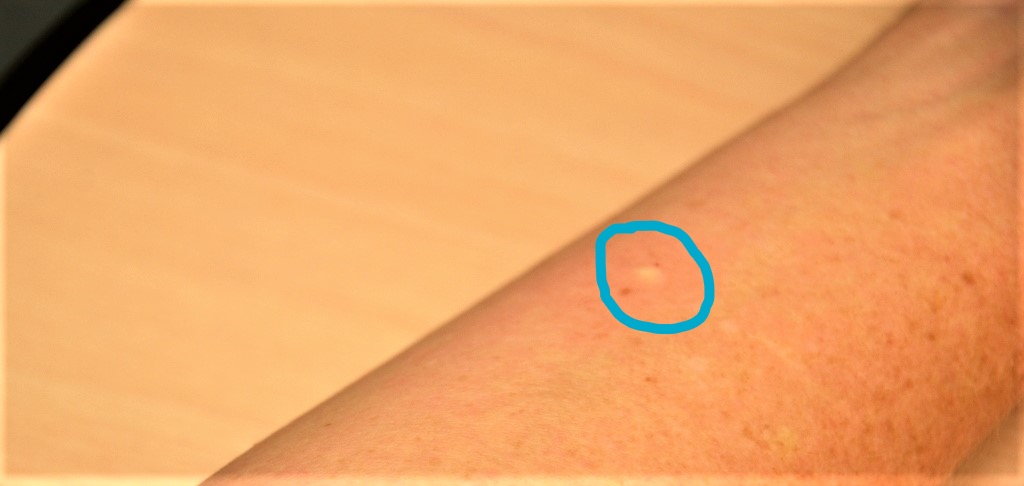
After the ID injection is completed, a bleb (small blister) should appear under the skin. The presence of the bleb indicates that the medication has been correctly placed in the dermis. See Figure 18.19[65] for an image of a bleb.
Carefully withdraw the needle out of the insertion site using the same angle it was placed so as not to disturb the bleb. Withdrawing at the same angle as insertion also minimizes discomfort to the patient and damage to the tissue. Do not massage or cover the site. Massaging the area may spread the solution to the underlying subcutaneous tissue. Discard the syringe in the sharps container. If administering a TB test, advise the patient to return for a reading in 48-72 hours. Discard used supplies, remove gloves, perform hand hygiene, and document.[66]
Intradermal injections (ID) are administered into the dermis just below the epidermis. See Figure 18.14[67] for an image of the layers of the skin. Intradermal (ID) injections have the longest absorption time of all parenteral routes because there are fewer blood vessels and no muscle tissue. These types of injections are used for sensitivity testing because the patient’s reaction is easy to visualize, and the degree of reaction can be assessed. Examples of intradermal injections include tuberculosis (TB) and allergy testing.[68]

Anatomic Sites
The most common anatomical sites used for intradermal injections are the inner surface of the forearm and the upper back below the scapula. The nurse should select an injection site that is free from lesions, rashes, moles, or scars that may alter the visual inspection of the test results. See Figure 18.15[69] for an image of the nurse inspecting a patient’s forearm site prior to injection.

Description of Procedure
Clean the site with an alcohol swab or antiseptic swab for 30 seconds using a firm, circular motion. Allow the site to dry. Allowing the skin to dry prevents introducing alcohol into the tissue, which can be irritating and uncomfortable.[70]
Use a tuberculin syringe, calibrated in tenths and hundredths of a milliliter, with a needle length of 3/8 inches to 5/8 inches and a gauge of 25 or 27.[71] See Figure 18.16[72] for an image of a tuberculin syringe. Remove the cap from the needle by pulling it off in a straight motion. A straight motion helps prevent needlestick injury.

The dosage of an intradermal injection is usually under 0.1 mL, and the angle of administration for an ID injection is 5 to 15 degrees. Using your nondominant hand, spread the skin taut over the injection site. Taut skin provides easy entrance for the needle and is also important to do for older adults, whose skin is less elastic. See Figure 18.17[73] of an image of a nurse holding the skin taut prior to injection.[74]

Hold the syringe in the dominant hand between the thumb and forefinger, with the bevel of the needle up at a 5- to 15-degree angle at the selected site. Place the needle almost flat against the patient’s skin, bevel side up, and insert the needle into the skin. Keeping the bevel side up allows for smooth piercing of the skin and induction of the medication into the dermis. Advance the needle no more than an eighth of an inch to cover the bevel. Once the syringe is in place, push on the plunger to slowly inject the medication.[75] See Figure 18.18[76] for an image of a nurse administering an intradermal injection.

After the ID injection is completed, a bleb (small blister) should appear under the skin. The presence of the bleb indicates that the medication has been correctly placed in the dermis. See Figure 18.19[77] for an image of a bleb.

Carefully withdraw the needle out of the insertion site using the same angle it was placed so as not to disturb the bleb. Withdrawing at the same angle as insertion also minimizes discomfort to the patient and damage to the tissue. Do not massage or cover the site. Massaging the area may spread the solution to the underlying subcutaneous tissue. Discard the syringe in the sharps container. If administering a TB test, advise the patient to return for a reading in 48-72 hours. Discard used supplies, remove gloves, perform hand hygiene, and document.[78]

