Basic Concepts
Open Resources for Nursing (Open RN)
Topical and Transdermal Medications
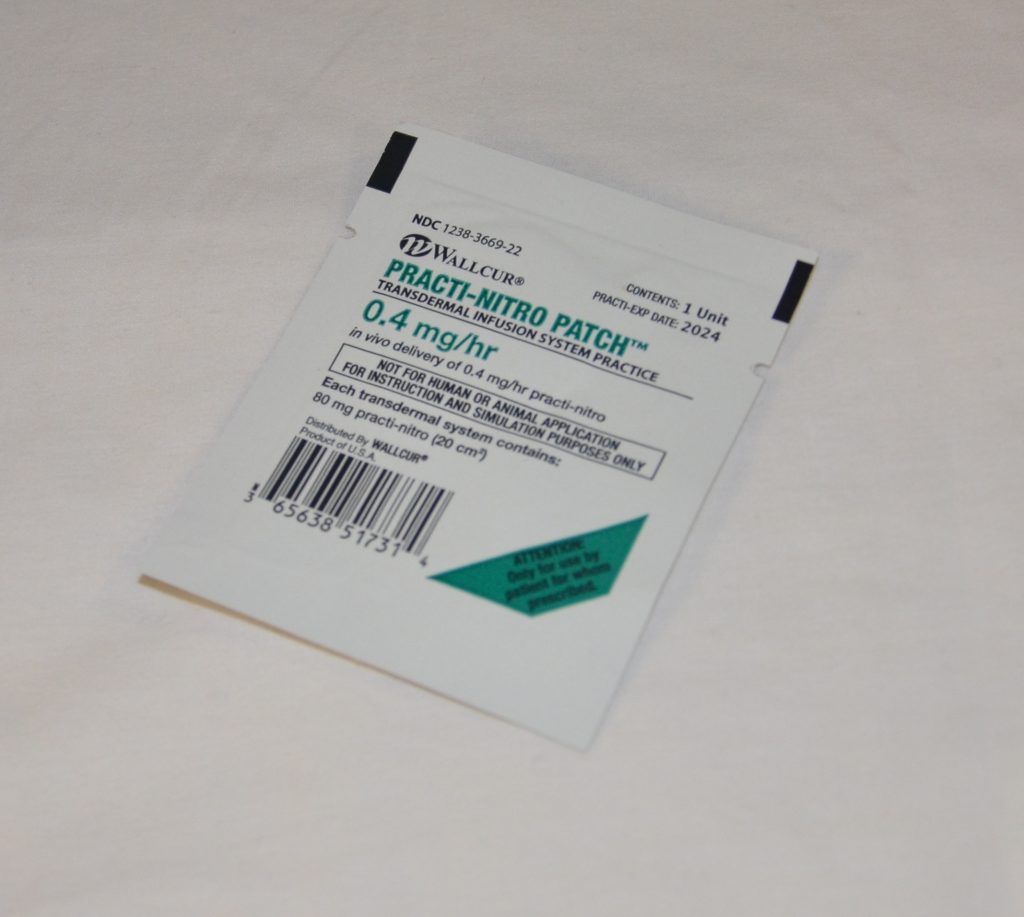
Topical medications are medications that are administered via the skin or mucous membranes for direct local action, as well as for systemic effects. An inunction is a medication that is massaged or rubbed into the skin and includes topical creams such as nystatin antifungal cream. The transdermal route of medication administration includes patches or disks applied to the skin that deliver medication over an extended period of time. Common types of transdermal medications are analgesics (such as fentanyl), cardiac medications (such as nitroglycerin), hormones (such as estrogen), and nicotine patches (for smoking cessation). See Figure 16.1[1] for an image of typical packaging of a topical patch. Medications delivered transdermally provide a consistent level of the drug in the bloodstream for distribution. The transdermal route is also helpful for patients who are nauseated or having difficulty swallowing.
Heat may be applied with the administration of some inunctions. Heat causes vasodilation that enhances blood flow and improves absorption of some medication. However, heat should never be applied over patches, such as the fentanyl or nitroglycerin patches, because it increases the release of the drug and can cause overdose and death. Be sure to reference manufacturer recommendations regarding the application of heat.[2]
When applying transdermal patches, the nurse should always wear gloves and check the rights of medication administration as is done with other types of medication. Before applying a new patch, the old patch should be removed, the skin around the old patch should be assessed, and the site for the patch cleansed and dried thoroughly. The skin around the patch should be monitored for any irritation or reaction to the medication or patch adhesive. Patches should not be applied to broken or irritated skin.
When applying a new patch, the nurse should remove the clear plastic backing and take care to not touch the medication surface of the patch while placing it on the patient’s skin. Patches should be placed on an appropriate skin area per manufacturer guidelines, such as the upper arms or on the chest. The patch should be pressed firmly to the skin for ten seconds to ensure adhesion to the skin. For documentation purposes, the nurse should initial, date, and time a piece of tape that is applied close to the patch. If your agency allows you to mark the patch directly, please be sure to use a marking pen in order to not puncture the patch and render it ineffective. Based on the onset of the medication, the patient should be evaluated to ensure they are responding appropriately to the therapeutic effects of the medication and not experiencing any adverse effects.
Patch placement should be routinely assessed for dislodgement per agency policy. For example, for some opioid patches like fentanyl, the nurse is required to assess and document that the patch is present during every shift. The nurse should also be aware that patches with aluminum backing can cause issues with defibrillation and MRI scans, so this type of patch should be removed prior to either of these actions.
To remove a patch, the nurse should wear gloves and remove the patch carefully so as not to tear the skin. The patch should be disposed of in the proper waste receptacle per agency policy. For example, some agencies have specific receptacles for nitroglycerin patches. Additionally, agencies have specific policies for disposal of fentanyl patches to prevent drug diversion of used patches. Patch removal should be documented in the patient’s record.
Eye Instillations and Irrigations
Eye Drops
Eye drops are administered for a local effect on the eye. Examples of eye drop medications include antibiotic drops for conjunctivitis, glaucoma medication to reduce intraocular pressure, and saline drops to relieve dry eyes. The amount of drops to administer per eye is indicated on the provider order. When instilling eye drops, the nurse should perform hand hygiene, apply gloves, and check the same rights of medication administration as done with other types of medication. Prior to administration of eye medication, the patient’s eyes should be assessed for new or unusual redness or drainage. If discharge is present, the eyelids should be cleansed with gauze saturated with warm water or normal saline to remove any dirt or debris that could be carried into the eye during instillation. When cleaning the eyelids, the nurse should clean from the inner canthus toward the outer canthus so as not to introduce debris or dirt into the lacrimal ducts that could cause an infection. A new gauze pad is used for each stroke. The nurse should remove gloves after cleansing, perform hand hygiene, and apply new gloves prior to medication administration.
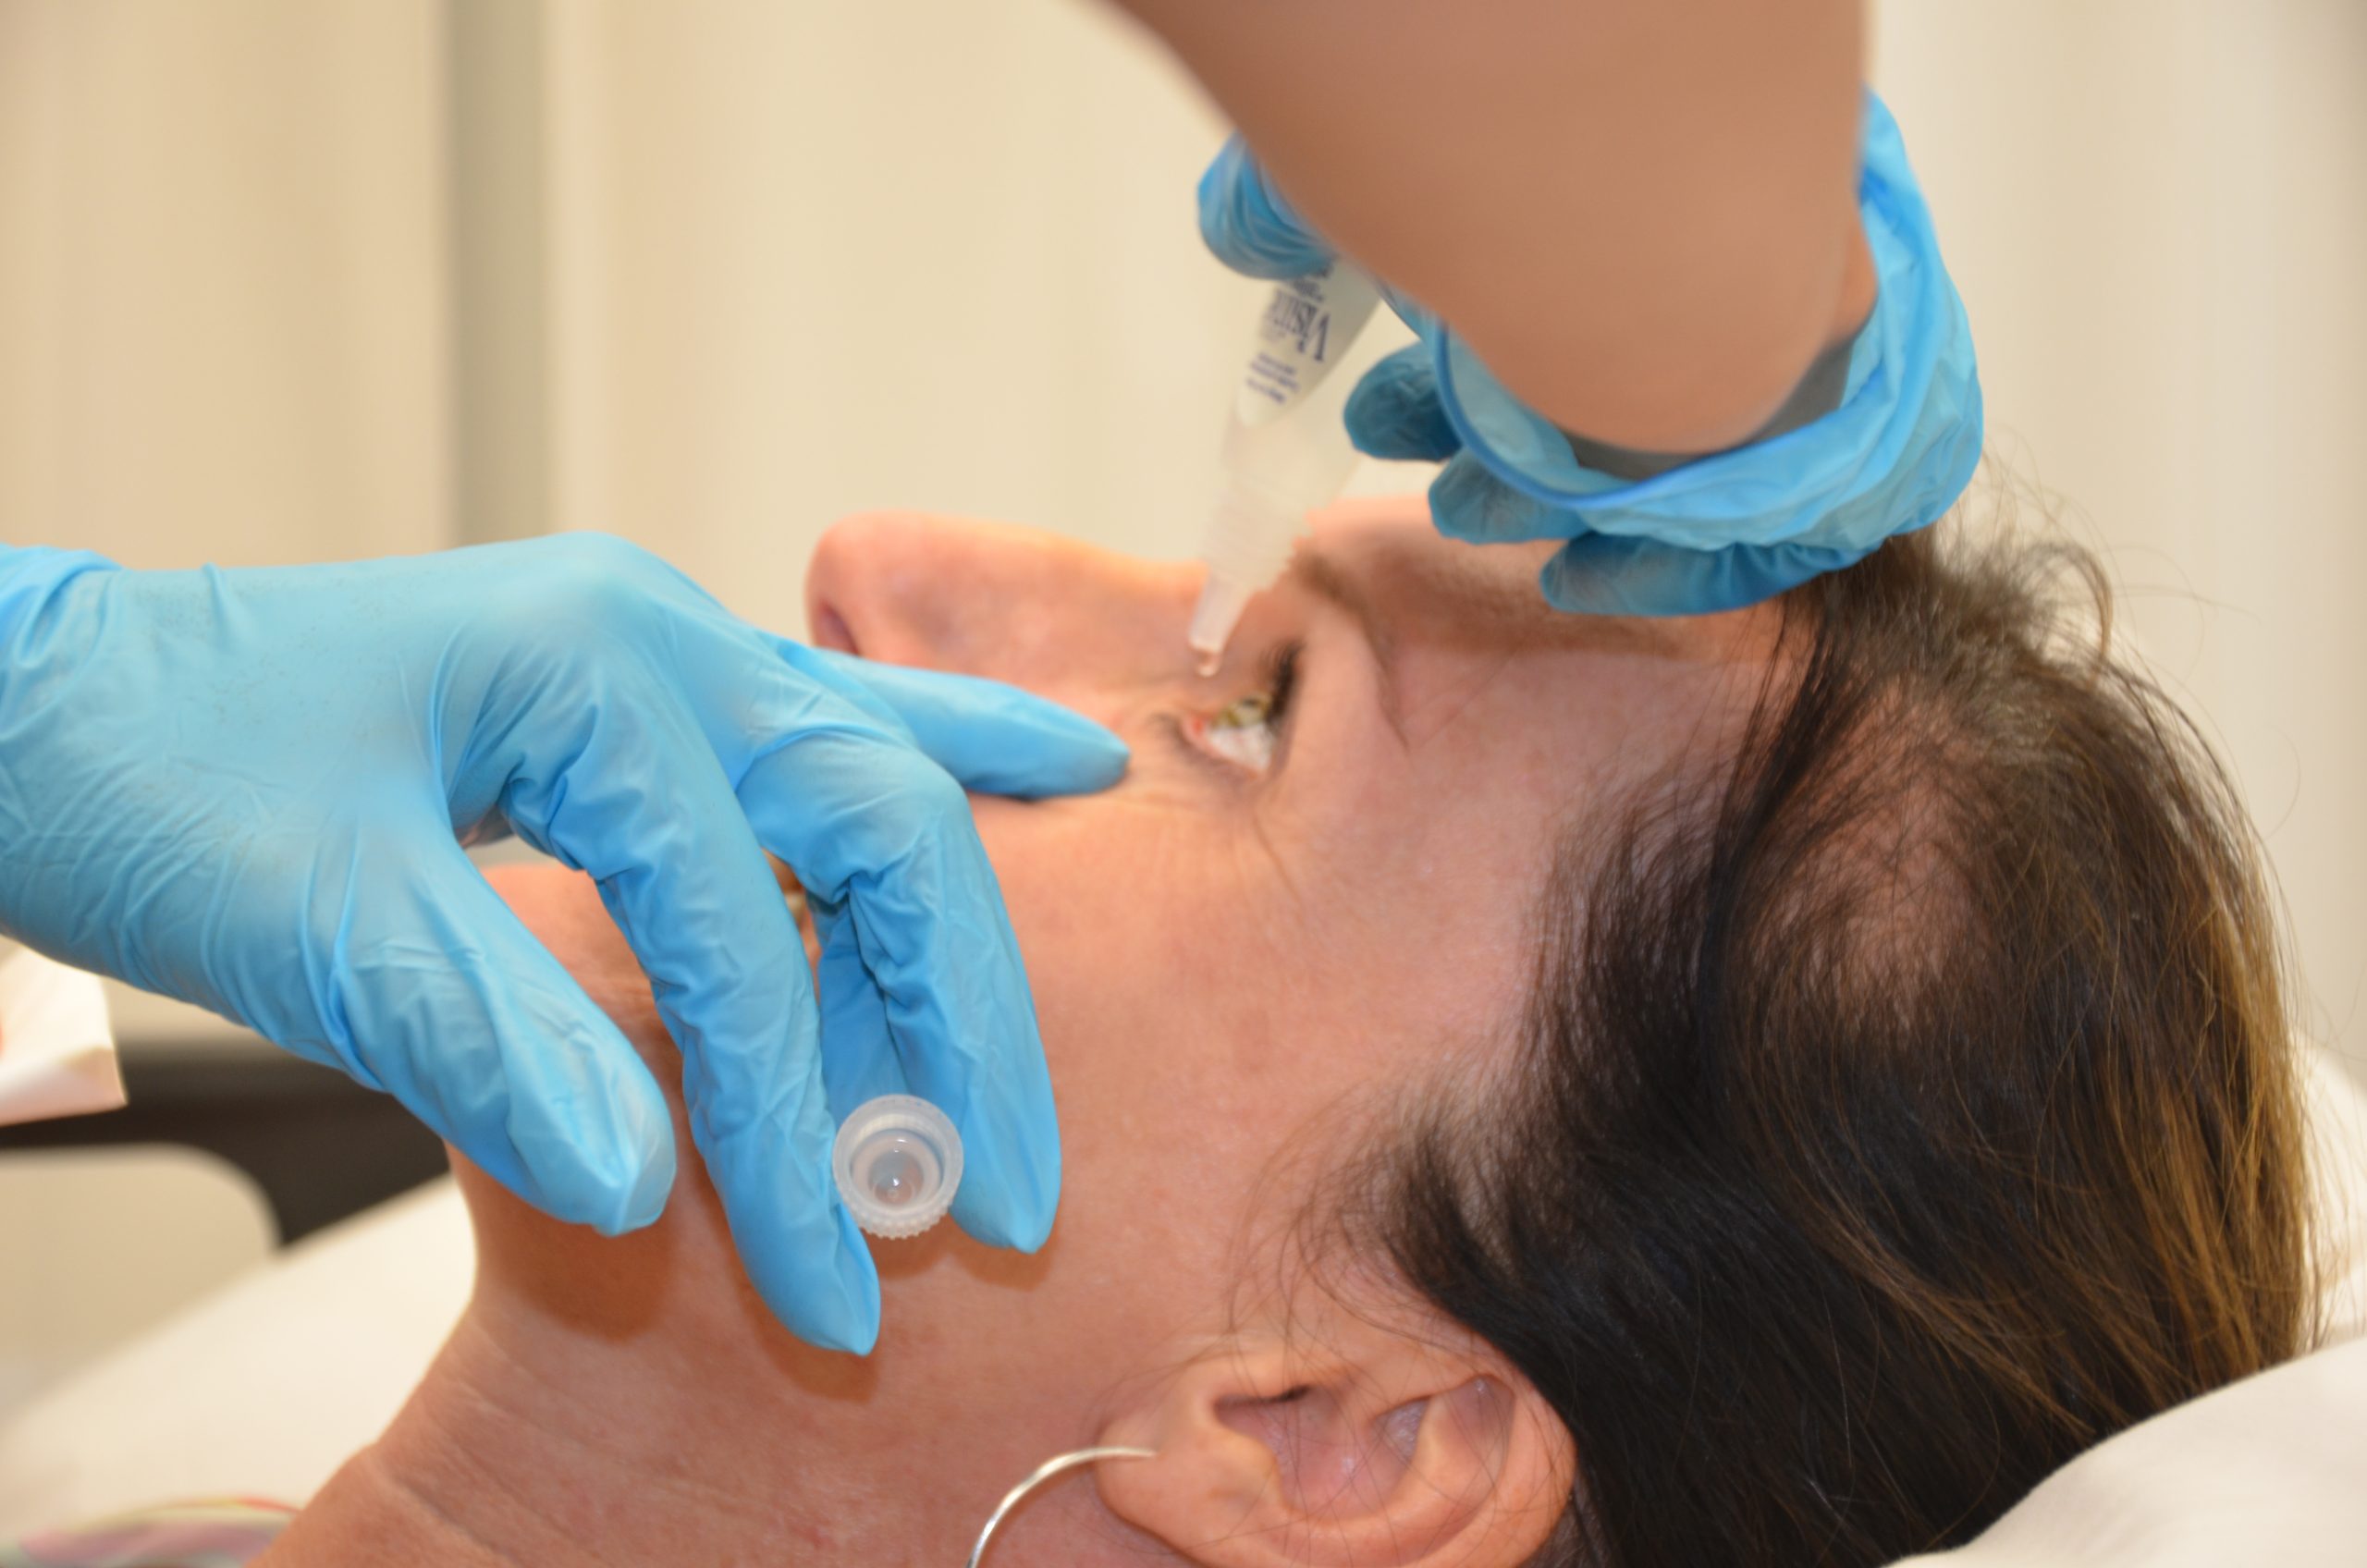
When administering the drops, the patient should be instructed to tilt their head backwards or be positioned in a supine position with their head on a pillow looking up. When the cap of the medication is removed, it should be placed on a clean surface with care taken to keep the inside of the cap sterile and to not contaminate the dropper tip. The patient should look up and away while the nurse gently uses pressure to pull the lower lid down and expose the lower conjunctival sac. By holding the dropper close to the sac without touching it, the nurse should squeeze the bottle and allow the drop to fall into the sac, taking care to not touch the dropper to the eye. After the eye drop has been instilled, the patient should close their eye. The nurse should apply gentle pressure to the inner canthus, when appropriate, to prevent the medication from entering the lacrimal duct and causing a possible systemic reaction to the medication. This procedure should be repeated in the other eye as ordered. The patient should be instructed to not to rub their eye(s). During the procedure, the nurse evaluates the patient’s tolerance of the medication and the procedure and documents it. See Figure 16.2[3] for an image of a nurse administering eye drops.
Review of Administering Eye Drops on YouTube[4]
Eye Ointment
Administering eye ointment follows the same procedure as administering eye drops, except that instead of drops, ½ inch of ointment is placed in the lower conjunctival sac. When applying the ointment, the nurse should start at the inner canthus and move outward. After application, the patient should be instructed to close their eyelid and move the eye to spread the ointment, so it is absorbed. They should be advised they may experience blurry vision for a few minutes until the medication is absorbed.
Eye Irrigations
Eye irrigations are used to flush foreign bodies from the eye, such as debris or chemicals, using large amounts of saline. The amount of solution and length of time used to irrigate the eye depends on the contaminant. Follow agency policy when performing eye irrigation. For example, some emergency eye flush stations provide a 15-minute flush to the eye. Care should be taken to not contaminate the other eye while removing the debris unless it is necessary to flush both eyes.
Ear Instillations and Irrigations
Medications and fluids may be instilled into the ear for local effect, including antibiotics, analgesics, wax softeners, and irrigation fluid to remove foreign objects or wax buildup. Medications and fluids are instilled into the outer ear canal, with the tympanic membrane forming a thin barrier to the middle and inner ear. However, if the tympanic membrane is ruptured, instillation of ear drops is generally contraindicated unless a sterile, no-touch technique is used. However, if a patient has a surgical opening in the tympanic membrane (i.e., tympanostomy tubes have been placed), ear drops may be prescribed but caution must be taken not to introduce debris into the middle or inner ear.
Ear Drops
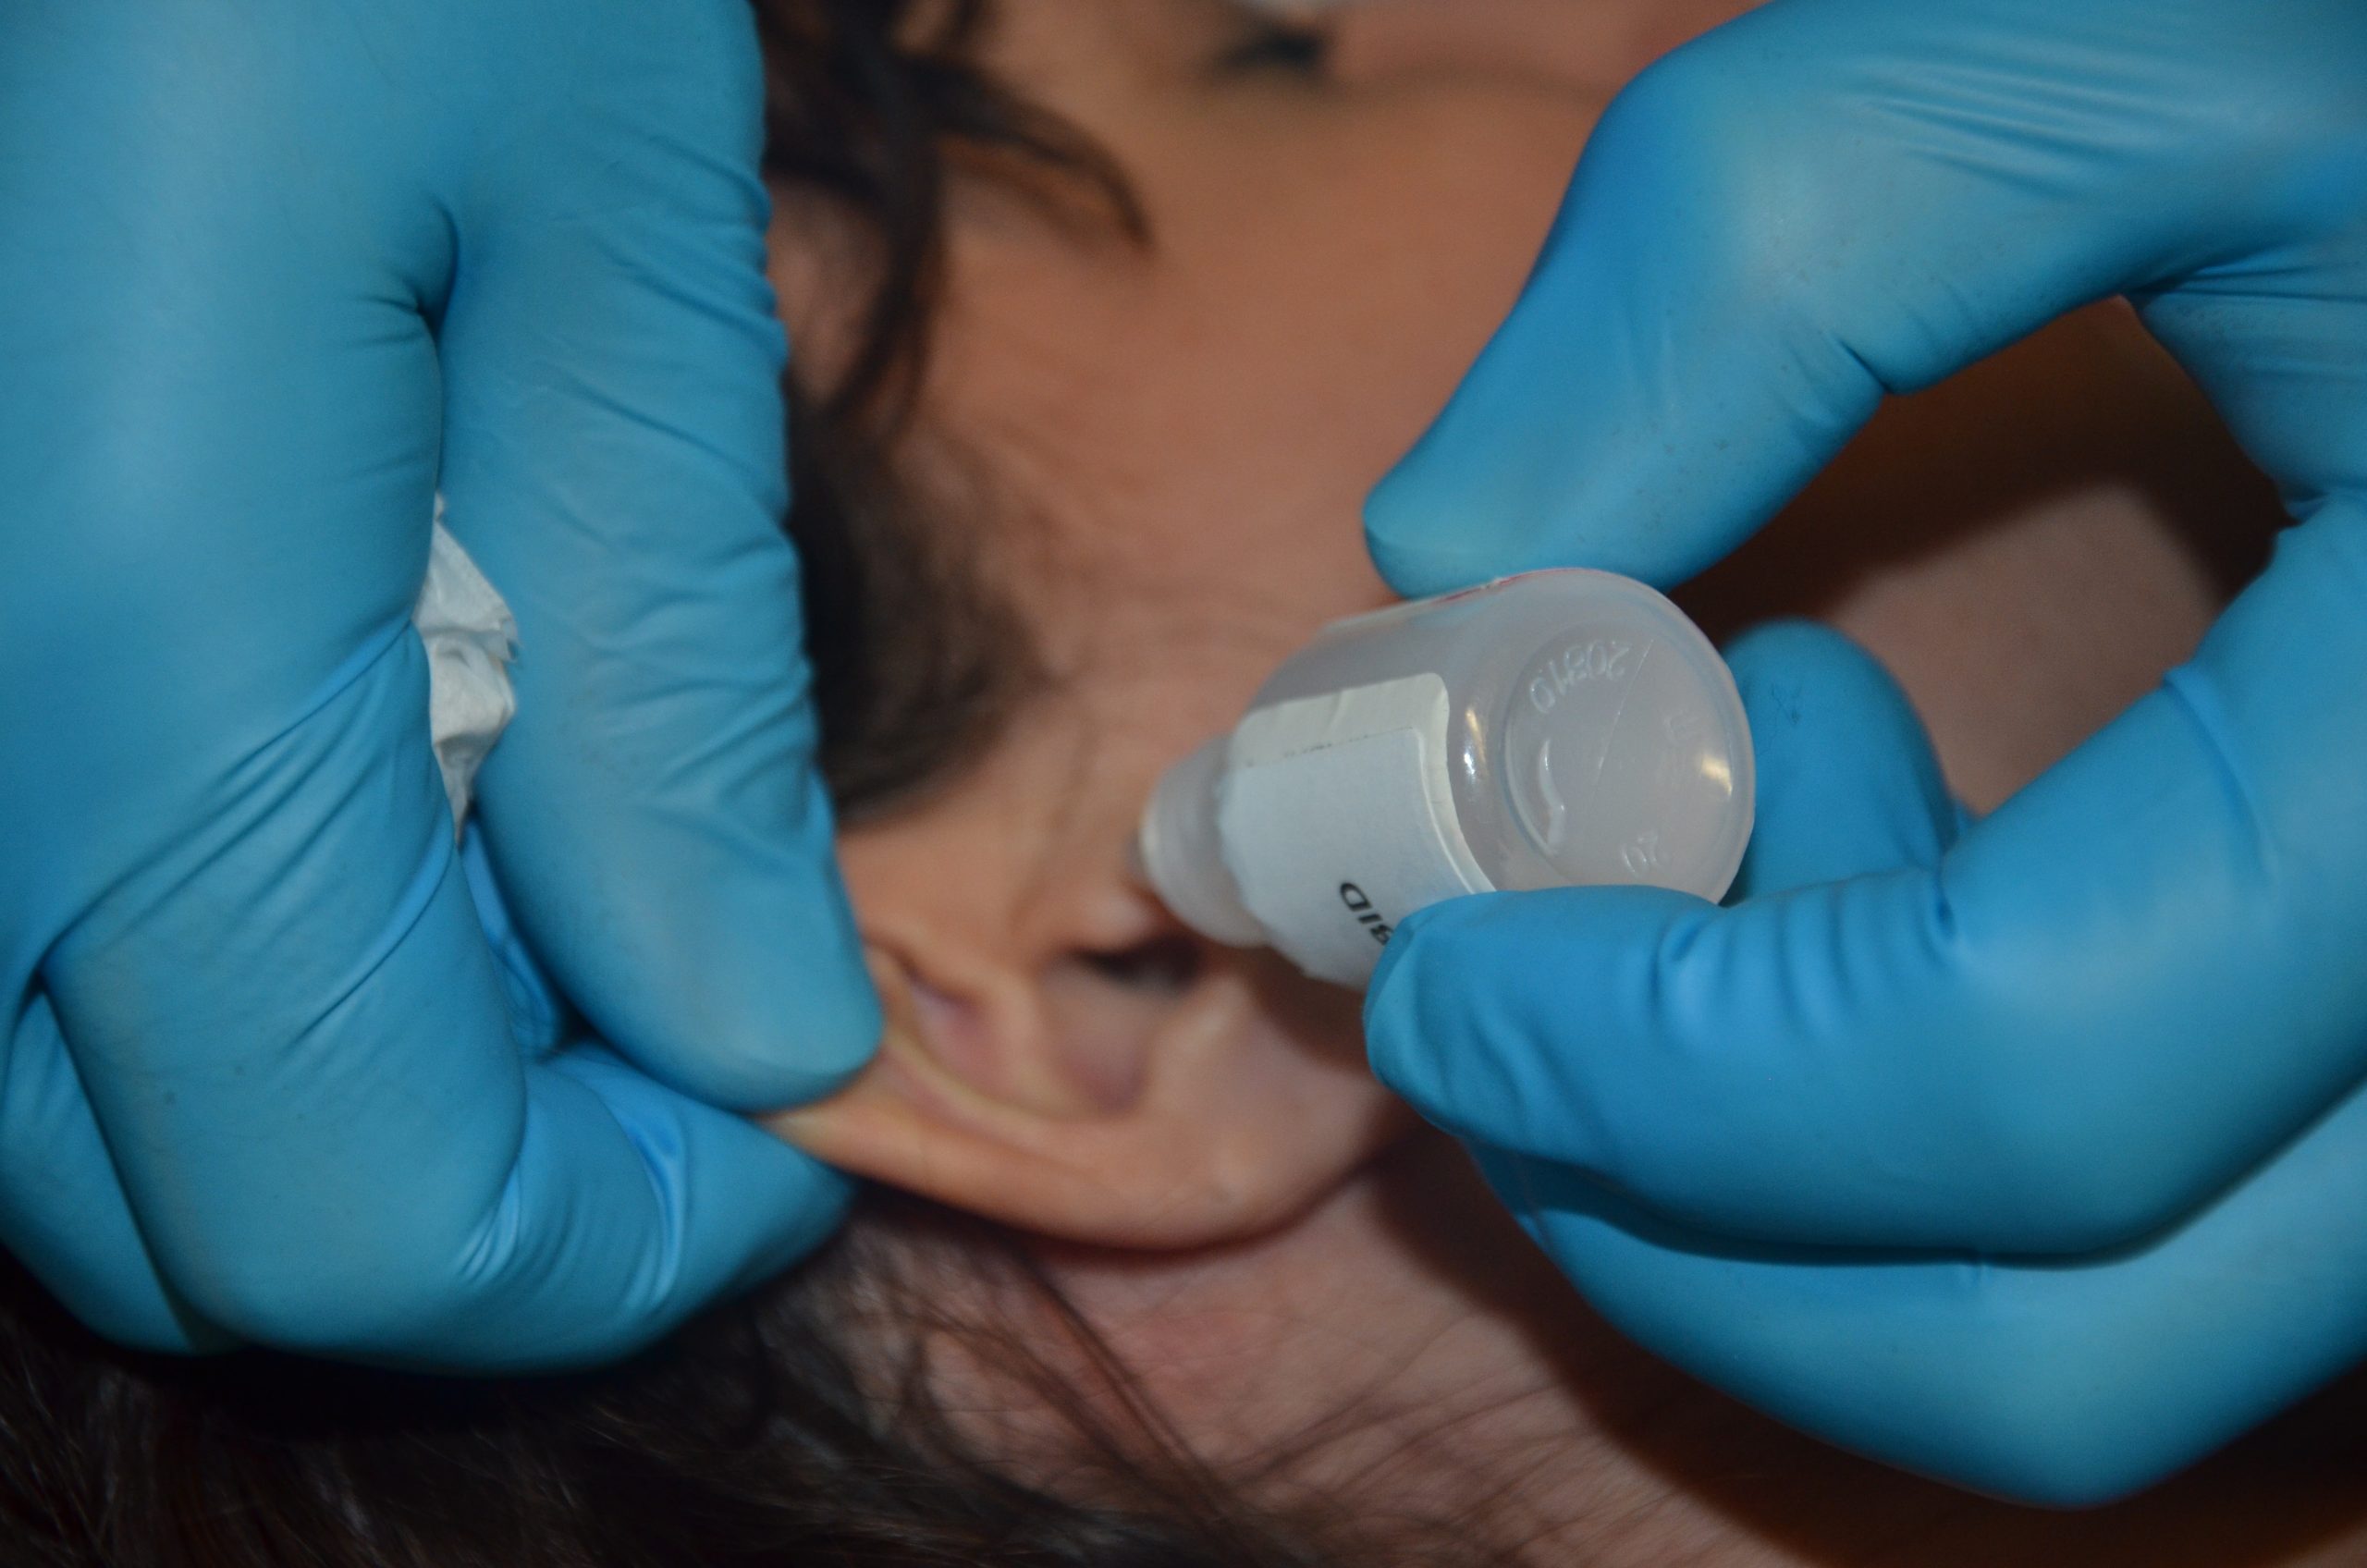
When administering ear drops, the nurse should carefully follow the dosage and amount of drops per ear according to the provider order. The nurse should perform hand hygiene, apply gloves, and check the same rights of medication administration as is completed with other types of medication. The external ear should be cleaned of debris prior to drops being instilled. The patient should be positioned so the affected ear is tilted in the uppermost position. If the patient is lying in bed, position the patient so they are lying with the unaffected ear against the pillow and the affected ear upward. When removing the cap of the medication, caution should be used to not touch the dropper or the inside of the cap to avoid contamination. The pinna of the ear should be grasped and pulled backwards and upwards for an adult. For children, the pinna should be pulled straight back, and for infants, it should be pulled down and back. This movement straightens the auditory canal and prepares it for instillation. The nurse should squeeze the bottle so that the drops of medication fall onto the side of the auditory canal and not directly onto the tympanic membrane. The medication should run towards the tympanic membrane after it is instilled. The tragus can be massaged to help move the medication into place. The patient should remain in this lying position for five minutes. After five minutes, this procedure can be repeated on the other ear, if ordered. Evaluation of the patient should be performed post administration to assess if the patient tolerated the procedure and if anticipated therapeutic effects occurred. When instilling medication or fluids into the ear, monitor for side effects such as dizziness or nausea. See Figure 16.3[5] for an image of a nurse administering ear drops.
Ear Irrigations
Ear irrigations are typically performed to remove wax buildup or foreign bodies from the external ear canal. Normal saline at room temperature is typically used, although a mixture of saline and hydrogen peroxide can also be used. A 60-cc needleless syringe is typically used to irrigate the ear, or a spray bottle with a soft angiocatheter can also be used. Ask the patient to hold an emesis basin under the ear to catch the expelled irrigant. During and after the irrigation, the patient should be evaluated for side effects such as dizziness, nausea, or pain.
Nasal Instillation
Medications administered via the nasal passage are typically used to treat allergies, sinus infections, and nasal congestion. Nasal spray or drops should be administered via the nasal passage using a clean technique. The nurse should perform hand hygiene, apply gloves, and perform the same rights of medication administration as is completed with other types of medications. The patient should be given tissues and asked to blow their nose. Position the patient with their head tilted backwards while sitting or lying supine looking upwards. The nurse should insert the tip of the spray bottle or the nasal dropper into one nare while occluding the other nare and then activate the spray as the patient inhales. The bottle should remain compressed as it is removed from the nose to prevent contamination. The patient should be instructed to hold their breath for a few seconds and then breathe through their mouth. Repeat this procedure in the other nare if ordered. Wipe the outside of the bottle with clean tissue before storing it and advise the patient to avoid blowing their nose for 5-10 minutes after nasal instillation. Note any unexpected situations such as nosebleeds or increased congestion.[6]
Vaginal Instillations
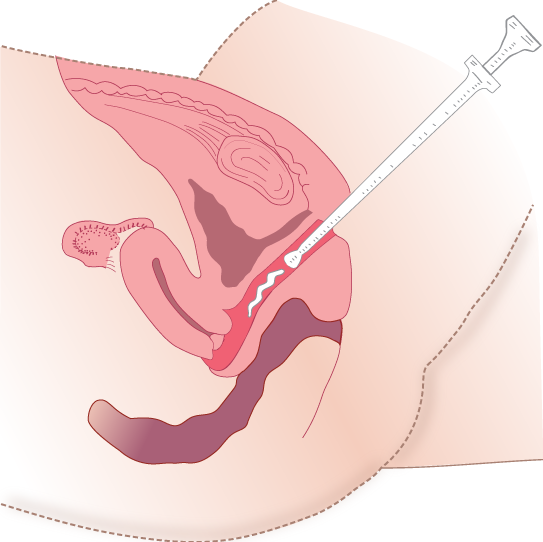
Vaginal instillations are typically used to administer hormone therapy and antifungal treatment. Vaginal applications can be supplied in foams, suppositories that melt with body heat, creams, and tablets. The patient should be asked to void prior to placement. The nurse should perform hand hygiene, apply gloves, perform the same rights of medication administration as is completed with other types of medications, and provide privacy. Position the patient on their back with knees flexed. Perineal care should be performed by the nurse prior to administration of the medication. After perineal care, remove gloves, perform hand hygiene, and apply new gloves. Fill a vaginal applicator with cream or foam or open the suppository to be placed. Lubricate the applicator or your gloved finger with water-based lubricant. With the nondominant hand, spread the labia and place the applicator into the full length of the vagina, push the plunger, and then remove the applicator. If a suppository is being placed, insert the rounded end of the suppository with your index finger, placing it along the posterior wall of the vagina. Ask the patient to remain in the supine position for 5-10 minutes for optimal absorption. If possible, administer the medication at bedtime so the patient can remain in the supine position for an extended period of time to enhance absorption. Assess the patient for any unexpected situations, such as the suppository coming out. See Figure 16.4[7] for an illustration of vaginal administration of cream medication.
Inhaled Medications
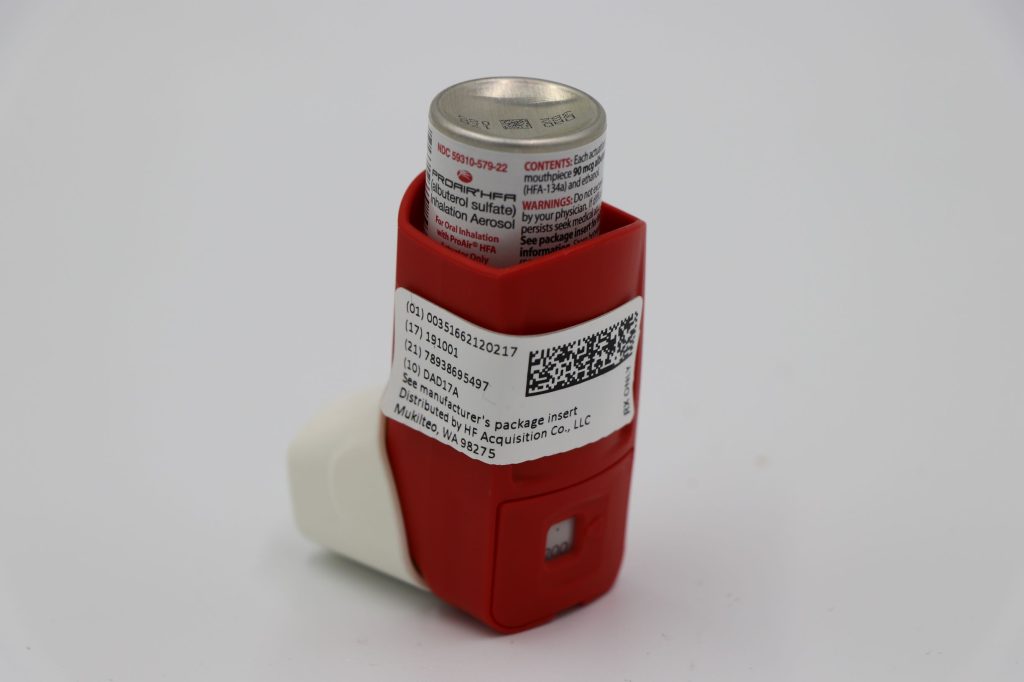
The lungs have a large surface area with an increased amount of blood flow, so medications are easily absorbed. Medications inhaled from the mouth into the lungs can be administered using a metered dose inhaler (MDI), a dry powder inhaler (DPI), or a small-volume nebulizer. A metered dose inhaler (MDI) provides a mist of medication that is inhaled through the mouth into the lungs. See Figure 16.5[8] for an image of an albuterol MDI. However, during inhalation from an MDI, small medication particles can get trapped on the tongue or aerosolize into the air and not make it into the lungs, so a spacer is optimally used for full absorption of medication.
A DPI is medication provided in a powder form that is inhaled from the mouth into the lungs using a quick breath to activate the medication and move it into the lungs from the inhaler. An example of Advair Diskus DPI is illustrated in Figure 16.6.[9]
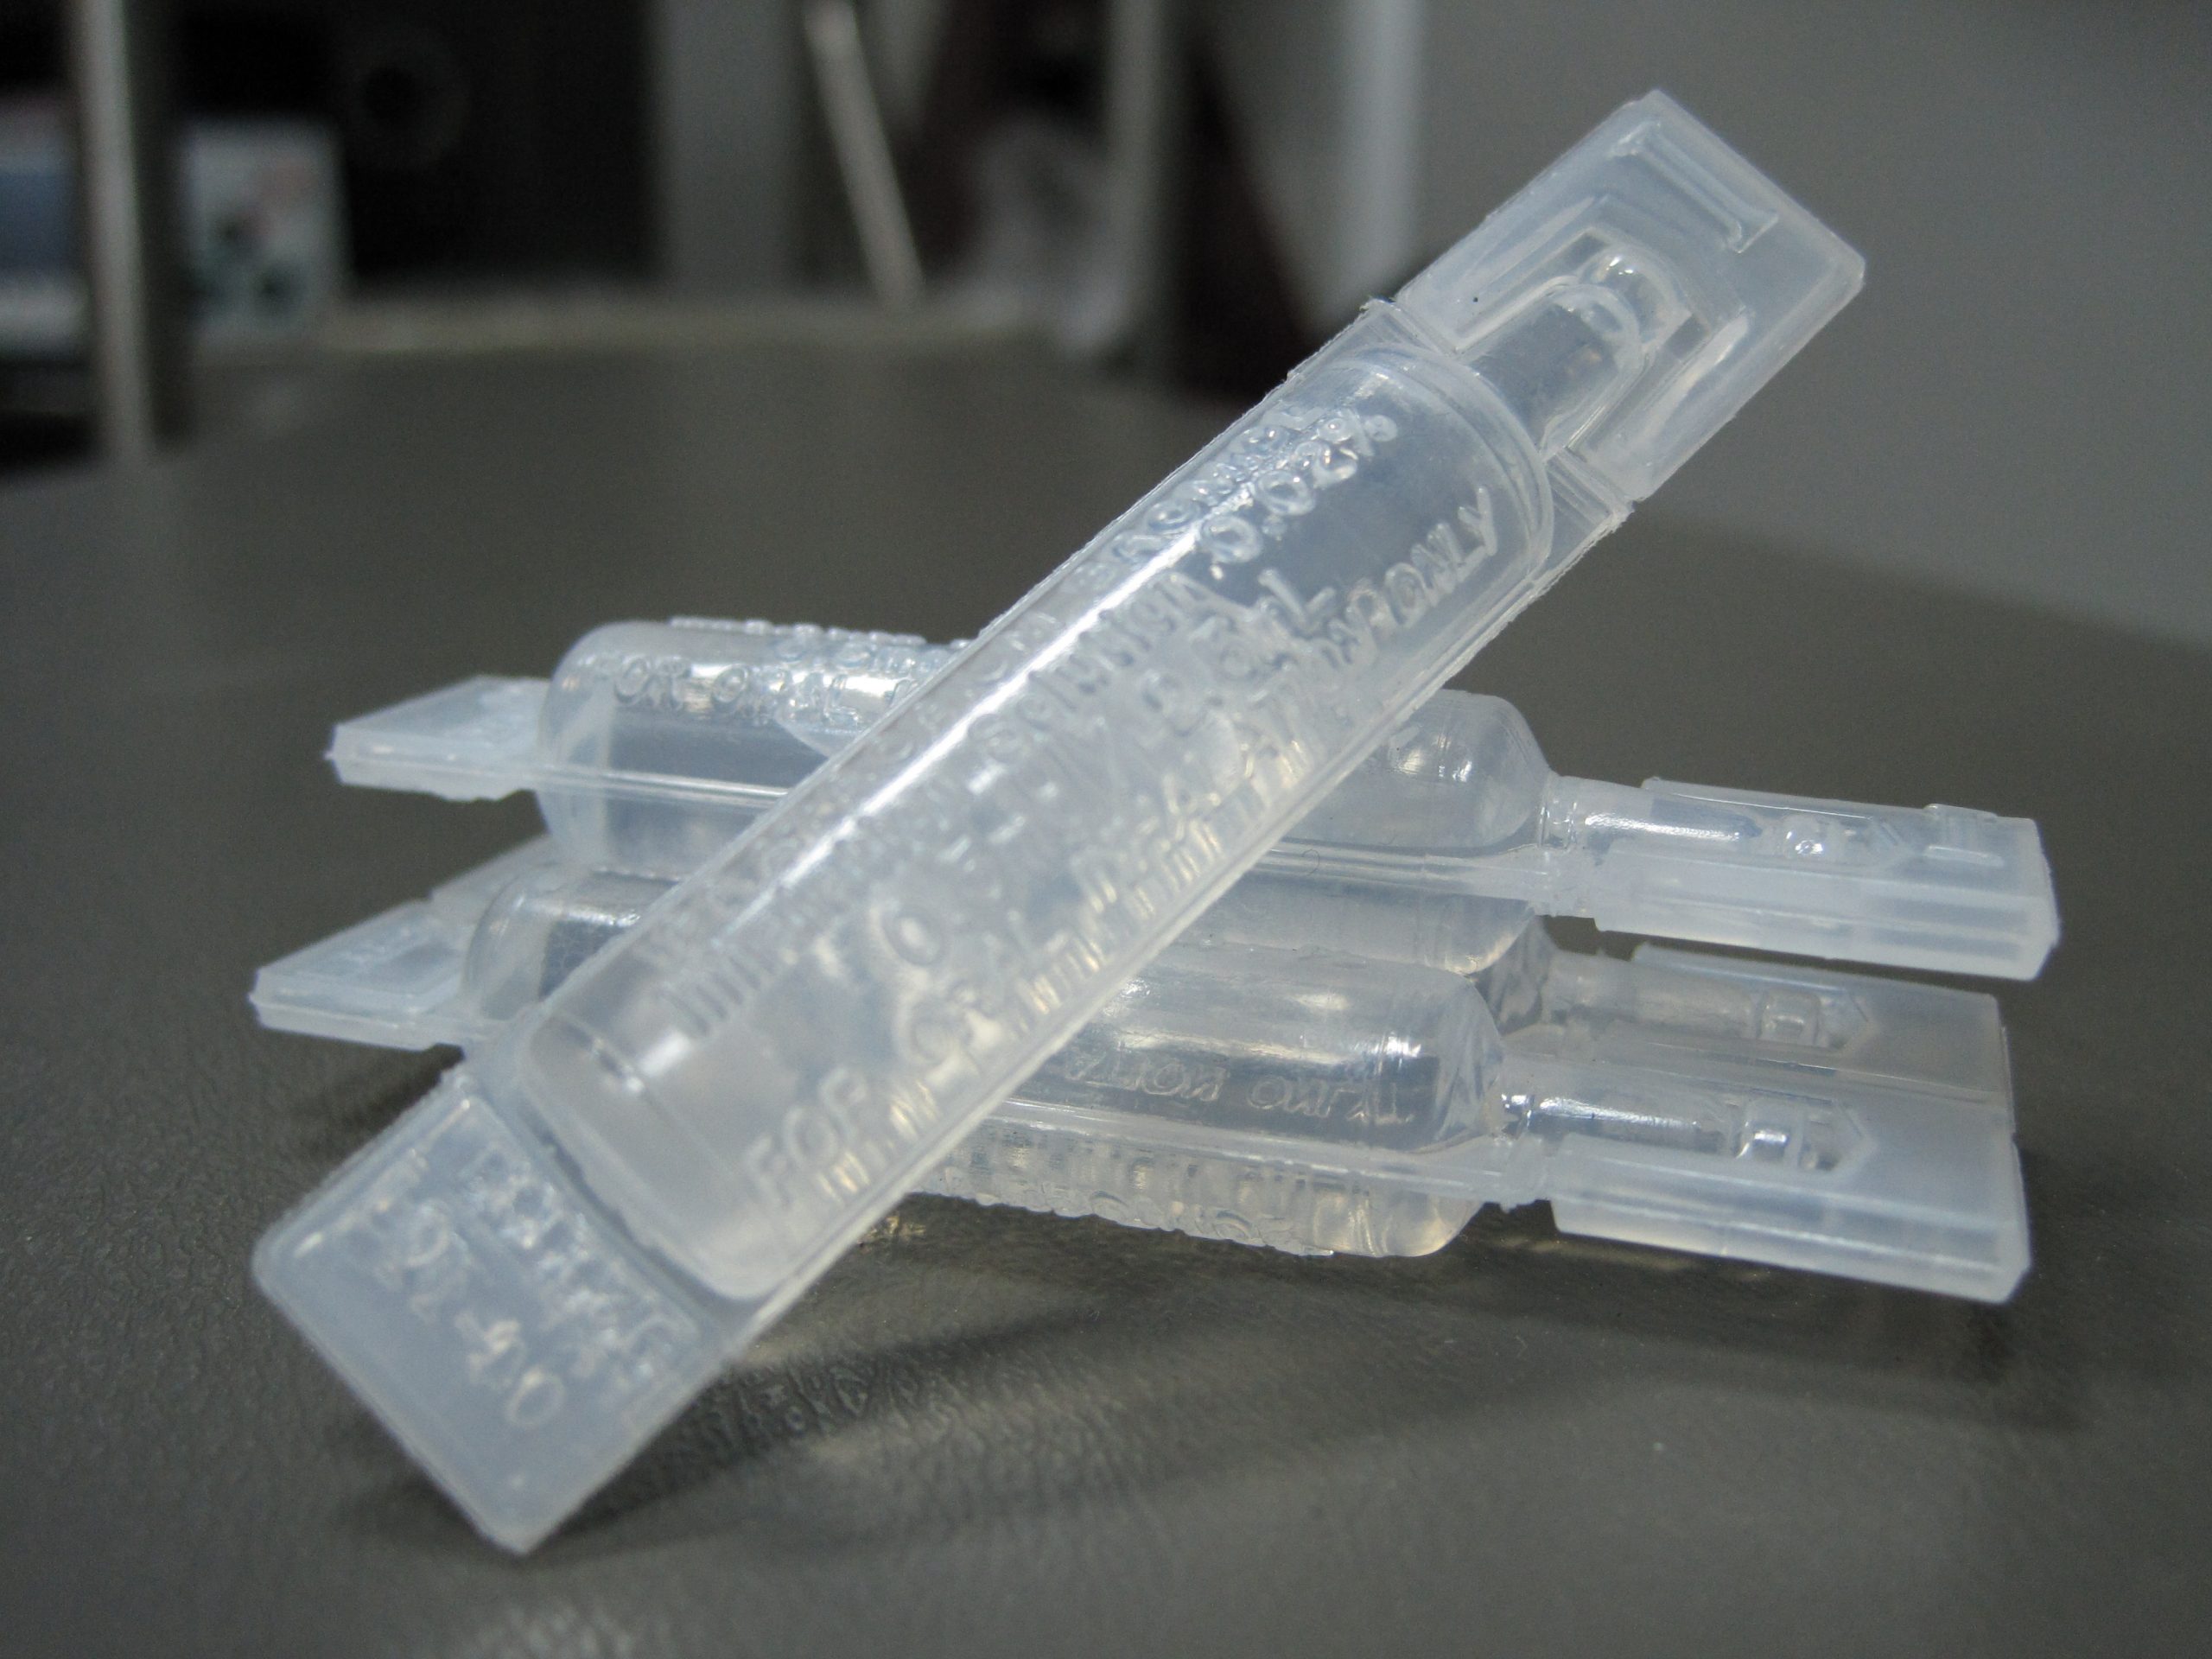
Hand-held, small-volume nebulizers provide a fine mist using oxygen or compressed air to transport the liquid medication from the nebulizer cup into the mouth and into the lungs as the patient breathes normally. See Figure 16.7[10] for an image of medication packaged for use with nebulizers.[11]

Before administering an inhaler, the nurse should perform hand hygiene and check medication rights as with all medication. If the patient is self-administering the medication, advise them to wash their hands. The patient’s respiratory system should be assessed and documented before and after the administration of inhaled medications, including assessment of respiratory rate, pulse oximetry, heart rate, and lung sounds.
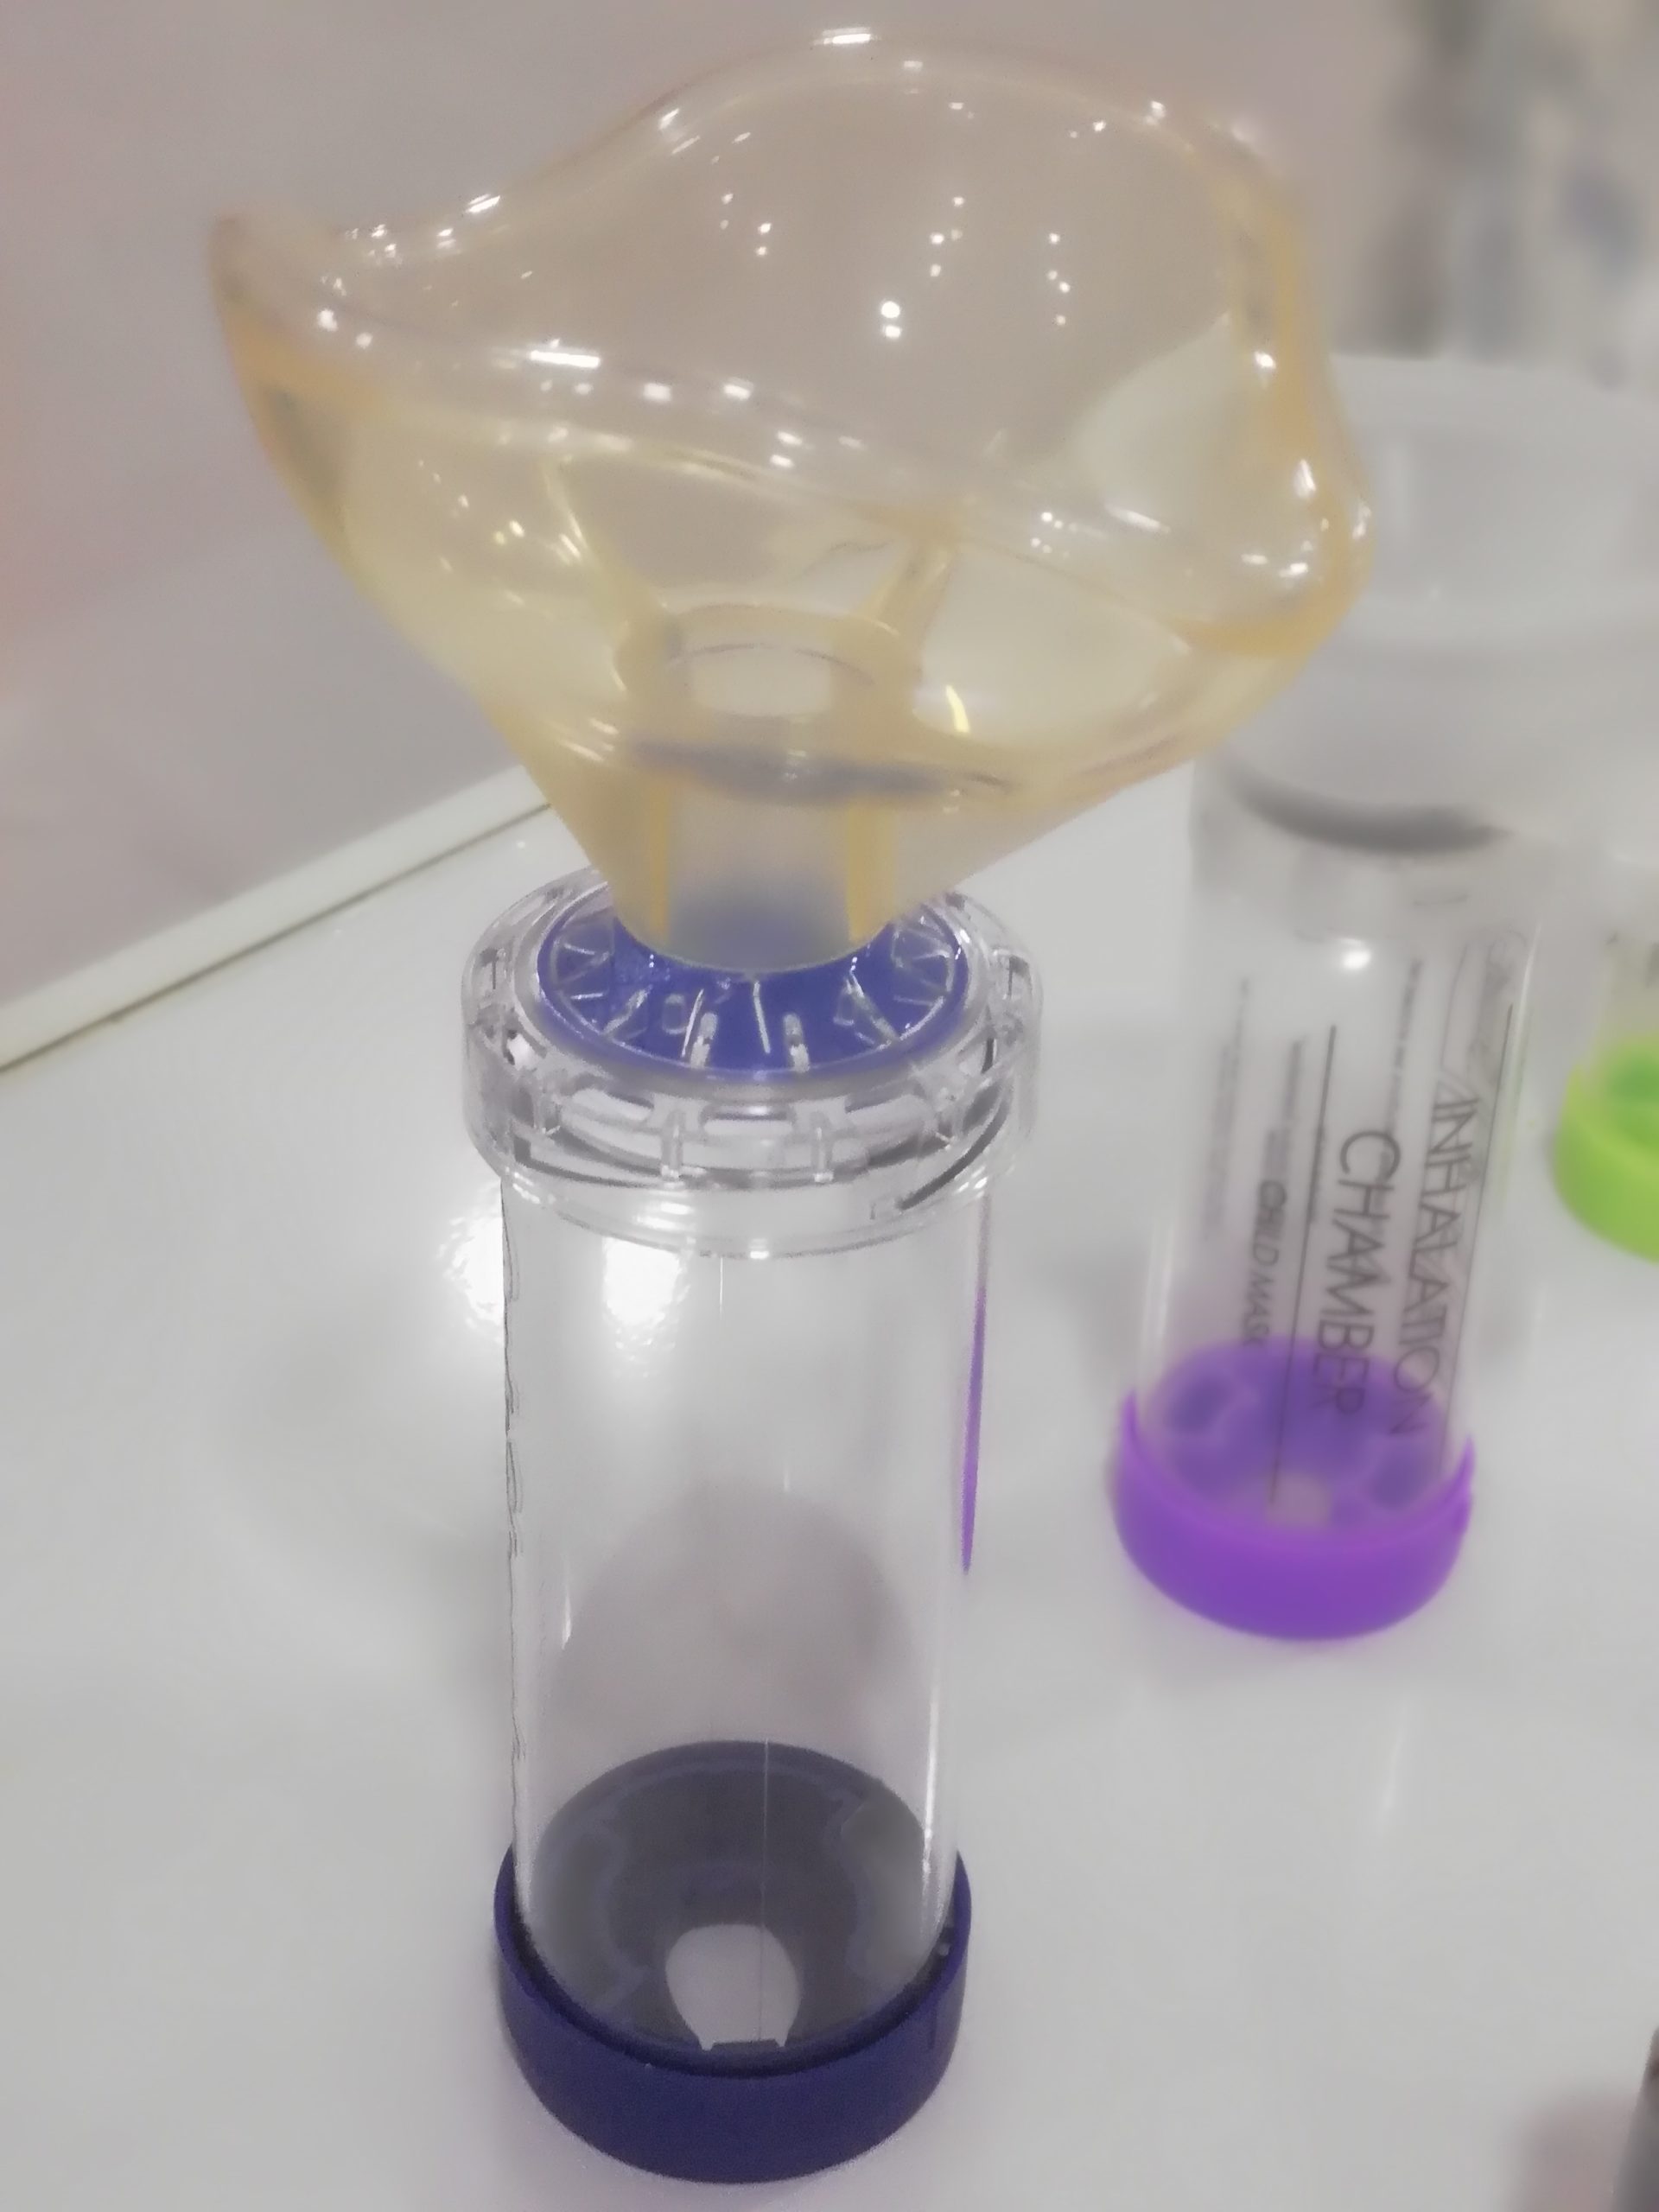
When administering an MDI, the nurse should shake the inhaler and add a spacer onto the mouthpiece. The use of spacers with MDIs is considered best practice because they help ensure the medication is inhaled rather than inadvertently placed in the mouth. They also reduce waste by ensuring the patient receives the full amount of medication. The patient should be instructed to exhale while placing the spacer’s mouthpiece into their mouth. The inhaler is depressed to move the aerosolized medication into the spacer, and the patient should breathe in normally through the spacer to receive the medication. If a spacer is not available, the patient should exhale and hold the inhaler mouthpiece about 1 to 2 inches away from their mouth to help ensure the medication is inhaled via the larynx and not sprayed onto the posterior pharynx. As the inhaler is depressed, the patient should inhale the medication deeply through their mouth and into their lungs. The patient should be advised to hold their breath for 5 to 10 seconds after inhaling the medication and then exhale through pursed lips. The patient should wait for 1 to 5 minutes between each puff of medication. When administering inhaled corticosteroids via MDI, the patient should rinse their mouth with water afterwards to prevent fungal infection. See Figure 6.7[12] for an image of a spacer with a mask used in inhaler therapy with children.
When using a DPI, the nurse should load the medication into the devices as required and then activate the inhaler per the manufacturer’s guidelines. The patient should be instructed to exhale and then place their lips around the mouthpiece and inhale strongly and deeply. After they have inhaled, they should hold their breath for 10 seconds or as long as comfortable and then exhale through pursed lips. The patient should wait 1 to 5 minutes between puffs of medication. If the DPI contains a corticosteroid medication, the patient should gargle and rinse with tap water to decrease the risk of developing a fungal infection.[13]
When using a small-volume nebulizer, the nurse pours the liquid medication into the medication cup of the nebulizer. When possible, the patient should be sitting or positioned in high Fowler’s position to enhance deep breaths and absorption of medication. The bottom end of the tubing is attached to the oxygen flowmeter, and the flow rate should be set between 6-10 L/minute, based on the manufacturer’s recommendations. The top end of the tubing is connected to either a nebulizer mask or mouthpiece. The patient should be instructed to inhale slowly through the device into their mouth and hold each breath for a slight pause before exhaling. Remain with the patient during the nebulizer treatment, which usually takes about 15 minutes. After treatment, the patient should be encouraged to cough and perform oral care. The patient’s respiratory system should be reevaluated after the administration of inhaled medications to document therapeutic effects, as well as to monitor for adverse effects.[14]
Inhalers should be cleaned after use per the manufacturer’s directions. Most MDI and DPI inhalers track how much medication is left in the canister. Patients should be advised to obtain refills of these medications before the inhaler runs out of doses.
Media Attributions
- DSC_17661
- Instilling_eye_medication
- DSC_2273
- Administering-med-vaginally-appliator
- image (2)
- image (3)
- Ipratropium_Bromide_(1)
- rpt
- “DSC_17661.jpg” by British Columbia Institute of Technology is licensed under CC BY 4.0. Access for free at https://opentextbc.ca/clinicalskills/chapter/administering-topical-medication/ ↵
- Institute for Safe Medication Practices. (2015). Transdermal patches and heat sources. NurseAdviseERR, 13(4). https://www.ismp.org/sites/default/files/attachments/2018-04/NurseAdviseERR201504.pdf ↵
- “Instilling eye medication” by British Columbia Institute of Technology is licensed under CC BY 4.0. Access for free at https://opentextbc.ca/clinicalskills/chapter/6-5-installing-eye-ear-and-nose-medications/ ↵
- RegisteredNurseRN. (2017, March 24). Eye drop administration nursing | Instill eye drops punctal occlusion for glaucoma [Video.] YouTube. All rights reserved. Video used with permission. https://youtu.be/TLhnsABDtco ↵
- “DSC_2273.jpg” by British Columbia Institute of Technology is licensed under CC BY 4.0. Access for free at https://opentextbc.ca/clinicalskills/chapter/6-5-installing-eye-ear-and-nose-medications/ ↵
- Djupesland, P. G. (2012). Nasal drug delivery devices: Characteristics and performance in a clinical perspective - a review. Drug Delivery and Translational Research, 3, 42-62. https://doi.org/10.1007/s13346-012-0108-9 ↵
- “Administering-med-vaginally-appliator.png” by British Columbia Institute of Technology is licensed under CC BY 4.0. Access for free at https://opentextbc.ca/clinicalskills/chapter/6-4-rectal-and-vaginal-medications/ ↵
- This work is derivative of “RESIZED+SERIALIZED+1202-1.jpg” courtesy of the U.S.National Library of Medicine. This image is included on the basis of Fair Use. ↵
- This work is a derivative of “advair-diskus-spl-graphic-16.jpg” courtesy of the U.S.National Library of Medicine. This image is included on the basis of Fair Use. ↵
- “Ipratropium_Bromide_(1).JPG” by Intropin is licensed under CC BY-SA 3.0 ↵
- Ari, A., & Restrepo, R. D. (2012). Aerosol delivery device selection for spontaneously breathing patients: 2012. Respiratory Care, 57(4), 613-626. http://rc.rcjournal.com/content/respcare/57/4/613.full.pdf ↵
- "Spacer_for_MDI_inhalers_therapy" by Ashashyou is licensed under CC BY-SA 3.0 ↵
- Ari, A., & Restrepo, R. D. (2012). Aerosol delivery device selection for spontaneously breathing patients: 2012. Respiratory Care, 57(4), 613-626. http://rc.rcjournal.com/content/respcare/57/4/613.full.pdf ↵
- Gregory, K. L., Wilken, L., & Hart, M. K. (2017). Pulmonary disease aerosol delivery devices: A guide for physicians, nurses, pharmacists, and other health care professionals (3rd ed.). American Association for Respiratory Care. https://www.aarc.org/wp-content/uploads/2018/03/aersol-guides-for-hcp.pdf ↵
- ARISE. (2016). Inhaler with spacer MVI_7500-ARISE.mp4 [Video]. Licensed under CC BY 3.0. https://youtu.be/-qNySzIGHWQ ↵
[latexpage]
Sometimes multi-step calculations are required, especially for medications used in critical care. There are many different ways to solve multi-step calculations, so it is important to select a method that works for you that is consistently accurate. Let’s practice a multi-step calculation for a medication supplied in mg/mL but is prescribed based on micrograms (mcg) per kilogram (kg) per minute, and the patient’s weight is provided in pounds.
Practice Problem: Multi-Step Calculations
Patient Information:
Name: Ideen Hanson, DOB: 09/29/19xx, Allergies: NKDA, Weight: 180 lbs
Diagnosis: Hypertension
Prescription: Begin initial infusion of Nipride at 0.5 mcg/kg/min
Medication Supplied: See Figure 5.20[1] for the drug label of the medication supplied.

Problem: What rate (in mL/hr) should the nurse set the pump to begin the infusion?
1. Set up the goal units to solve for, which is mL/hr.
\[
\frac{mL}{hr}~=
\]
2. Review the problem. The prescription is based on mcg/kg/min. Having three elements can create confusion when setting up the equation using dimensional analysis, so it can be easier to eliminate one element by doing some preliminary steps. First, convert the patient weight to kilograms (kg) by dividing 180 pounds/2.2= 81.8181 kg. Now multiply the micrograms (mcg) ordered by weight in kg to determine the amount of medication to administer per minute: 81.8181 x 0.5 mcg = 40.9090 mcg/minute. Use this information as you set up your problem.
3. Start by identifying the unit you are solving for, which is mL/hour. Then set up the first fraction. Match the numerator to mL. Look to the problem for information related to mL. On the drug label, we see that 50 mg of Nipride is supplied in 250 mL of D5W. Place 250 in the numerator, and then 50 mg in the denominator:
\[
\frac{mL}{Hr}~=~\frac{250~mL}{50~mg}
\]
4. Set up the second fraction with the intent to cross off mg by placing 1 mg in the numerator. Based on the known equivalency that 1000 mcg are equal to 1 mg, place 1000 mcg in the denominator:
\[
\frac{mL}{Hr} ~=~\frac{250~mL}{50~mg}~x~\frac{1~mg}{1000~mcg}
\]
5. Cross off mg diagonally. Set up the third equation with the intent to cross off mcg by placing it in the numerator. Place the information previously calculated, which was 40.9090 mcg/minute:
\[
\frac{mL}{Hr}~=~\frac{250~mL}{50~\cancel{mg}}~x~\frac{1~\cancel{mg}}{1000~mcg}~x~\frac{40.9090~mcg}{1~min}
\]
6. Cross off mcg diagonally. Set up the fourth fraction with the intent to cross off minutes. Based on the known equivalency of 60 minutes in 1 hour, place 60 in the numerator and 1 hour in the denominator:
\[
\frac{mL}{Hr} ~=~\frac{250~mL}{50~\cancel{mg}}~x~\frac{1~\cancel{mg}}{1000~\cancel{mcg}}~x~\frac{40.9090~\cancel{mcg}}{1~min}~x~\frac{60~min}{1~hour}~=~12.2727
\]
7. Cross off min diagonally. Review the equation to ensure the goal unit has been met. It has been met, so multiply across the numerators and the denominators, and then divide the final fraction:
\[
\frac{mL}{Hr}~=~\frac{250~mL}{50~\cancel{mg}}~x~\frac{1~\cancel{mg}}{1000~\cancel{mcg}}~x~\frac{40.9090~\cancel{mcg}}{1~\cancel{min}}~x~\frac{60~\cancel{min}}{1~hour}~=~12.2727
\]
8. Depending on the agency policy and available pump settings, round to 12.27 mL/hour.
View supplementary YouTube Videos on Multiple-Step Calculations That Commonly Occur With Heparin and Dopamine Drips:
Heparin Drip Calculations[2]
Dopamine Drip Calculations[3]
![]()
Test your clinical judgment with an NCLEX Next Generation-style question: Chapter 5, Assignment 1.
Learning Objectives
- Perform a neurological assessment, including mental status, cranial nerves, sensory function, motor strength, cerebellar function, and reflexes
- Modify assessment techniques to reflect variations across the life span
- Document actions and observations
- Recognize and report significant deviations from norms
The neurological system is a complex and intricate system that affects all body functions. A neurological assessment includes collecting subjective and objective data through an interview and detailed physical examination of the central nervous system and the peripheral nervous system. Let’s begin by reviewing the anatomy of the neurological system.
Routine assessment of a patient’s mental status by registered nurses includes evaluating their level of consciousness, as well as their overall appearance, general behavior, affect and mood, general speech, and cognitive performance.[4],[5] See the "General Survey Assessment" chapter for more information about an overall mental status assessment.
Level of Consciousness
Level of consciousness refers to a patient’s level of arousal and alertness.[6] Assessing a patient’s orientation to time, place, and person is a quick indicator of cognitive functioning. Level of consciousness is typically evaluated on admission to a facility to establish a patient’s baseline status and then frequently monitored every shift for changes in condition.[7] To assess a patient’s orientation status, ask, “What is your name? Where are you? What day is it?” If the patient is unable to recall a specific date, it may be helpful to ask them the day of the week, the month, or the season to establish a baseline of their awareness level.
A normal level of orientation is typically documented as, “Patient is alert and oriented to person, place, and time,” or by the shortened phrase, “Alert and oriented x 3.”[8] If a patient is confused, an example of documentation is, “Patient is alert and oriented to self, but disoriented to time and place.”
There are many screening tools that can be used to further objectively assess a patient’s mental status and cognitive impairment. Common screening tools used frequently by registered nurses to assess mental status include the Glasgow Coma Scale, the National Institutes of Health Stroke Scale (NIHSS), and the Mini-Mental State Exam (MMSE).
Glasgow Coma Scale
The Glasgow Coma Scale (GCS) is a standardized tool used to objectively assess and continually monitor a patient’s level of consciousness when damage has occurred, such as after a head injury or a cerebrovascular accident (stroke). See Figure 6.9[9] for an image of the Glasgow Coma Scale. Three primary areas assessed in the GCS include eye opening, verbal response, and motor response. Scores are added from these three categories to assign a patient's level of responsiveness. Scores ranging from 15 or higher are classified as the best response, less than 8 is classified as comatose, and 3 or less is classified as unresponsive.
![]"glasgow-coma-scale-gcs-600w-309293585.jpg" by joshya on Shutterstock. All rights reserved. Imaged used with purchased permission Chart, with illustrations and labels, listing the glasgow coma scale](https://opencontent.ccbcmd.edu/app/uploads/sites/30/2020/09/thumbnail_309293585-huge-1024x980.jpg)
National Institutes of Health Stroke Scale
The National Institutes of Health Stroke Scale (NIHSS) is a standardized tool that is commonly used to assess patients suspected of experiencing an acute cerebrovascular accident (i.e., stroke).[10] The three most predictive findings that occur during an acute stroke are facial drooping, arm drift/weakness, and abnormal speech. Use the box below to view the stroke scale.
A commonly used mnemonic regarding assessment of individuals suspected of experiencing a stroke is "BEFAST." BEFAST stands for Balance, Eyes, Face, Arm, and Speech Test.
- B: Does the person have a sudden loss of balance?
- E: Has the person lost vision in one or both eyes?
- F: Does the person's face look uneven?
- A: Is one arm weak or numb?
- S: Is the person's speech slurred? Are they having trouble speaking or seem confused?
- T: Time to call for assistance immediately
View the NIH Stroke Scale at the National Institutes of Health.
Mini-Mental Status Exam
The Mini-Mental Status Exam (MMSE) is commonly used to assess a patient’s cognitive status when there is a concern of cognitive impairment. The MMSE is sensitive and specific in detecting delirium and dementia in patients at a general hospital and in residents of long-term care facilities.[11] Delirium is acute, reversible confusion that can be caused by several medical conditions such as fever, infection, and lack of oxygenation. Dementia is chronic, irreversible confusion and memory loss that impacts functioning in everyday life.
Prior to administering the MMSE, ensure the patient is wearing their glasses and/or hearing aids, if needed.[12] A patient can score up to 30 points by accurately responding and following directions given by the examiner. A score of 24-30 indicates no cognitive impairment, 18-23 indicates mild cognitive impairment, and a score less than 18 indicates severe cognitive impairment. See Figure 6.10[13] for an image of one of the questions on the MMSE regarding interlocking pentagons.
Visit the Oxford Medical Education website for more information about the Mini-Mental Status Exam.
!["InterlockingPentagons.svg" by Jfdwolff [2] is licensed under CC BY-SA 3.0 Illustration of two overlapping pentagon shapes](https://opencontent.ccbcmd.edu/app/uploads/sites/30/2024/08/InterlockingPentagons.svg-1024x649.png)
When performing a comprehensive neurological exam, examiners may assess the functioning of the cranial nerves. When performing these tests, examiners compare responses of opposite sides of the face and neck. Instructions for assessing each cranial nerve are provided below.
Cranial Nerve I - Olfactory
Ask the patient to identify a common odor, such as coffee or peppermint, with their eyes closed. See Figure 6.11[14] for an image of a nurse performing an olfactory assessment.

Cranial Nerve II - Optic
Be sure to provide adequate lighting when performing a vision assessment.
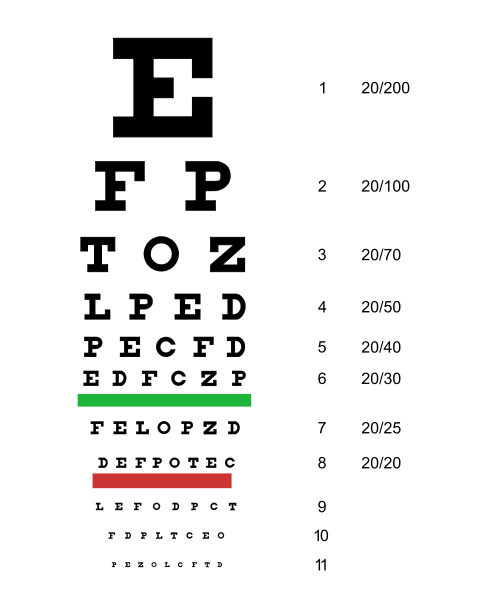
Far vision is tested using the Snellen chart. See Figure 6.12[15] for an image of a Snellen chart. The numerator of the fractions on the chart indicates what the individual can see at 20 feet, and the denominator indicates the distance at which someone with normal vision could see this line. For example, a result of 20/40 indicates this individual can see this line at 20 feet but someone with normal vision could see this line at 40 feet.
Test far vision by asking the patient to stand 20 feet away from a Snellen chart. Ask the patient to cover one eye and read the letters from the lowest line they can see.[16] Record the corresponding result in the furthermost right-hand column, such as 20/30. Repeat with the other eye. If the patient is wearing glasses or contact lens during this assessment, document the results as “corrected vision.” Repeat with each eye, having the patient cover the opposite eye. Alternative charts are available for children or adults who can’t read letters in English.
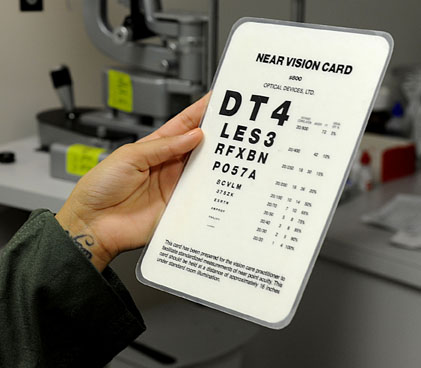
Near vision is assessed by having a patient read from a prepared card from 14 inches away. See Figure 6.13[17] for a card used to assess near vision.
Cranial Nerve III, IV, and VI - Oculomotor, Trochlear, Abducens
Cranial nerve III, IV, and VI (oculomotor, trochlear, abducens nerves) are tested together.
- Test eye movement by using a penlight. Stand 1 foot in front of the patient and ask them to follow the direction of the penlight with only their eyes. At eye level, move the penlight left to right, right to left, up and down, upper right to lower left, and upper left to lower right. Watch for smooth movement of the eyes in all fields. An unexpected finding is involuntary eye movement which may cause the eye to move rapidly from side to side, up and down, or in a circle, and may slightly blur vision referred to as nystagmus.
- Test bilateral pupils to ensure they are equally round and reactive to light and accommodation. Dim the lights of the room before performing this test.
- Pupils should be round and bilaterally equal in size. The diameter of the pupils usually ranges from two to five millimeters. Emergency clinicians often encounter patients with the triad of pinpoint pupils, respiratory depression, and coma related to opioid overuse.
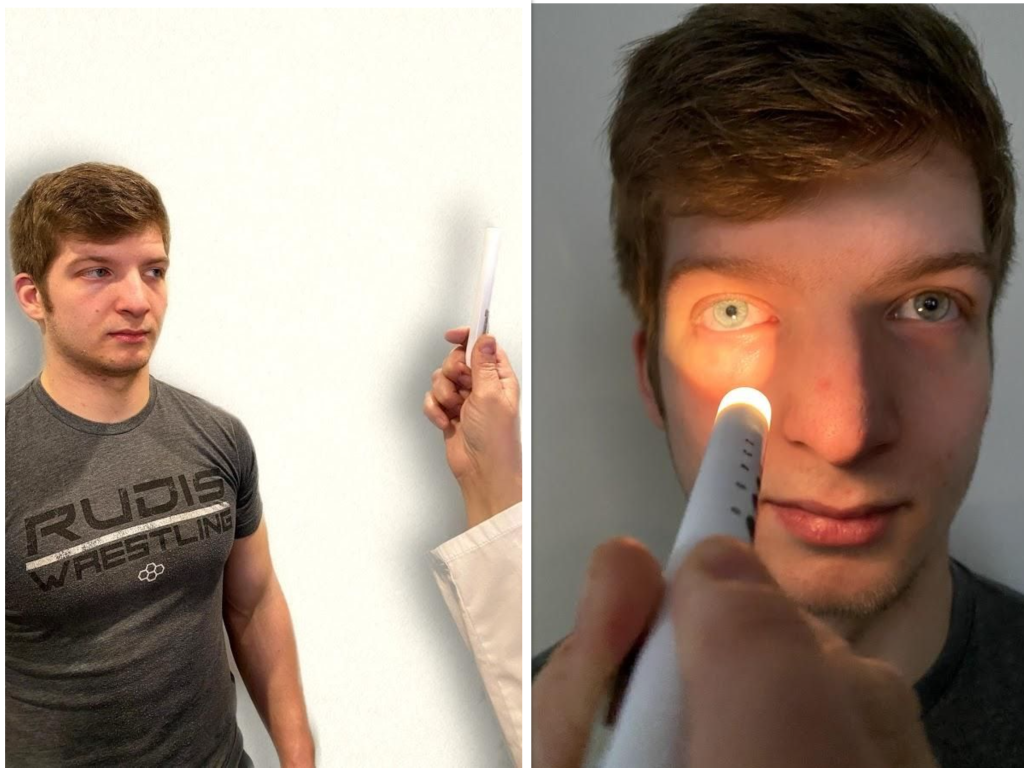
- Test pupillary reaction to light. Using a penlight, approach the patient from the side, and shine the penlight on one pupil. Observe the response of the lighted pupil, which is expected to quickly constrict. The pupil where you shine the light should constrict (direct reaction) and so should the other one (consensual reaction). Repeat by shining the light on the other pupil. Both pupils should react in the same manner to light. See Figure 6.14[18] for an image of a nurse assessing a patient’s pupillary reaction to light. An unexpected finding is when one pupil is larger than the other or one pupil responds more slowly than the other to light, which is often referred to as a “sluggish response.”
- Test eye convergence and accommodation. Recall that accommodation refers to the ability of the eye to adjust from near to far vision, with pupils constricting for near vision and dilating for far vision. Convergence refers to the action of both eyes moving inward as they focus on a close object using near vision. Ask the patient to look at a near object (4-6 inches away from the eyes), and then move the object out to a distance of 12 inches. Pupils should constrict while viewing a near object and then dilate while looking at a distant object, and both eyes should move together. See Figure 6.15[19] for an image of a nurse assessing convergence and accommodation.
- The acronym PERRLA is commonly used in medical documentation and refers to, "pupils are equal, round and reactive to light and accommodation."

Visit the National Library of Medicine's webpage for more details about assessing the Pupillary Light Reflex.
Cranial Nerve V - Trigeminal
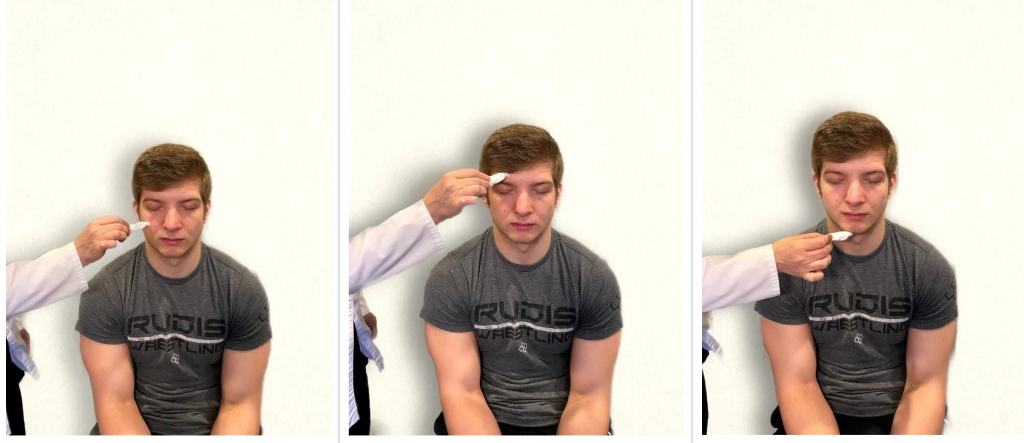
- Test sensory function. Ask the patient to close their eyes, and then use a wisp from a cotton ball to lightly touch their face, forehead, and chin. Instruct the patient to say “Now” every time they feel the placement of the cotton wisp. See Figure 6.16[21] for an image of assessing trigeminal sensory function. The expected finding is that the patient will report every instance the cotton wisp is placed. An advanced technique is to assess the corneal reflex in comatose patients by touching the cotton wisp to the cornea of the eye to elicit a blinking response.
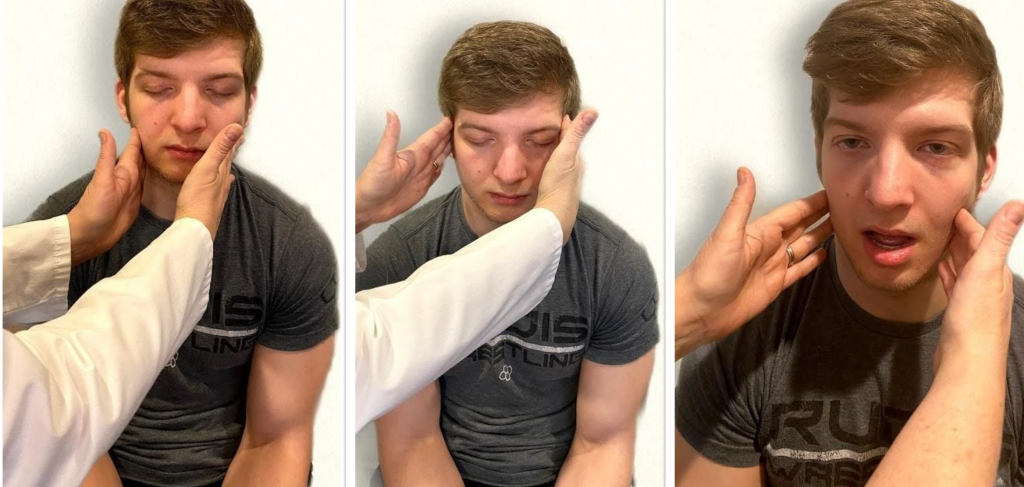
- Test motor function. Ask the patient to clench their teeth tightly while bilaterally palpating the temporalis and masseter muscles for strength. Ask the patient to open and close their mouth several times while observing muscle symmetry. See Figure 6.17[22] for an image of assessing trigeminal motor strength. The expected finding is the patient is able to clench their teeth and symmetrically open and close their mouth.
Cranial Nerve VII - Facial Nerve
- Test motor function. Ask the patient to smile, show teeth, close both eyes, puff cheeks, frown, and raise eyebrows. Look for symmetry and strength of facial muscles. See Figure 6.18[23] for an image of assessing motor function of the facial nerve.
- Test sensory function. Test the sense of taste by moistening three different cotton applicators with salt, sugar, and lemon. Touch the patient's anterior tongue with each swab separately, and ask the patient to identify the taste. See Figure 6.19[24] for an image of assessing taste.


Cranial Nerve VIII - Vestibulocochlear
- Test auditory function. Perform the whispered voice test. The whispered voice test is a simple test for detecting hearing impairment if done accurately. See Figure 6.20[25] for an image assessing hearing using the whispered voice test. Complete the following steps to accurately perform this test:
- Stand at arm's length behind the seated patient to prevent lip reading.
- Each ear is tested individually. The patient should be instructed to occlude the non-test ear with their finger.
- Exhale before whispering and use as quiet a voice as possible.
- Whisper a combination of numbers and letters (for example, 4-K-2), and then ask the patient to repeat the sequence.
- If the patient responds correctly, hearing is considered normal; if the patient responds incorrectly, the test is repeated using a different number/letter combination.
- The patient is considered to have passed the screening test if they repeat at least three out of a possible six numbers or letters correctly.
- The other ear is assessed similarly with a different combination of numbers and letters.
- Test balance. The Romberg test is used to test balance and is also used as a test for driving under the influence of an intoxicant. See Figure 6.21[26] for an image of the Romberg test. Ask the patient to stand with their feet together and eyes closed. Stand nearby and be prepared to assist if the patient begins to fall. It is expected that the patient will maintain balance and stand erect. A positive Romberg test occurs if the patient sways or is unable to maintain balance. The Romberg test is also a test of the body's sense of positioning (proprioception), which requires healthy functioning of the spinal cord.


Cranial Nerve IX - Glossopharyngeal
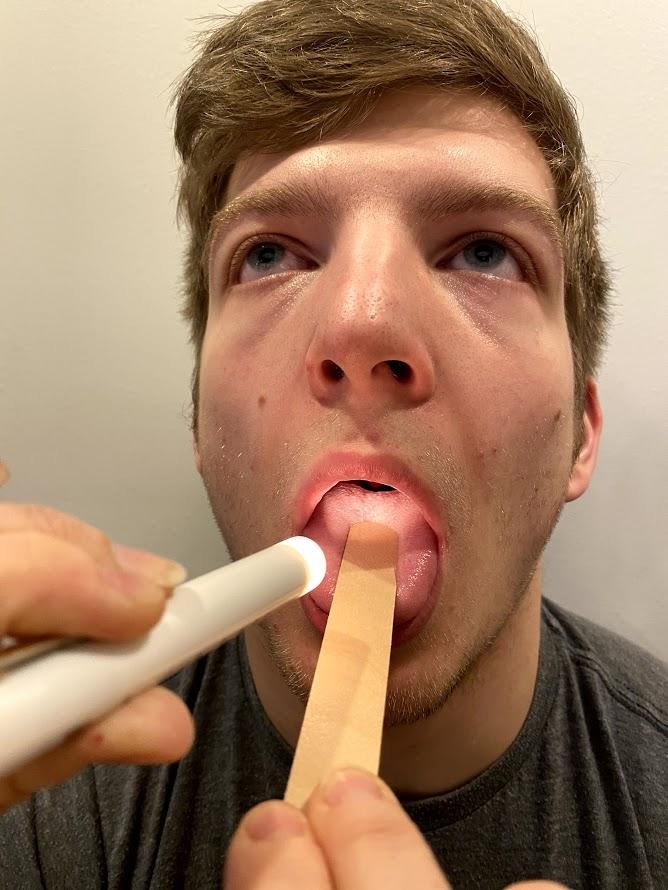
Ask the patient to open their mouth and say “Ah” and note symmetry of the upper palate. The uvula and tongue should be in a midline position and the uvula should rise symmetrically when the patient says "Ah." (See Figure 6.22.[27])
Cranial Nerve X - Vagus
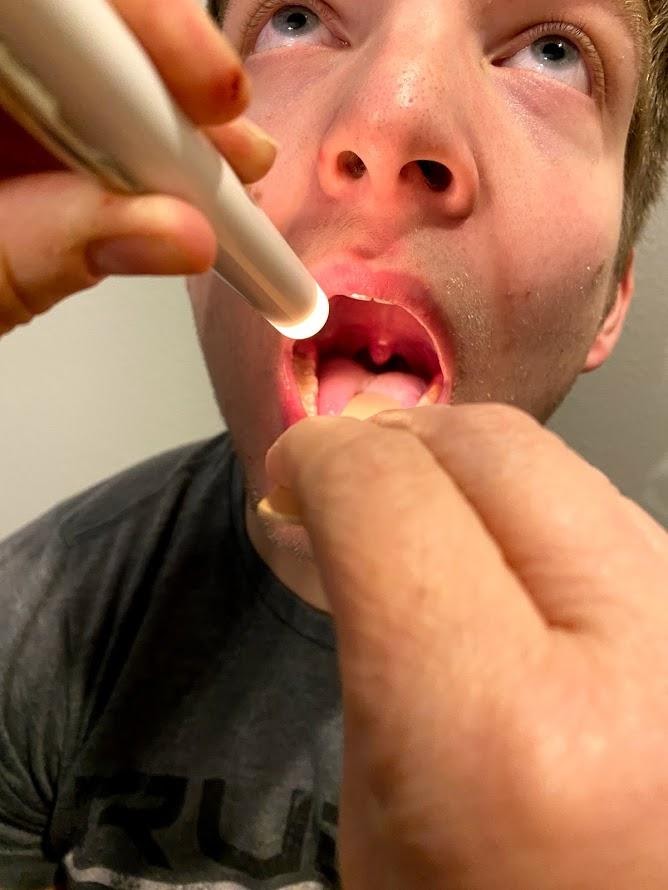
Use a cotton swab or tongue blade to touch the patient’s posterior pharynx and observe for a gag reflex followed by a swallow. The glossopharyngeal and vagus nerves work together for integration of gag and swallowing. See Figure 6.23[28] for an image of assessing the gag reflex.
Cranial Nerve XI - Spinal Accessory
Test the right sternocleidomastoid muscle. Face the patient and place your right palm laterally on the patient's left cheek. Ask the patient to turn their head to the left while resisting the pressure you are exerting in the opposite direction. At the same time, observe and palpate the right sternocleidomastoid with your left hand. Then reverse the procedure to test the left sternocleidomastoid.
Continue to test the sternocleidomastoid by placing your hand on the patient's forehead and pushing backward as the patient pushes forward. Observe and palpate the sternocleidomastoid muscles.
Test the trapezius muscle. Ask the patient to face away from you and observe the shoulder contour for hollowing, displacement, or winging of the scapula and observe for drooping of the shoulder. Place your hands on the patient's shoulders and press down as the patient elevates or shrugs the shoulders and then retracts the shoulders.[29] See Figure 6.24[30] for an image of assessing the trapezius muscle.

Cranial Nerve XII - Hypoglossal
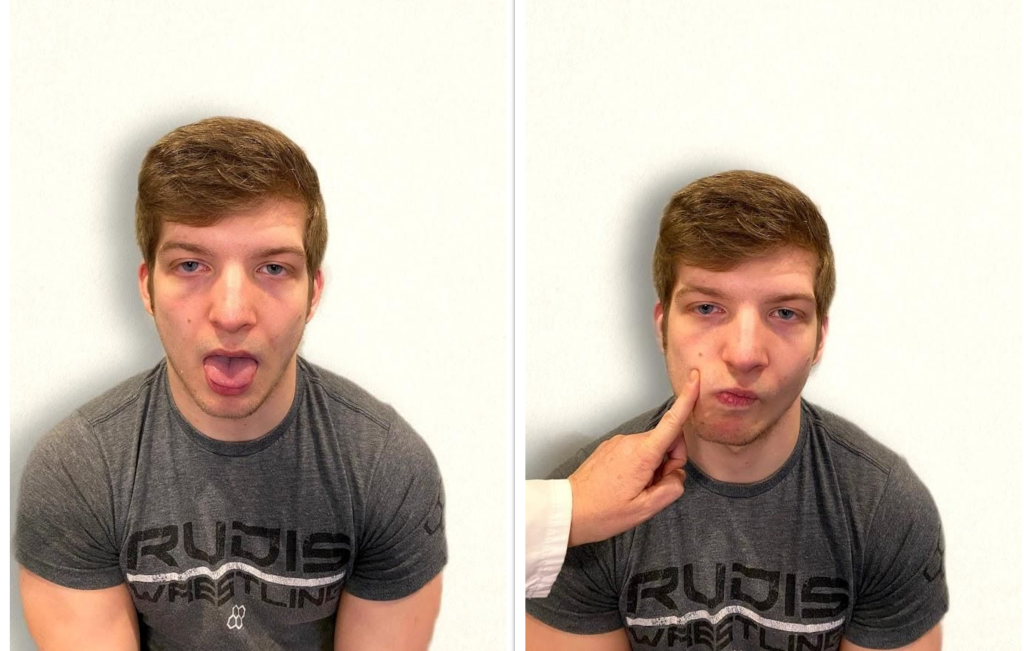
Ask the patient to protrude the tongue. If there is unilateral weakness present, the tongue will point to the affected side due to unopposed action of the normal muscle. An alternative technique is to ask the patient to press their tongue against their cheek while providing resistance with a finger placed on the outside of the cheek. See Figure 6.25[31] for an image of assessing the hypoglossal nerve.
Review of Cranial Nerve Assessment on YouTube[32]
Expected Versus Unexpected Findings
See Table 6.5 for a comparison of expected versus unexpected findings when assessing the cranial nerves.
Table 6.5 Expected Versus Unexpected Findings of an Adult Cranial Nerve Assessment
| Cranial Nerve | Expected Finding | Unexpected Finding (Dysfunction) |
|---|---|---|
| I. Olfactory | Patient is able to describe odor. | Patient has inability to identify odors (anosmia). |
| II. Optic | Patient has 20/20 near and far vision. | Patient has decreased visual acuity and visual fields. |
| III. Oculomotor | Pupils are equal, round, and reactive to light and accommodation. | Patient has different sized or reactive pupils bilaterally. |
| IV. Trochlear | Both eyes move in the direction indicated as they follow the examiner’s penlight. | Patient has inability to look up, down, inward, outward, or diagonally. Ptosis refers to drooping of the eyelid and may be a sign of dysfunction. |
| V. Trigeminal | Patient feels touch on forehead, maxillary, and mandibular areas of face and chews without difficulty. | Patient has weakened muscles responsible for chewing; absent corneal reflex; and decreased sensation of forehead, maxillary, or mandibular area. |
| VI. Abducens | Both eyes move in coordination. | Patient has inability to look side to side (lateral); patient reports diplopia (double vision). |
| VII. Facial | Patient smiles, raises eyebrows, puffs out cheeks, and closes eyes without difficulty; patient can distinguish different tastes. | Patient has decreased ability to taste. Patient has facial paralysis or asymmetry of face such as facial droop. |
| VIII. Vestibulocochlear (Acoustic) | Patient hears whispered words or finger snaps in both ears; patient can walk upright and maintain balance. | Patient has decreased hearing in one or both ears and decreased ability to walk upright or maintain balance. |
| IX. Glossopharyngeal | Gag reflex is present. | Gag reflex is not present; patient has dysphagia. |
| X. Vagus | Patient swallows and speaks without difficulty. | Slurred speech or difficulty swallowing is present. |
| XI. Spinal Accessory | Patient shrugs shoulders and turns head side to side against resistance. | Patient has inability to shrug shoulders or turn head against resistance. |
| XII. Hypoglossal | Tongue is midline and can be moved without difficulty. | Tongue is not midline or is weak. |

