5.11 Deep Vein Thrombosis
Open Resources for Nursing (Open RN)
Overview
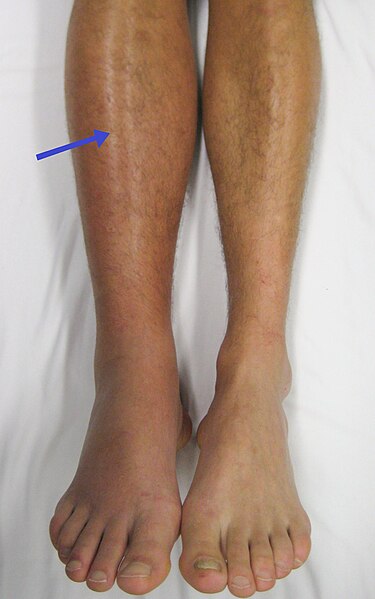
Deep vein thrombosis (DVT) is a clot that forms in a deep, peripheral vein. DVTs usually develop in the lower leg, thigh, or pelvis, but they can also occur in the arm.[1] See Figure 5.33[2] for an image of a DVT in the client’s right leg, indicated by unilateral redness and edema as compared to the left leg.

Three main pathophysiological mechanisms involved in the development of a DVT (often referred to as Virchow’s triad) are venous stasis, hypercoagulability, and injury to a vein.[3] Venous stasis refers to slow blood flow, often caused by immobility, medication therapies, and heart failure. Hypercoagulability may occur due to deficient fluid volume, pregnancy, oral contraceptive use, or smoking. Injury to a vein is often caused by major surgery (particularly the abdomen, pelvis, hips, or legs), fracture, or severe muscle injury. Venous wall damage may occur due to venipuncture, certain medications, trauma, and surgery. Chronic disease like cancer, heart disease, and lung disease can also increase the risk for developing DVTs, as well as other factors such as obesity, central venous access devices, inherited clotting disorders, and a previous history or family history of DVTs.[4],[5]
Assessment
The lower extremities of clients at risk for developing DVTs should be routinely assessed for unilateral extremity edema, redness, warmth, and calf pain. The bilateral extremities should be examined simultaneously because DVTs can initially cause minor signs that are easily missed. Although Homan’s sign was a traditional procedure used to assess for DVT, current research indicates it is not sensitive or specific for diagnosing DVT and is no longer considered a criterion for DVT.[6] Any signs or symptoms suspicious for DVT should be immediately communicated to the health care provider for urgent diagnostic testing.
Pulmonary emboli (PE) are a potential complication of a DVT and can develop quickly, even without noticeable symptoms of a DVT. A pulmonary embolism can occur when a clot from elsewhere in the body travels through venous circulation and gets lodged in the blood vessels of the lungs. This impedes blood flow, and impacted lung tissue dies. PEs are medical emergencies that require emergent treatment. Signs and symptoms of a PE include the following[7]:
- Sudden difficulty breathing
- Tachycardia and/or irregular heart rhythm
- Chest pain or discomfort, which usually worsens with a deep breath or coughing
- Hemoptysis (Coughing up blood)
- Very low blood pressure, lightheadedness, change in level of consciousness, or fainting
- Sudden anxiety
Diagnostic Testing
Diagnostic testing for a suspected DVT includes a D-dimer and a duplex ultrasound, with the results available within four hours if possible.[8]
- D-dimer is a blood test that is a marker for the presence of blood clots, specifically the breakdown products of fibrin that result from the dissolution of a blood clot. Elevated levels of D-dimer may suggest the presence of an active blood clotting process in the body. If the D-dimer test is negative, it means that the client probably does not have a DVT.[9],[10]
- Duplex ultrasonography is an imaging test that uses sound waves to look at the flow of blood in the veins. It can detect blockages or blood clots in the deep veins.[11]
If a PE is suspected, additional diagnostic testing is performed, such as a computed tomographic pulmonary angiography (CTPA), a special type of X-ray test that includes injection of contrast material into a vein to provide images of the blood vessels in the lungs.
Nursing Diagnosis
Nursing diagnoses for clients with a DVT that can form life-threatening emboli are based on the client’s assessment data, medical history, and specific needs. Nursing priorities of care include preventing pulmonary embolism, managing pain, administering anticoagulant therapy, and providing health teaching.
Nursing diagnoses guide the development of individualized care plans and interventions. Examples of nursing diagnoses related to DVT include the following[12]:
- Acute Pain
- Readiness for Enhanced Knowledge
- Risk for Impaired Tissue Perfusion
- Risk for Bleeding
Outcome Identification
Examples of outcome criteria for clients at risk for developing a DVT or PE are as follows:
- The client will not experience a DVT during hospitalization for other medical or surgical conditions.
- The client will not experience a pulmonary embolism, as evidenced by absence of dyspnea and chest pain.
Interventions
Medical Interventions
Medical interventions for DVTs typically include administration of anticoagulants. In severe or chronic cases, thrombolytic therapy, inferior vena cava filter, or surgery may be performed.
Medication Therapy
Anticoagulants
Anticoagulants reduce the ability of the blood to clot, preventing the clot from becoming larger while the body slowly reabsorbs it and reducing the risk of further clots developing. The most frequently used injectable anticoagulants are unfractionated heparin (administered intravenously), low-molecular weight heparin (LMWH), and fondaparinux (injected subcutaneously). Anticoagulants administered orally include warfarin, dabigatran, rivaroxaban, apixaban, and edoxaban.[13] All anticoagulants can cause excessive bleeding, so nurses must closely monitor for unusual bleeding and implement bleeding precautions to clients receiving anticoagulants. Nurses and providers monitor laboratory results to help ensure therapeutic levels of anticoagulation medication is administered. Clients are typically started on heparin injections and transitioned to coumadin to ensure that therapeutic impact is achieved more quickly.
Thrombolytics
Thrombolytics (commonly referred to as “clot busters”) work by dissolving the clot. They have a high risk of excessive bleeding compared to the anticoagulants, so they are prescribed for severe cases.[14] Tissue Plasminogen Activator (tPA), also known by the generic name alteplase, is administered intravenously to dissolve severe clots blocking tissue perfusion but are most commonly used to dissolve clots or emboli causing myocardial infarction, strokes, or pulmonary embolism.
Read more information about anticoagulants in the “Blood Coagulation Modifiers” section of the “Cardiovascular & Renal Systems” chapter in Open RN Nursing Pharmacology, 2e.
Surgical Interventions
Inferior Vena Cava Filter
When anticoagulants cannot be used or clients develop chronic cases of DVTs, a filter can be inserted inside the inferior vena cava to trap an embolus before it reaches the lungs.[15]
Thrombectomy/Embolectomy
In rare cases, a surgical procedure to remove the clot may be necessary for preservation of life or limb. Thrombectomy involves removal of the clot in a client with DVT, and embolectomy refers to removal of an embolus.[16]
Nursing Interventions
Nursing interventions primarily focus on preventing DVTs and PEs for clients who are at risk. If a DVT is diagnosed, nurses administer anticoagulants and analgesics, implement bleeding precautions, and monitor for excessive bleeding.
Nursing Interventions to Prevent DVTs
For hospitalized clients at risk, the following interventions are commonly implemented to prevent the development of a DVT[17]:
- Encourage early ambulation or frequent leg exercises in postoperative clients or those who are bed-bound.
- Apply mechanical measures to prevent venous stasis, as prescribed, such as sequential compression devices (SCDs) or compression stockings.
- Administer LMWH as prescribed to prevent the development of clots.
Health Teaching to Prevent DVTs
Nurses teach the following information to clients who are at risk for developing DVTs[18]:
- Move around as soon as possible after having been confined to bed, such as after surgery, illness, or injury.
- When sitting for long periods of time, such as when traveling for more than four hours, get up and walk around every one to two hours.
- Exercise your legs while you’re sitting by raising and lowering your heels while keeping your toes on the floor and tightening and releasing your leg muscles.
- Wear loose-fitting clothes.
- Reduce your risk by stopping smoking, maintaining a healthy weight, and avoiding a sedentary lifestyle.
If a DVT is diagnosed, nurses administer prescribed anticoagulants and manage discomfort by administering analgesics as needed, while continuing to monitor for signs and symptoms of a PE. Bleeding precautions are implemented for clients receiving anticoagulants with routine monitoring for signs and symptoms of excessive bleeding.
Review NIC interventions of bleeding precautions in the “Thrombocytopenia” section of the “Hematological Alterations” chapter.
Evaluation
During the evaluation stage, nurses determine the effectiveness of nursing interventions for a specific client. The previously identified expected outcomes are reviewed to determine if they were met, partially met, or not met by the time frames indicated. If outcomes are not met or only partially met by the time frame indicated, the nursing care plan is revised. Evaluation should occur every time the nurse implements interventions with a client, reviews updated laboratory or diagnostic test results, or discusses the care plan with other members of the interprofessional team.
![]() RN Recap: Deep Vein Thrombosis
RN Recap: Deep Vein Thrombosis
View a brief YouTube video overview of deep vein thrombosis[19]:
Media Attributions
- Deep_vein_thrombosis_of_the_right_leg
- RN Recap Icon
- Centers for Disease Control and Prevention. (2023, June 28). Venous thromboembolism. https://www.cdc.gov/ncbddd/dvt/facts.html ↵
- “Deep vein thrombosis of the right leg.jpg” by James Heilman, MD is licensed under CC BY-SA 3.0 ↵
- This work is a derivative of StatPearls by Waheed, Kudaravalli, & Hotwagner and is licensed under CC BY 4.0 ↵
- Martin, P. (2023, October 13). 9 Deep vein thrombosis care plans. NursesLabs. https://nurseslabs.com/deep-vein-thrombosis-nursing-care-plans/ ↵
- Centers for Disease Control and Prevention. (2023, June 28). Venous thromboembolism. https://www.cdc.gov/ncbddd/dvt/facts.html ↵
- Ambesh, P., Obiagwu, C., & Shetty, V. (2017). Homan's sign for deep vein thrombosis: A grain of salt? Indian Heart Journal, 69(3), 418–419. https://doi.org/10.1016/j.ihj.2017.01.013 ↵
- Centers for Disease Control and Prevention. (2023, June 28). Venous thromboembolism. https://www.cdc.gov/ncbddd/dvt/facts.html ↵
- Centers for Disease Control and Prevention. (2023, June 28). Venous thromboembolism. https://www.cdc.gov/ncbddd/dvt/facts.html ↵
- Mayo Clinic. (2022, January 15). Blood tests for heart disease. https://www.mayoclinic.org/diseases-conditions/heart-disease/in-depth/heart-disease/art-20049357 ↵
- Centers for Disease Control and Prevention. (2023, June 28). Venous thromboembolism. https://www.cdc.gov/ncbddd/dvt/facts.html ↵
- Centers for Disease Control and Prevention. (2023, June 28). Venous thromboembolism. https://www.cdc.gov/ncbddd/dvt/facts.html ↵
- Flynn Makic, M. B., & Martinez-Kratz, M. R. (2023). Ackley and Ladwig’s Nursing diagnosis handbook: An evidence-based guide to planning care (13th ed.). ↵
- Centers for Disease Control and Prevention. (2023, June 28). Venous thromboembolism. https://www.cdc.gov/ncbddd/dvt/facts.html ↵
- Centers for Disease Control and Prevention. (2023, June 28). Venous thromboembolism. https://www.cdc.gov/ncbddd/dvt/facts.html ↵
- Centers for Disease Control and Prevention. (2023, June 28). Venous thromboembolism. https://www.cdc.gov/ncbddd/dvt/facts.html ↵
- Centers for Disease Control and Prevention. (2023, June 28). Venous thromboembolism. https://www.cdc.gov/ncbddd/dvt/facts.html ↵
- National Blood Clot Alliance. (n.d.). Stop the clot, spread the word. https://www.stoptheclot.org/spreadtheword/ ↵
- Centers for Disease Control and Prevention. (2023, June 28). Venous thromboembolism. https://www.cdc.gov/ncbddd/dvt/facts.html ↵
- Open RN Project. (2024, June 23). Health Alterations - Chapter 5 - Deep vein thrombosis [Video]. You Tube. CC BY-NC 4.0 https://youtu.be/tDAGmwFDFfg?si=EgdLSHVyjJtoRcAF ↵
Practical Guidelines for a Balanced Diet
Creating a balanced diet involves choosing a variety of foods that provide all the essential nutrients in the right amounts.
- The Plate Method
The Plate Method is a simple visual guide to help balance meals:- Half the plate: Fruits and vegetables
- One-quarter of the plate: Lean protein (such as chicken, fish, beans)
- One-quarter of the plate: Whole grains (such as brown rice, whole wheat bread)
- Include a serving of dairy or a dairy alternative.
- Portion Control
Portion control is key to preventing overeating and maintaining a healthy weight. Use smaller plates, be mindful of portion sizes, and avoid eating directly from packages to help manage portions effectively. - Mindful Eating
Mindful eating involves paying attention to what and how you eat. It encourages eating slowly, savoring the flavors, and recognizing hunger and fullness cues. This practice can help prevent overeating and promote a healthier relationship with food. - Limit Processed Foods
Processed foods are often high in unhealthy fats, sugars, and sodium. Limiting these foods and focusing on whole, unprocessed foods can significantly improve overall nutrition and health outcomes.
A sterile field is established whenever a patient’s skin is intentionally punctured or incised, during procedures involving entry into a body cavity, or when contact with nonintact skin is possible (e.g., surgery or trauma). Surgical asepsis requires adherence to strict principles and intentional actions to prevent contamination and to maintain the sterility of specific parts of a sterile field during invasive procedures. Creating and maintaining a sterile field is foundational to aseptic technique and encompasses practice standards that are performed immediately prior to and during a procedure to reduce the risk of infection, including the following:
- Handwashing
- Using sterile barriers, including drapes and appropriate personal protective equipment
- Preparing the patient using an approved antimicrobial product
- Maintaining a sterile field
- Using aseptically safe techniques
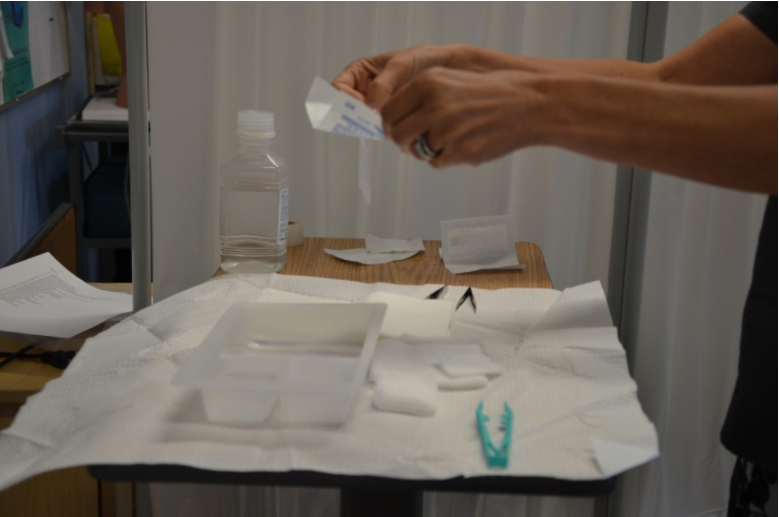
There are basic principles of asepsis that are critical to understand and follow when creating and maintaining a sterile field. The most basic principle is to allow only sterile supplies within the sterile field once it is established. This means that prior to using any supplies, exterior packaging must be checked for any signs of damage, such as previous exposure to moisture, holes, or tears. Packages should not be used if they are expired or if sterilization indicators are not the appropriate color. Sterile contents inside packages are dispensed onto the sterile field using the methods outlined below. See Figure 4.16[1] for an image of a nurse dispensing sterile supplies from packaging onto an established sterile field.

When establishing and maintaining a sterile field, there are other important principles to strictly follow:
- Disinfect any work surfaces and allow to them thoroughly dry before placing any sterile supplies on the surface.
- Be aware of areas of sterile fields that are considered contaminated:
- Any part of the field within 1 inch from the edge.
- Any part of the field that extends below the planar surface (i.e., a drape hanging down below the tray tabletop).
- Any part of the field below waist level or above shoulder level.
- Any supplies or field that you have not directly monitored (i.e., turned away from the sterile field or walked out of the room).
- Within 1 inch of any visible holes, tears, or moisture wicked from an unsterile area.
- When handling sterile kits and trays:
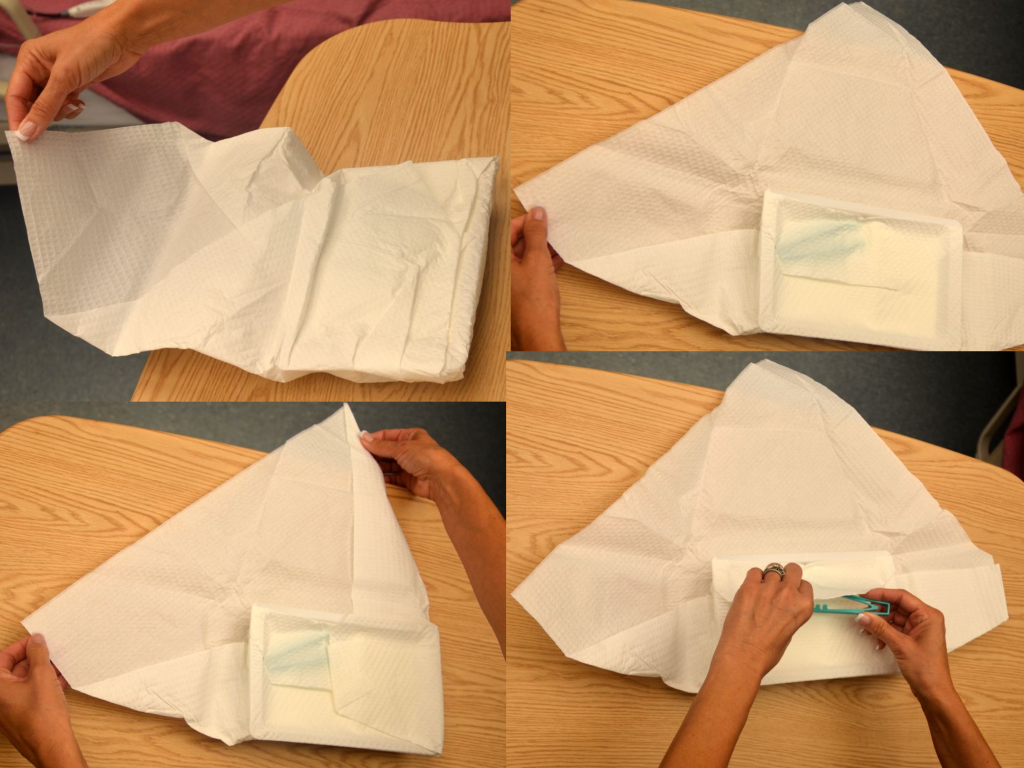
- Sterile kits and trays generally have an outer protective wrapper and four inner flaps that must be opened aseptically.
- Open sterile kits away from your body first, touching only the very edge of the opening flap.
- Using the same technique, open each of the side flaps one at a time using only one hand, being careful not to allow your body or arms to be directly above the opened drape. Take care not to allow already-opened corners to flip back into the sterile area again.
- Open the final flap toward you, being careful to not allow any part of your body to be directly over the field. See Figure 4.17[2] for images of opening the flaps of a sterile kit.
- If you must remove parts of the sterile kit (i.e., sterile gloves), reach into the sterile field with the elbow raised, using only the tips of the fingers before extracting. Pay close attention to where your body and clothing are in relationship to the sterile field to avoid inadvertent contamination.

- When dispensing sterile supplies onto a sterile field:
- Before dispensing sterile supplies to a sterile field, do not allow sterile items to touch any part of the outer packaging once it is opened, including the former package seal.
- Heavy or irregular items should be opened and held, allowing a second person with sterile gloves to transfer them to the sterile field.
- Wrapped sterile items should be opened similarly to a sterile kit. Tuck each flap securely within your palm, and then open the flap away from your body first. Then open each side flap; secure the flap in the palm one at a time and open. Finally, open the flap (closest to you) toward you, while also protecting the other opened flaps from springing back onto the wrapped item.
- Peel pouches (i.e., gloves, gauze, syringes, etc.) can be opened by firmly grasping each side of the sealed edge with the thumb side of each hand parallel to the seal and pulling carefully apart.
- Drop items from six inches away from the sterile field.
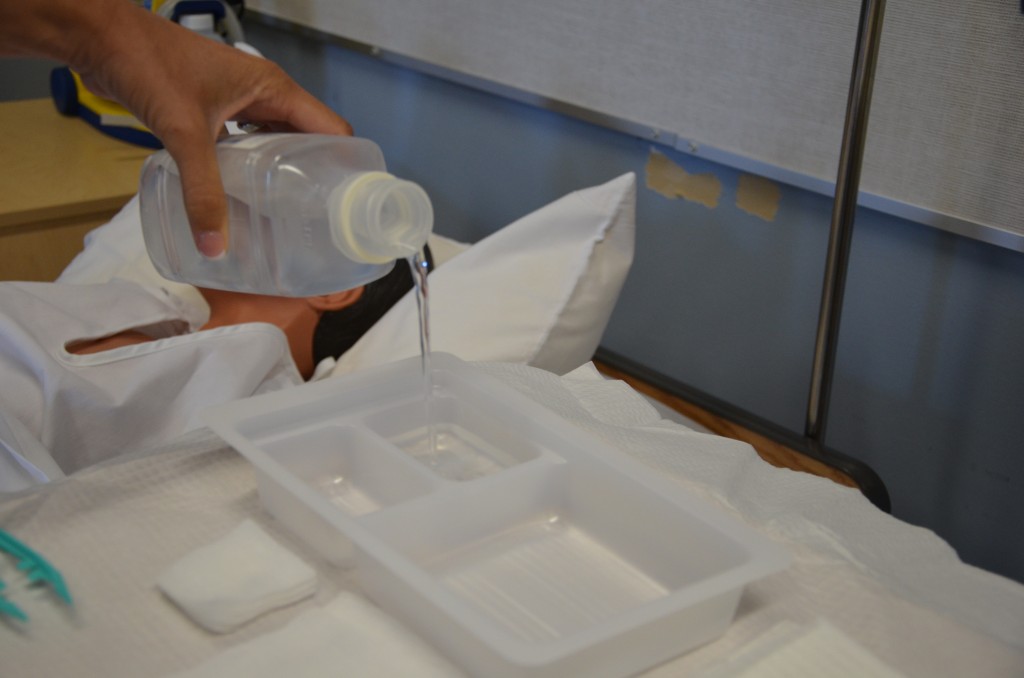
- Sterile solutions should be poured into a sterile bowl or tray from the side of the sterile field and not directly over it. Use only sealed, sterile, unexpired solutions when pouring onto a sterile field. Solution should be held six inches away from the field as it is being poured. Avoid splashing solutions because this allows wicking and transfer of microbes. After pouring of solution stops, it should not be restarted because the edge is considered contaminated. See Figure 4.18[3] of an image of a nurse pouring sterile solution into a receptacle in a sterile field before the procedure begins.
- Don sterile gloves away from the sterile field to avoid contaminating the sterile field.


