5.2 Review of Anatomy & Physiology of the Cardiovascular System
Open Resources for Nursing (Open RN)
Heart
Location of the Heart
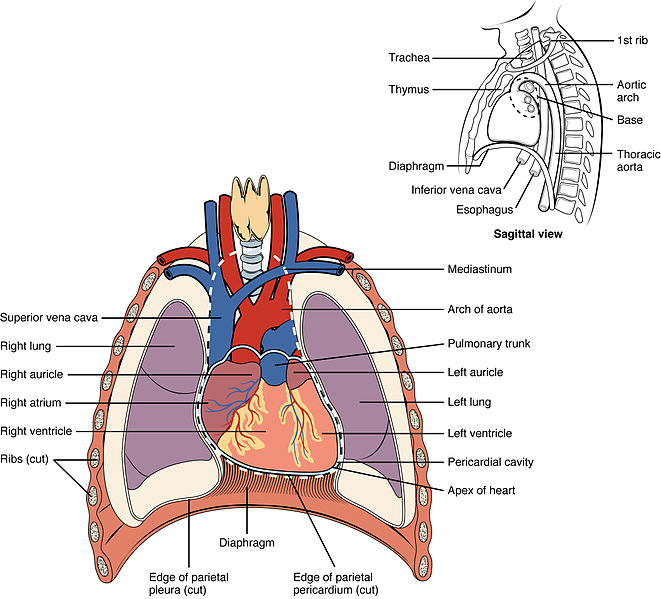
The human heart is located within the thoracic cavity, medially between the lungs in the space known as the mediastinum. The great veins, the superior and inferior venae cavae, and the great arteries, the aorta and pulmonary trunk, are attached to the superior surface of the heart, called the base. The base of the heart is located at the level of the third costal cartilage, as seen in Figure 5.1.[1] The inferior tip of the heart, the apex, lies just to the left of the sternum between the junction of the fourth and fifth ribs. It is important to remember the position of the heart when placing a stethoscope on the chest of a client and listening for heart sounds.[2]
Chambers and Circulation Through the Heart
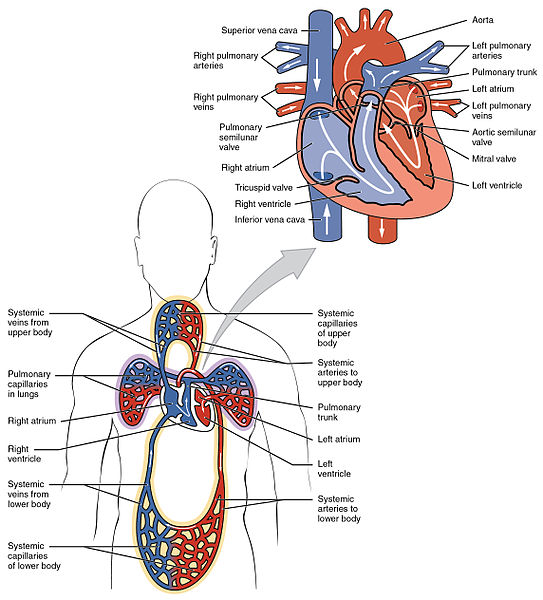
The heart consists of four chambers: two atria and two ventricles. The right atrium receives deoxygenated blood from the systemic circulation, and the left atrium receives oxygenated blood from the lungs. The atria contract to push blood into the lower chambers, the right ventricle and the left ventricle. The right ventricle contracts to push blood into the lungs, and the left ventricle is the primary pump that propels blood to the rest of the body.
There are two distinct but linked circuits in the human circulation called the pulmonary and systemic circuits. The pulmonary circuit transports blood to and from the lungs, where it picks up oxygen and delivers carbon dioxide for exhalation. The systemic circuit transports oxygenated blood to virtually all of the tissues of the body and returns deoxygenated blood and carbon dioxide to the heart to be sent back to the pulmonary circulation. See Figure 5.2[3] for an illustration of blood flow through the heart and blood circulation throughout the body.[4]
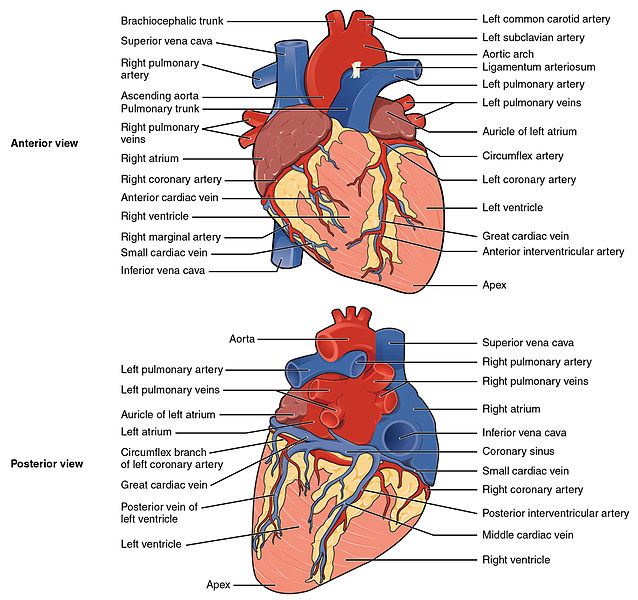
Blood also circulates through the coronary arteries with each beat of the heart. The left coronary artery distributes blood to the left side of the heart, and the right coronary distributes blood to the right atrium, portions of both ventricles, and the heart conduction system. See Figure 5.3[5] for an illustration of the coronary arteries. When a client has a myocardial infarction, a blood clot lodges in one of these coronary arteries that perfuse the heart tissue. If a significant area of muscle tissue dies from lack of perfusion, the heart is no longer able to pump.
Conduction System of the Heart
Contractions of the heart are stimulated by the electrical conduction system. The components of the cardiac conduction system include the sinoatrial (SA) node, the atrioventricular (AV) node, the bundle of His, the left and right bundle branches, and the Purkinje fibers. See Figure 5.4[6] for an image of the conduction system of the heart.
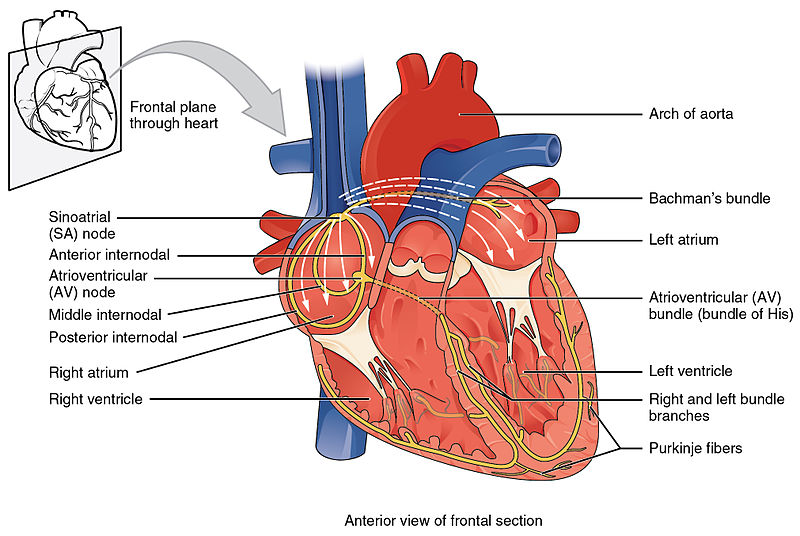
Normal cardiac rhythm is established by the sinoatrial (SA) node. The SA node has an intrinsic rate of 60-100 beats per minute and is known as the pacemaker of the heart. It initiates the sinus rhythm or normal electrical pattern followed by contraction of the heart. The SA node initiates the action potential, which sweeps across the atria through the AV node to the bundle branches and Purkinje fibers, and then spreads to the contractile fibers of the ventricle to stimulate the contraction of the ventricle.[7]
Cardiac Conductive Cells
Sodium (Na), potassium (K), and calcium (Ca2) ions play critical roles in cardiac conduction. Conductive cells contain a series of sodium ion channels that allow influx of sodium ions that cause the membrane potential to rise slowly and eventually cause spontaneous depolarization. Calcium ion channels open and Ca2 enters the cell, further depolarizing it. As the calcium ion channels then close, the K channels open, resulting in repolarization. When the membrane potential reaches approximately −60 mV, the K channels close and Na channels open, and the prepotential phase begins again. This phenomenon explains the autorhythmicity properties of cardiac muscle. Calcium ions play two critical roles in the physiology of cardiac muscle: conduction and contraction. In addition to depolarization, calcium ions also cause myosin to form cross bridges with the muscle cells that then provide the power stroke of contraction. Medications called calcium channel blockers thus affect both the conduction and contraction roles of calcium in the heart.[8]
Focus on Clinical Practice: The ECG
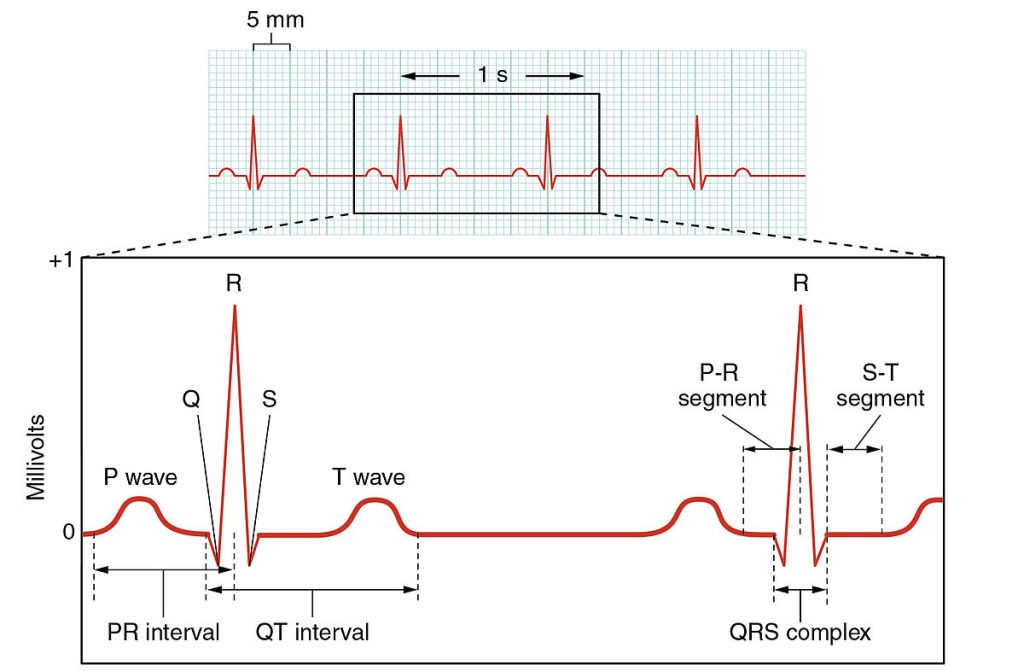
Surface electrodes placed on specific anatomical sites on the body can record the heart’s electrical signals. This tracing of the electrical signal is called an electrocardiogram (ECG), also historically abbreviated EKG. Careful analysis of an ECG reveals a detailed picture of both normal and abnormal heart function and is an indispensable clinical diagnostic tool. A normal ECG tracing is presented in Figure 5.5.[9] Each component, segment, and interval is labeled and corresponds to important electrical events.
There are five prominent components of the ECG: the P wave; the Q, R, and S components; and the T wave. The small P wave represents the depolarization of the atria. The large QRS complex represents the depolarization of the ventricles, which requires a much stronger impulse because of the larger size of the ventricular cardiac muscle. The ventricles begin to contract as the QRS reaches the peak of the R wave. Lastly, the T wave represents the repolarization of the ventricle. Several cardiac disorders can cause an altered conduction of the electrical signal through the heart, resulting in an abnormal rate or rhythm called dysrhythmia (also called arrhythmia).[10]
Cardiac Cycle
The period of time that begins with contraction of the atria and ends with ventricular relaxation is known as the cardiac cycle. The period of contraction that the heart undergoes while it pumps blood into circulation is called systole. The period of relaxation that occurs as the chambers fill with blood is called diastole.
Phases of the Cardiac Cycle
At the beginning of the cardiac cycle, both the atria and ventricles are relaxed, referred to as diastole. During diastole, blood flows into the right atrium from the superior and inferior venae cavae and into the left atrium from the four pulmonary veins. Contraction of the atria follows depolarization, which is represented by the P wave of the ECG. Just prior to atrial contraction, the ventricles contain approximately 130 mL of blood in a resting adult. This volume is known as the end diastolic volume or preload. As the atrial muscles contract, pressure rises within the atria, and blood is pumped into the ventricles.
Ventricular systole follows the depolarization of the ventricles and is represented by the QRS complex in the ECG. During the ventricular ejection phase, the contraction of the ventricular muscle causes blood to be pumped out of the heart. This quantity of blood is referred to as stroke volume (SV). Ventricular relaxation, or diastole, follows repolarization of the ventricles and is represented by the T wave of the ECG.[11]
Cardiac Output
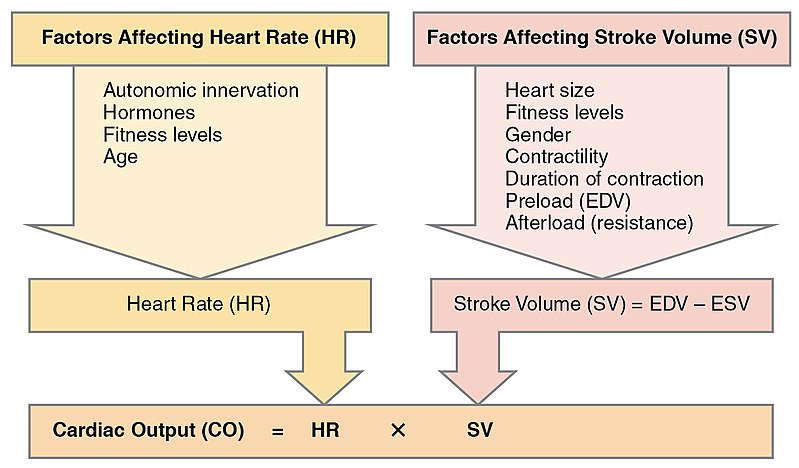
Cardiac output (CO) is a measurement of the amount of blood pumped by each ventricle in one minute. To calculate this value, multiply stroke volume (SV), the amount of blood pumped by the left ventricle, by the heart rate (HR) in beats per minute. It can be represented mathematically by the following equation: CO = HR × SV. Factors influencing CO are summarized in Figure 5.6[12] and include autonomic innervation by the sympathetic and parasympathetic nervous systems, hormones such as epinephrine, preload, contractility, and afterload. Each of these factors is further discussed below.[13] SV is also used to calculate ejection fraction, which is the portion of the blood that is pumped or ejected from the heart with each contraction.
Heart Rate
Heart rate (HR) can vary considerably, not only with exercise and fitness levels, but also with age. Newborn resting HRs may be 120 -160 bpm. HR gradually decreases until young adulthood and then gradually increases again with age. For an adult, normal resting HR will be in the range of 60–100 bpm. Bradycardia is the condition in which resting rate drops below 60 bpm, and tachycardia is the condition in which the resting rate is above 100 bpm.
Correlation Between Heart Rate and Cardiac Output
Conditions that cause increased HR also trigger an initial increase in SV. However, as the HR rises, there is less time spent in diastole and, consequently, less time for the ventricles to fill with blood. As HR continues to increase, SV gradually decreases due to less filling time. In this manner, tachycardia will eventually cause decreased cardiac output.
Autonomic Nervous Stimulation
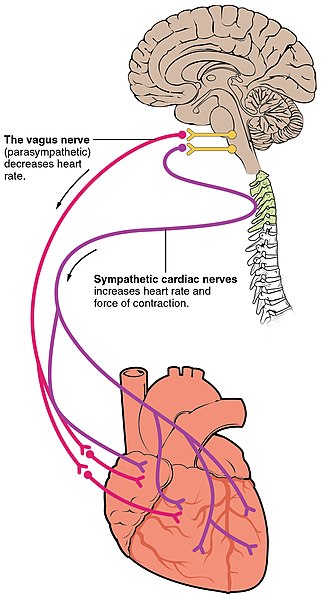
Sympathetic stimulation increases the heart rate and contractility, whereas parasympathetic stimulation decreases the heart rate. See Figure 5.7 for an illustration of the ANS stimulation of the heart.[14] Sympathetic stimulation causes the release of the neurotransmitter norepinephrine (NE), which shortens the repolarization period, thus speeding the rate of depolarization and contraction and increasing the HR. It also opens sodium and calcium ion channels, allowing an influx of positively charged ions.
NE binds to the Beta-1 receptor. Some cardiac medications (for example, beta-blockers) work by blocking these receptors, thereby slowing HR and lowering blood pressure. However, an overdose of beta-blockers can lead to bradycardia and even stop the heart.[15]
Stroke Volume
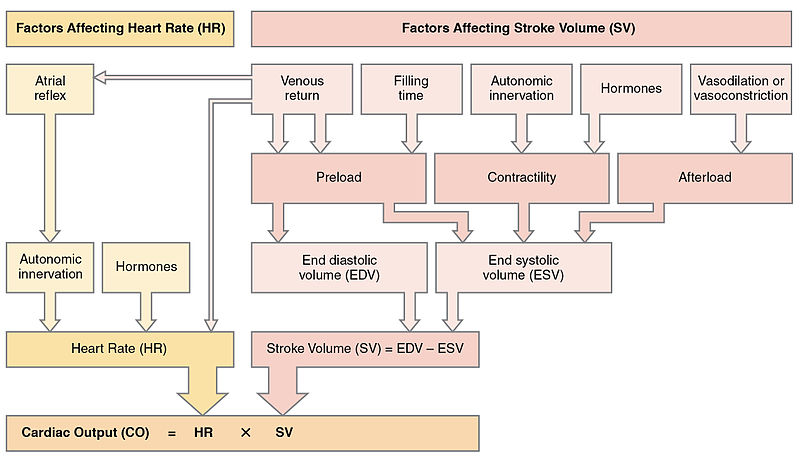
Many of the same factors that regulate HR also impact cardiac function by altering SV. Three primary factors that affect stroke volume are preload, or the stretch on the ventricles prior to contraction; contractility, or the force or strength of the contraction itself; and afterload, the force the ventricles must generate to pump blood against the resistance in the vessels. Many cardiovascular medications affect cardiac output by affecting preload, contractility, or afterload.[16]
Preload
Preload reflects the degree of myocardial stretch of muscle tissue at the end of diastole and before contraction. Preload is another way of describing end diastolic volume (EDV). Therefore, the greater the EDV is, the greater the preload is. One of the primary factors to consider is filling time, the duration of ventricular diastole during which filling occurs. Any sympathetic stimulation to the venous system will also increase venous return to the heart, which contributes to ventricular filling and preload. Medications such as diuretics decrease preload by causing the kidneys to excrete more water, thus decreasing blood volume.
Contractility
Contractility refers to the force of the contraction of the heart muscle, which controls SV. Factors that increase contractility are described as positive inotropic factors, and those that decrease contractility are described as negative inotropic factors.
Not surprisingly, sympathetic stimulation is a positive inotrope, whereas parasympathetic stimulation is a negative inotrope. The drug digoxin is used to lower HR and increase the strength of the contraction. It works by inhibiting the activity of an enzyme (ATPase) that controls movement of calcium, sodium, and potassium into heart muscle. Inhibiting ATPase increases calcium in heart muscle and, therefore, increases the force of heart contractions.
Negative inotropic agents include hypoxia, acidosis, hyperkalemia, and a variety of medications such as beta-blockers and calcium channel blockers.
Afterload
Afterload refers to the force that the ventricles must develop to pump blood effectively against the resistance in the vascular system. Any condition that increases resistance requires a greater afterload to force open the semilunar valves and pump the blood, which decreases cardiac output. On the other hand, any decrease in resistance reduces the afterload and then increases cardiac output. Figure 5.8[17] summarizes the major factors influencing cardiac output. Calcium channel blockers such as amlodipine, verapamil, nifedipine, and diltiazem can be used to reduce afterload and increase cardiac output.[18]
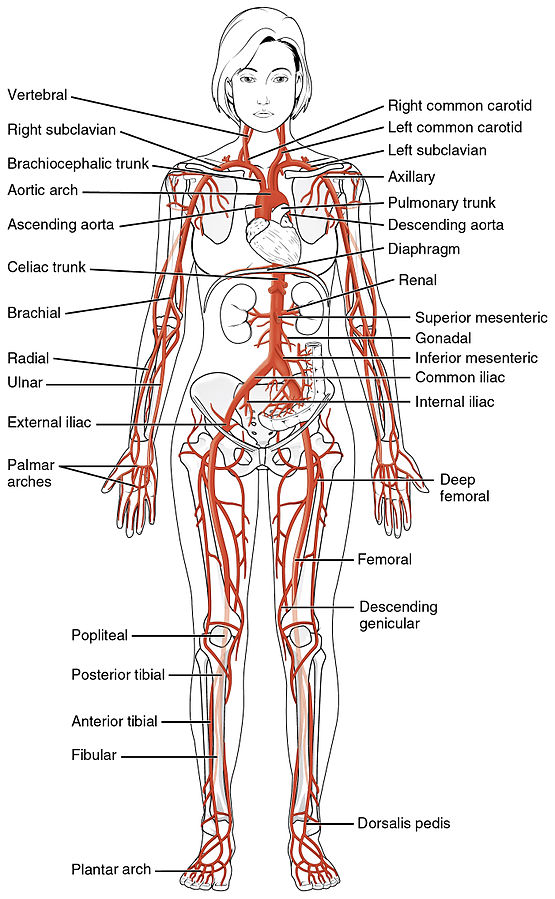
After blood is pumped out of the left ventricle into the aorta, it is carried through the body via the systemic arteries. An artery is a blood vessel that carries blood away from the heart, where it branches into ever-smaller arterioles and eventually into tiny capillaries. See Figure 5.9[19] for an illustration of the systemic arteries that carry oxygenated blood throughout the body to organs and tissues, as indicated by the red color.
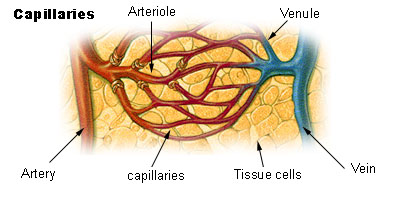
Oxygen and nutrients are exchanged with cells at the capillary level. A capillary is a microscopic channel that supplies blood to the tissue cells where nutrients and wastes are exchanged at the cellular level. Capillaries connect arterioles and venules, small veins. See Figure 5.10[20] for an illustration of capillaries supplying blood to tissue cells.
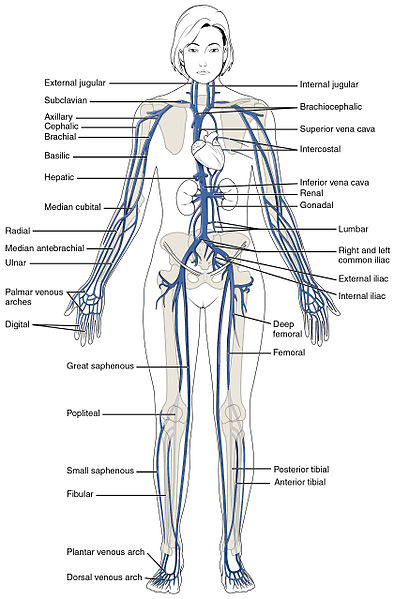
Venules carry blood to veins, a larger blood vessel that returns blood to the heart. Compared to arteries, veins are thin-walled, low-pressure vessels. Larger veins are also equipped with valves that promote the unidirectional flow of blood toward the heart and prevent backflow caused by the inherent low blood pressure in veins, as well as the pull of gravity. See Figure 5.11[21] for an illustration of the systemic veins.
In addition to their primary function of returning blood to the heart, veins may be considered blood reservoirs because systemic veins contain approximately 64 percent of the blood volume at any given time. Approximately 21 percent of the venous blood is located in venous networks within the liver, bone marrow, and integument. This volume of blood is referred to as venous reserve. Through venoconstriction, this reserve volume of blood can get back to the heart more quickly for redistribution to other parts of the circulation. Nitroglycerin is an example of a medication that causes arterial and venous vasodilation. It is used for clients with angina to decrease cardiac workload and increase the amount of oxygen available to the heart. By causing vasodilation of the veins, nitroglycerin decreases the amount of blood returned to the heart, which then decreases preload. It also reduces afterload by causing vasodilation of the arteries and reducing peripheral vascular resistance.[22]
Transportation
The systemic circulation transports blood and its components for physiological processes that occur throughout the body:
- The right ventricle pumps deoxygenated blood through the pulmonary arteries away from the heart to the lungs. Note this is the only place where arteries carry deoxygenated blood. Oxygen from the air breathed into the lungs diffuses into the pulmonary circulation in the alveoli. The pulmonary veins return oxygenated blood to the left atria of the heart, which moves into the left ventricle where it is pumped out to the rest of the body via the aorta to the systemic arteries.
- Nutrients from the foods eaten are absorbed in the digestive tract, where they diffuse into the systemic circulation and are transported throughout the body.
- Systemic arteries carry blood to the liver, where wastes are filtered out of the blood in the form of bile and nutrients and medications are metabolized.
- Systemic arteries carry blood to the kidneys, where wastes are filtered out and urine is created.
- Endocrine glands scattered throughout the body release hormones into the bloodstream, where they are transported to distant target cells.
Pulse
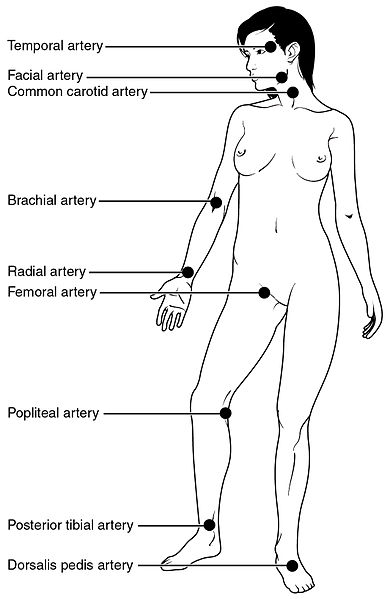
Each time the heart ejects blood forcefully into the circulation, the arteries expand and recoil to accommodate the surge of blood moving through them. This expansion and recoiling of the arterial wall is called the pulse and allows us to measure heart rate. The pulse can be palpated manually by placing the tips of the fingers across an artery that runs close to the body surface, such as the radial artery or the common carotid artery. Common pulse sites are shown in the Figure 5.12[23] below.
Both the rate and the strength of the pulse are important clinically. A high pulse rate can be temporarily caused by physical activity, but an extended fast or irregular pulse indicates a cardiac condition. The pulse strength indicates the strength of ventricular contraction, cardiac output, and perfusion. Recall that cardiac output is the amount of blood pumped by the heart per minute, and perfusion is the passage of blood through the blood vessels. If the pulse is strong, then cardiac output is high and perfusion to that site is good. If the pulse is weak, cardiac output is low or perfusion is impaired, and medical intervention may be warranted.
Blood Flow and Blood Pressure
Blood flow refers to the movement of blood through a vessel, tissue, or organ. Blood pressure is the force exerted by blood on the walls of the blood vessels. In clinical practice, this pressure is measured in mm Hg and is typically obtained using a sphygmomanometer (a blood pressure cuff) on the brachial artery of the arm. When systemic arterial blood pressure is measured, it is recorded as a ratio of two numbers expressed as systolic pressure over diastolic pressure (e.g., 120/80 is a normal adult blood pressure). The systolic pressure is the higher value (typically around 120 mm Hg) and reflects the arterial pressure resulting from the ejection of blood during ventricular contraction or systole. The diastolic pressure is the lower value (usually about 80 mm Hg) and represents the arterial pressure of blood during ventricular relaxation or diastole.
Three primary variables influence blood flow and blood pressure:
- Cardiac output
- Compliance of vessels
- Volume of the blood
Any factor that causes cardiac output to increase will elevate blood pressure and promote blood flow. Conversely, any factor that decreases cardiac output will decrease blood flow and blood pressure. See the previous “Cardiac Output” subsection for more information about factors that affect cardiac output.
Compliance is the ability of any compartment to expand to accommodate increased content. A metal pipe, for example, is not compliant, whereas a balloon is. The greater the compliance of an artery, the more effectively it is able to expand to accommodate surges in blood flow without increased resistance or blood pressure. When vascular disease causes arteriosclerosis (i.e., stiffening of arteries), compliance is reduced and resistance to blood flow is increased. The result is higher blood pressure within the vessel and reduced blood flow.
There is a relationship between blood volume, blood pressure, and blood flow. As an example, water may merely trickle along a creek bed in a dry season but rush quickly and under great pressure after a heavy rain. Similarly, as blood volume decreases, blood pressure and flow decrease, but when blood volume increases, blood pressure and flow increase.
Low blood volume, called hypovolemia, may be caused by bleeding, dehydration, vomiting, severe burns, or by diuretics used to treat hypertension. Treatment typically includes intravenous fluid replacement. Excessive fluid volume, called hypervolemia, is caused by retention of water and sodium, as seen in clients with heart failure, liver cirrhosis, and some forms of kidney disease. Treatment may include the use of diuretics that cause the kidneys to eliminate sodium and water.[24]
Edema
Despite the presence of valves within larger veins, over the course of a day, some blood will inevitably pool in the lower limbs, due to the pull of gravity. Any blood that accumulates in a vein will increase the pressure within it. Increased pressure will promote the flow of fluids out of the capillaries and into the interstitial fluid. The presence of excess fluid around the cells leads to a condition called edema. See Figure 5.13[25] for an image of a client with pitting edema. Edema can also be generalized and non-pitting.
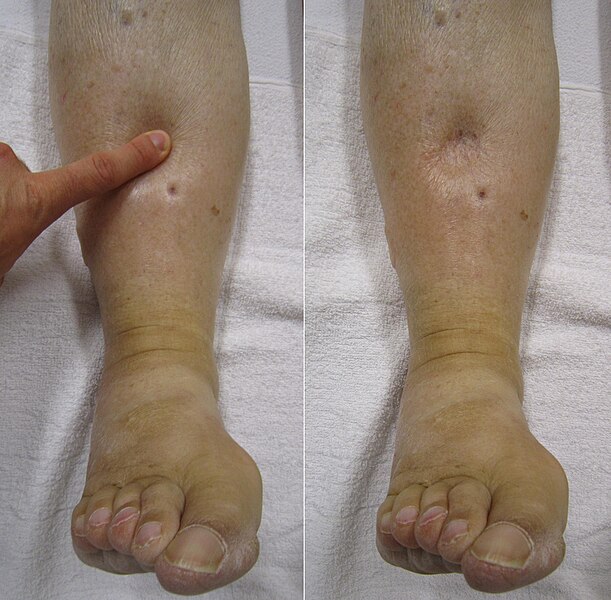
Most people experience a daily accumulation of fluid in their tissues, especially if they spend much of their time on their feet. However, clinical edema goes beyond normal swelling and requires medical treatment. Edema has many potential causes, including heart failure, severe protein deficiency, and renal failure. Diuretics such as furosemide are used to treat edema by causing the kidneys to eliminate sodium and water.[26] Read additional information about how to assess and document pitting edema in the “Assessment” subsection of the “General Cardiovascular System Assessment” section of this chapter.
Homeostatic Regulation of the Cardiovascular System
To maintain homeostasis in the cardiovascular system and provide adequate blood to the tissues, blood flow must be redirected continually to the tissues as they become more active. For example, when an individual is exercising, more blood will be directed to skeletal muscles, the heart, and the lungs. On the other hand, following a meal, more blood is directed to the digestive system. Only the brain receives a constant supply of blood regardless of rest or activity. Three homeostatic mechanisms ensure adequate blood flow and ultimately perfusion of tissues: autonomic nervous system, endocrine system, and autoregulatory mechanisms.
Baroreceptors and Chemoreceptors
The autonomic nervous system plays a critical role in the regulation of vascular homeostasis based on baroreceptors and chemoreceptors. Baroreceptors are specialized stretch receptors located within the aorta and carotid arteries that respond to the degree of stretch caused by the presence of blood and then send impulses to the cardiovascular center to regulate blood pressure. Baroreceptors sense changes in the level of pressure within the vessels. In addition to the baroreceptors, chemoreceptors monitor levels of oxygen, carbon dioxide, and hydrogen ions (pH). Chemoreceptors sense changes in the level of oxygen within the blood. When the cardiovascular center in the brain receives this input, it triggers a reflex that maintains homeostasis.
Endocrine Regulation
Endocrine control over the cardiovascular system involves catecholamines, epinephrine, and norepinephrine, as well as several hormones that interact with the kidneys in the regulation of blood volume.
Epinephrine and Norepinephrine
The catecholamines epinephrine and norepinephrine are released by the adrenal medulla and are a part of the body’s sympathetic or fight-or-flight response. They increase heart rate and force of contraction, while temporarily constricting blood vessels to organs not essential for flight-or-fight responses and redirecting blood flow to the liver, muscles, and heart.
Antidiuretic Hormone
Antidiuretic hormone (ADH), also known as vasopressin, is secreted by the hypothalamus. The primary trigger prompting the hypothalamus to release ADH is increasing osmolarity of tissue fluid, usually in response to significant loss of blood volume. ADH signals its target cells in the kidneys to reabsorb more water, thus preventing the loss of additional fluid in the urine. This will increase overall fluid levels and help restore blood volume and pressure.
Renin-Angiotensin-Aldosterone System
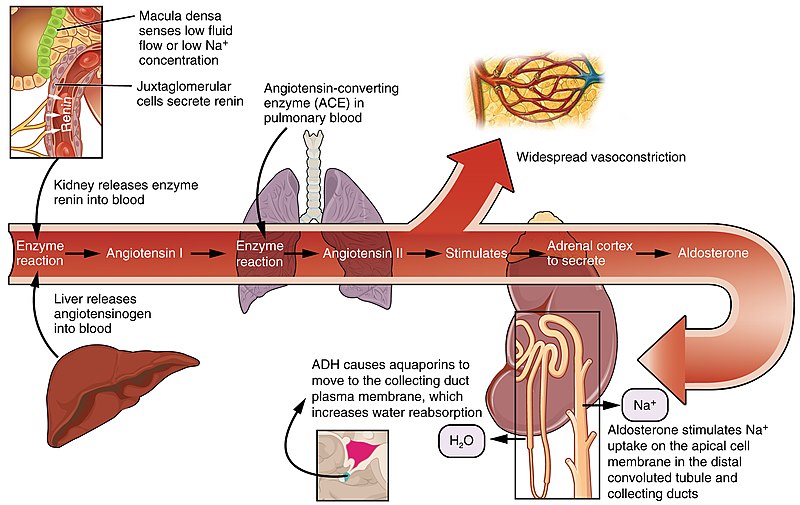
The renin-angiotensin-aldosterone system (RAAS) also has a major effect on the cardiovascular system. Specialized cells in the kidneys respond to decreased blood flow by secreting renin into the blood. Renin converts the plasma protein angiotensinogen into its active form—Angiotensin I. Angiotensin I circulates in the blood and is then converted into Angiotensin II in the lungs. This reaction is catalyzed by the enzyme called angiotensin-converting enzyme (ACE). Medications that impact angiotensin, such as angiotensin-converting enzyme (ACE) inhibitors or angiotensin receptor blockers (ARBs) target this step in the RAAS in an effort to decrease blood pressure.
Angiotensin II is a powerful vasoconstrictor that greatly increases blood pressure. It also stimulates the release of ADH and aldosterone, a hormone produced by the adrenal cortex. Aldosterone then increases the reabsorption of sodium into the blood by the kidneys. Because water follows sodium, there is an increase in the reabsorption of water, which increases blood volume and blood pressure. See Figure 5.14[27] for an illustration of the renin-angiotensin-aldosterone system. See Figure 5.15 [28] for a summary of the effect of hormones involved in renal control of blood pressure.
Autoregulation of Perfusion
Local, self-regulatory mechanisms allow each region of tissue to adjust its blood flow—and thus its perfusion. These mechanisms are affected by sympathetic and parasympathetic stimulation, as well as endocrine factors. See Table 5.2 for a summary of these factors and their effects.[29]
Table 5.2. Effects of Nervous System, Endocrine, and Local Controls on the Vasoconstriction and Vasodilation of Arterioles
| Control | Factor | Vasoconstriction | Vasodilation |
|---|---|---|---|
| Autonomic Nervous System | Sympathetic stimulation | Arterioles within integument, abdominal viscera, and mucosa membrane; skeletal muscles (at high levels); varied in veins and venules | Arterioles within heart; skeletal muscles at low to moderate levels |
| Parasympathetic | No known innervation for most | Arterioles in external genitalia; no known innervation for most other arterioles or veins | |
| Endocrine | Epinephrine | Similar to sympathetic stimulation for extended flight-or-fight responses; at high levels, binds to specialized alpha (α)-receptors | Similar to sympathetic stimulation for extended fight-or-flight responses; at low to moderate levels, binds to specialized beta (β)-receptors |
| Norepinephrine | Similar to epinephrine | Similar to epinephrine | |
| Angiotensin II | Powerful generalized vasoconstrictor; also stimulates release of aldosterone and ADH | N/A | |
| ADH | Moderately strong generalized vasoconstrictor; also causes body to retain more fluid via kidneys, increasing blood volume and pressure | N/A |
Media Attributions
- 2001_Heart_Position_in_ThoraxN
- 2003_Dual_System_of_Human_Circulation
- 2005_Surface_Anatomy_of_the_Heart
- 2018_Conduction_System_of_Heart
- 2022_Electrocardiogram (1)
- 800px-2031_Factors_in_Cardiac_Output
- 2032_Automatic_Innervation
- 2036_Summary_of_Factors_in_Cardiac_Output
- 2120_Major_Systemic_Artery
- Illu_capillary_en
- 2131_Major_Systematic_Veins
- 2110_Pulse_Sites
- Combinpedal
- 2626_Renin_Aldosterone_Angiotensin
- “Position of the Heart in the Thorax” by OpenStax College is licensed under CC BY 4.0. Access for free at https://openstax.org/books/anatomy-and-physiology/pages/19-1-heart-anatomy ↵
- This work is a derivative of Anatomy and Physiology by OpenStax licensed under CC BY 4.0. Access for free at https://openstax.org/books/anatomy-and-physiology/pages/1-introduction ↵
- “Dual System of the Human Blood Circulation” by OpenStax College is licensed under CC By 4.0. Access for free at https://openstax.org/books/anatomy-and-physiology/pages/19-1-heart-anatomy ↵
- This work is a derivative of Anatomy and Physiology by OpenStax licensed under CC BY 4.0. Access for free at https://openstax.org/books/anatomy-and-physiology/pages/1-introduction ↵
- “Surface Anatomy of the Heart” by OpenStax College is licensed under CC BY 4.0. Access for free at https://openstax.org/books/anatomy-and-physiology/pages/19-1-heart-anatom ↵
- “2018 Conduction System of the Heart” by OpenStax College is licensed under CC BY 4.0. Access it for free at https://openstax.org/books/anatomy-and-physiology/pages/19-2-cardiac-muscle-and-electrical-activity ↵
- This work is a derivative of Anatomy and Physiology by OpenStax licensed under CC BY 4.0. Access for free at https://openstax.org/books/anatomy-and-physiology/pages/1-introduction ↵
- This work is a derivative of Anatomy and Physiology by OpenStax licensed under CC BY 4.0. Access for free at https://openstax.org/books/anatomy-and-physiology/pages/1-introduction ↵
- “2022_Electrocardiogram.jpg” by OpenStax College is licensed under CC BY 3.0. ↵
- This work is a derivative of Anatomy and Physiology by OpenStax licensed under CC BY 4.0. Access for free at https://openstax.org/books/anatomy-and-physiology/pages/1-introduction ↵
- This work is a derivative of Anatomy and Physiology by OpenStax licensed under CC BY 4.0. Access for free at https://openstax.org/books/anatomy-and-physiology/pages/1-introduction ↵
- “2031 Factors in Cardiac Output.jpg” by OpenStax College is licensed under CC BY 4.0. Access for free at https://openstax.org/books/anatomy-and-physiology/pages/19-4-cardiac-physiology ↵
- This work is a derivative of Anatomy and Physiology by OpenStax licensed under CC BY 4.0. Access for free at https://openstax.org/books/anatomy-and-physiology/pages/1-introduction ↵
- “2032 Automatic Innervation.jpg” by OpenStax College is licensed under CC BY 4.0. Access for free at https://openstax.org/books/anatomy-and-physiology/pages/19-4-cardiac-physiology ↵
- This work is a derivative of Anatomy and Physiology by OpenStax licensed under CC BY 4.0. Access for free at https://openstax.org/books/anatomy-and-physiology/pages/1-introduction ↵
- This work is a derivative of Anatomy and Physiology by OpenStax licensed under CC BY 4.0. Access for free at https://openstax.org/books/anatomy-and-physiology/pages/1-introduction ↵
- “2036 Summary of Factors in Cardiac Output.jpg” by OpenStax College is licensed under CC BY 4.0. Access for free at https://openstax.org/books/anatomy-and-physiology/pages/19-4-cardiac-physiology ↵
- This work is a derivative of Anatomy and Physiology by OpenStax licensed under CC BY 4.0. Access for free at https://openstax.org/books/anatomy-and-physiology/pages/1-introduction ↵
- “2120_Major_Systemic_Artery.jpg” by OpenStax College is licensed under CC BY 3.0 ↵
- “Illu_capillary_en.jpg” by Unknown author is licensed in the Public Domain ↵
- “2131_Major_S” by ystematic_Veins.jpg” by OpenStax College is licensed under CC BY 3.0 ↵
- This work is a derivative of Anatomy and Physiology by OpenStax licensed under CC BY 4.0. Access for free at https://openstax.org/books/anatomy-and-physiology/pages/1-introduction ↵
- “2110_Pulse_Sites.jpg” by OpenStax College is licensed under CC BY 3.0 ↵
- This work is a derivative of Anatomy and Physiology by OpenStax licensed under CC BY 4.0. Access for free at https://openstax.org/books/anatomy-and-physiology/pages/1-introduction ↵
- “Combinpedal.jpg” by James Heilman, MD is licensed under CC BY-SA 3.0 ↵
- This work is a derivative of Anatomy and Physiology by OpenStax licensed under CC BY 4.0. Access for free at https://openstax.org/books/anatomy-and-physiology/pages/1-introduction ↵
- “2626 Renin Aldosterone Angiotensin.jpg” by OpenStax College is licensed under CC BY 4.0. Access for free at https://openstax.org/books/anatomy-and-physiology/pages/25-4-microscopic-anatomy-of-the-kidney ↵
- This work is a derivative of Anatomy and Physiology by OpenStax licensed under CC BY 4.0. Access for free at https://openstax.org/books/anatomy-and-physiology/pages/1-introduction ↵
- This work is a derivative of Anatomy and Physiology by OpenStax licensed under CC BY 4.0. Access for free at https://openstax.org/books/anatomy-and-physiology/pages/1-introduction ↵
"Learn to see, learn to hear, learn to feel, learn to smell, and know that by practice alone can you become expert."[1]
This quote provides a good description of learning how to perform a general survey assessment. A general survey assessment is a component of a patient assessment that observes the entire patient as a whole. General surveys begin with the initial patient contact and continue throughout the helping relationship. In this instance, observation includes using all five senses to gather cues. Nurses begin assessing patients from the moment they meet them, noting their appearance, posture, gait, verbal communication, nonverbal communication, and behaviors. Cues obtained during a general survey assessment are used to guide additional focused assessments in areas of concern.
Introduction to the Nursing Process
Before discussing the components of a general survey, it is important to understand how assessment fits under the standards for professional nursing practice established by the American Nurses Association (ANA). These standards are the foundation of the nursing profession and include duties that all registered nurses, regardless of role or specialty, are expected to perform competently.[2] There are six components of the nursing process: Assessment, Diagnosis, Outcomes Identification, Planning, Implementation, and Evaluation. See Figure 1.1[3] for an illustration of the nursing process. The mnemonic ADOPIE is an easy way to remember the ANA Standards and the nursing process. The nursing process is a continuous, cyclic process that is constantly adapting to the patient’s current health status. This textbook contains several chapters pertaining to techniques used during the assessment phase of the nursing process.
Read more about the "Nursing Process" in the Open RN Nursing Fundamentals textbook.

Assessment
According to the ANA, assessment includes collecting “pertinent data, including but not limited to, demographics, social determinants of health, health disparities, and physical, functional, psychosocial, emotional, cognitive, sexual, cultural, age-related, environmental, spiritual/transpersonal, and economic assessments in a systematic, ongoing process with compassion and respect for the inherent dignity, worth, and unique attributes of every person.”[4]
Patient data is considered either subjective or objective, and it can be collected from multiple sources.
Subjective Assessment Data
Subjective data is information obtained from the patient and/or family members and offers important cues from their perspectives. When documenting subjective data, it should be in quotation marks and start with verbiage such as, “The patient reports…” or “The patient’s wife states…” It is vital for the nurse to establish rapport with a patient to obtain accurate, valuable subjective data regarding the mental, emotional, and spiritual aspects of their condition.
Example. An example of documented subjective data obtained from a patient assessment is, “The patient reports pain severity of 2 on a 0-10 scale.” Additionally, if you create an inference, then that data is considered subjective. For example, documenting an inference, such as “The patient appears anxious,” is subjective data.
There are two types of subjective information, primary and secondary. Primary data is information provided directly by the patient. Patients are the best source of information about their bodies and feelings, and the nurse who actively listens to a patient will often learn valuable information while also promoting a sense of well-being. Information collected from a family member, chart, or other sources is known as secondary data. Family members can provide important information, especially for infants and children or when the patient is unable to speak for themselves.
Objective Assessment Data
Objective data is anything that you can observe through your senses of hearing, sight, smell, and touch while assessing the patient. Objective data is reproducible, meaning another person can easily obtain the same data. Examples of objective data are vital signs, physical examination findings, and laboratory results.
Example. An example of documented objective data is, “The patient’s radial pulse is 58 and regular, and their skin feels warm and dry.”
Sources of Assessment Data
Assessment data is collected in three ways: during a focused interview, during physical examination, or while reviewing laboratory and diagnostic test results.
Interviewing
Interviewing includes asking the patient questions, listening, and observing verbal and nonverbal communication. Reviewing the chart prior to interviewing the patient eliminates redundancy in the interview process and allows the nurse to hone in on the most significant areas of concern or need for clarification. However, if information in the chart does not make sense or is incomplete, the nurse should use the interview process to verify data with the patient.
When beginning an interview, it may be helpful to start with questions related to the patient’s medical diagnoses to gather information about how they have affected the patient's functioning, relationships, and lifestyle. Listen carefully and ask for clarification when something isn’t clear to you. Patients may not volunteer important information because they don’t realize it is important for their care. By using critical thinking and active listening, you may discover valuable cues that are important to provide safe, quality nursing care. Sometimes nursing students can feel uncomfortable with having difficult conversations or asking personal questions because of generational or other differences. Don’t shy away from asking about information that is important to know for safe patient care. Most patients will be grateful that you cared enough to ask and listen.
Be alert and attentive to how the patient answers questions, as well as when they do not answer a question. Nonverbal communication and body language can be cues to important information that requires further investigation. A keen sense of observation is important. To avoid making inappropriate inferences, the nurse should validate any cues. For example, a nurse may make an inference that a patient is depressed when the patient avoids making eye contact during an interview. However, upon further questioning, the nurse may discover that the patient’s cultural background believes direct eye contact to be disrespectful and this is why they are avoiding eye contact.
Read more information about communicating with patients in the “Communication” chapter of the Open RN Nursing Fundamentals book.
Physical Examination
Physical examination is a systematic data collection method of the body that uses the techniques of inspection, auscultation, palpation, and percussion. Inspection is the observation of a patient’s anatomical structures. Auscultation is listening to sounds, such as heart, lung, and bowel sounds, created by organs using a stethoscope. Palpation is the use of touch to evaluate organs for size, location, or tenderness. Percussion is an advanced physical examination technique where body parts are tapped with fingers to determine their size and if fluid is present. See Figure 1.2[5] for an image of a nurse performing a physical examination.

Registered Nurses (RNs) complete a physical examination and analyze the findings as part of the nursing process. Collection of physical examination data can be delegated to Licensed Practical Nurses/Licensed Vocational Nurses (LPNs/LVNs), or measurements such as vital signs and weight may be delegated to Unlicensed Assistive Personnel (UAP) when it is appropriate to do so. However, the RN remains responsible for analyzing the findings.
Assessment data is documented in the patient’s electronic medical record (EMR), an electronic version of the patient’s paper medical chart.
Reviewing Laboratory and Diagnostic Test Results
Reviewing laboratory and diagnostic test results is an important component of the assessment phase of the nursing process and provides relevant and useful information related to the needs of the patient. Understanding how normal and abnormal results affect patient care is important when implementing the nursing care plan and administering prescriptions.
Read more about interpreting laboratory and diagnostic testing results based on nursing concepts in the Open RN Nursing Fundamentals textbook.
Learning Objectives
- Perform a general survey assessment, including vital signs, ability to communicate, appropriateness of behaviors and responses, general mobility, and basic nutritional and fluid status
- Modify assessment techniques to reflect variations across the life span, cultural values and beliefs, and gender expression
- Document actions and observations
- Recognize and report significant deviations from norms
"Learn to see, learn to hear, learn to feel, learn to smell, and know that by practice alone can you become expert."[6]
This quote provides a good description of learning how to perform a general survey assessment. A general survey assessment is a component of a patient assessment that observes the entire patient as a whole. General surveys begin with the initial patient contact and continue throughout the helping relationship. In this instance, observation includes using all five senses to gather cues. Nurses begin assessing patients from the moment they meet them, noting their appearance, posture, gait, verbal communication, nonverbal communication, and behaviors. Cues obtained during a general survey assessment are used to guide additional focused assessments in areas of concern.
Introduction to the Nursing Process
Before discussing the components of a general survey, it is important to understand how assessment fits under the standards for professional nursing practice established by the American Nurses Association (ANA). These standards are the foundation of the nursing profession and include duties that all registered nurses, regardless of role or specialty, are expected to perform competently.[7] There are six components of the nursing process: Assessment, Diagnosis, Outcomes Identification, Planning, Implementation, and Evaluation. See Figure 1.1[8] for an illustration of the nursing process. The mnemonic ADOPIE is an easy way to remember the ANA Standards and the nursing process. The nursing process is a continuous, cyclic process that is constantly adapting to the patient’s current health status. This textbook contains several chapters pertaining to techniques used during the assessment phase of the nursing process.
Read more about the "Nursing Process" in the Open RN Nursing Fundamentals textbook.

Assessment
According to the ANA, assessment includes collecting “pertinent data, including but not limited to, demographics, social determinants of health, health disparities, and physical, functional, psychosocial, emotional, cognitive, sexual, cultural, age-related, environmental, spiritual/transpersonal, and economic assessments in a systematic, ongoing process with compassion and respect for the inherent dignity, worth, and unique attributes of every person.”[9]
Patient data is considered either subjective or objective, and it can be collected from multiple sources.
Subjective Assessment Data
Subjective data is information obtained from the patient and/or family members and offers important cues from their perspectives. When documenting subjective data, it should be in quotation marks and start with verbiage such as, “The patient reports…” or “The patient’s wife states…” It is vital for the nurse to establish rapport with a patient to obtain accurate, valuable subjective data regarding the mental, emotional, and spiritual aspects of their condition.
Example. An example of documented subjective data obtained from a patient assessment is, “The patient reports pain severity of 2 on a 0-10 scale.” Additionally, if you create an inference, then that data is considered subjective. For example, documenting an inference, such as “The patient appears anxious,” is subjective data.
There are two types of subjective information, primary and secondary. Primary data is information provided directly by the patient. Patients are the best source of information about their bodies and feelings, and the nurse who actively listens to a patient will often learn valuable information while also promoting a sense of well-being. Information collected from a family member, chart, or other sources is known as secondary data. Family members can provide important information, especially for infants and children or when the patient is unable to speak for themselves.
Objective Assessment Data
Objective data is anything that you can observe through your senses of hearing, sight, smell, and touch while assessing the patient. Objective data is reproducible, meaning another person can easily obtain the same data. Examples of objective data are vital signs, physical examination findings, and laboratory results.
Example. An example of documented objective data is, “The patient’s radial pulse is 58 and regular, and their skin feels warm and dry.”
Sources of Assessment Data
Assessment data is collected in three ways: during a focused interview, during physical examination, or while reviewing laboratory and diagnostic test results.
Interviewing
Interviewing includes asking the patient questions, listening, and observing verbal and nonverbal communication. Reviewing the chart prior to interviewing the patient eliminates redundancy in the interview process and allows the nurse to hone in on the most significant areas of concern or need for clarification. However, if information in the chart does not make sense or is incomplete, the nurse should use the interview process to verify data with the patient.
When beginning an interview, it may be helpful to start with questions related to the patient’s medical diagnoses to gather information about how they have affected the patient's functioning, relationships, and lifestyle. Listen carefully and ask for clarification when something isn’t clear to you. Patients may not volunteer important information because they don’t realize it is important for their care. By using critical thinking and active listening, you may discover valuable cues that are important to provide safe, quality nursing care. Sometimes nursing students can feel uncomfortable with having difficult conversations or asking personal questions because of generational or other differences. Don’t shy away from asking about information that is important to know for safe patient care. Most patients will be grateful that you cared enough to ask and listen.
Be alert and attentive to how the patient answers questions, as well as when they do not answer a question. Nonverbal communication and body language can be cues to important information that requires further investigation. A keen sense of observation is important. To avoid making inappropriate inferences, the nurse should validate any cues. For example, a nurse may make an inference that a patient is depressed when the patient avoids making eye contact during an interview. However, upon further questioning, the nurse may discover that the patient’s cultural background believes direct eye contact to be disrespectful and this is why they are avoiding eye contact.
Read more information about communicating with patients in the “Communication” chapter of the Open RN Nursing Fundamentals book.
Physical Examination
Physical examination is a systematic data collection method of the body that uses the techniques of inspection, auscultation, palpation, and percussion. Inspection is the observation of a patient’s anatomical structures. Auscultation is listening to sounds, such as heart, lung, and bowel sounds, created by organs using a stethoscope. Palpation is the use of touch to evaluate organs for size, location, or tenderness. Percussion is an advanced physical examination technique where body parts are tapped with fingers to determine their size and if fluid is present. See Figure 1.2[10] for an image of a nurse performing a physical examination.

Registered Nurses (RNs) complete a physical examination and analyze the findings as part of the nursing process. Collection of physical examination data can be delegated to Licensed Practical Nurses/Licensed Vocational Nurses (LPNs/LVNs), or measurements such as vital signs and weight may be delegated to Unlicensed Assistive Personnel (UAP) when it is appropriate to do so. However, the RN remains responsible for analyzing the findings.
Assessment data is documented in the patient’s electronic medical record (EMR), an electronic version of the patient’s paper medical chart.
Reviewing Laboratory and Diagnostic Test Results
Reviewing laboratory and diagnostic test results is an important component of the assessment phase of the nursing process and provides relevant and useful information related to the needs of the patient. Understanding how normal and abnormal results affect patient care is important when implementing the nursing care plan and administering prescriptions.
Read more about interpreting laboratory and diagnostic testing results based on nursing concepts in the Open RN Nursing Fundamentals textbook.
Before every patient interaction, the nurse must perform hand hygiene and consider the use of additional personal protective equipment, introduce themselves, and identify the patient using two different identifiers. It is also important to provide a culturally safe space for interaction and to consider the developmental stage of the patient.
Hand Hygiene and Infection Prevention
Before initiating care with a patient, hand hygiene is required, and a risk assessment should be performed to determine the need for personal protective equipment (PPE). This is important for protection of both patient and nurse.
Hand Hygiene
Hand hygiene is a simple but effective way to prevent infection when performed correctly and at the appropriate times when providing patient care. See Figure 1.3.[11] for an image about hand hygiene from the Centers for Disease Control (CDC).[12] Use the information below to learn more and watch a video about effective handwashing.
Key points from the CDC about hand hygiene include the following[13]:
- In general, hand sanitizers are as effective as washing with soap and water and are less drying to the skin. When using hand sanitizer, use enough gel to cover both hands and rub for approximately 20 seconds, coating all surfaces of both hands until your hands feel dry. Go directly to the patient without putting your hands into pockets or touching anything else.[14]
- Be sure to wash with soap and water if your hands are visibly soiled or the patient has diarrhea from suspected or confirmed C. Difficile (C-diff).
- Clean all areas of the hands, including the front and back, the fingertips, the thumbs, and between fingers.
- Gloves are not a substitute for cleaning your hands. Wash your hands after removing gloves.
- Hand hygiene should be performed at these times:
- Immediately before touching a patient
- Before performing an aseptic task (e.g., placing an indwelling device) or handling invasive medical devices
- Before moving from working on a soiled body site to a clean body site on the same patient
- After contact with blood, body fluids, or contaminated surfaces
- Before donning gloves and immediately after glove removal
- When leaving the area after touching a patient or their immediate environment

Checklists for performing handwashing and using hand sanitizer are located in Appendix A.
Visit the Center for Disease Control and Prevention's website to read more about Hand Hygiene in Healthcare Settings.
Download a PDF factsheet from the Centers for Disease Control and Prevention called Clean Hands Count.
Personal Protective Equipment (PPE)
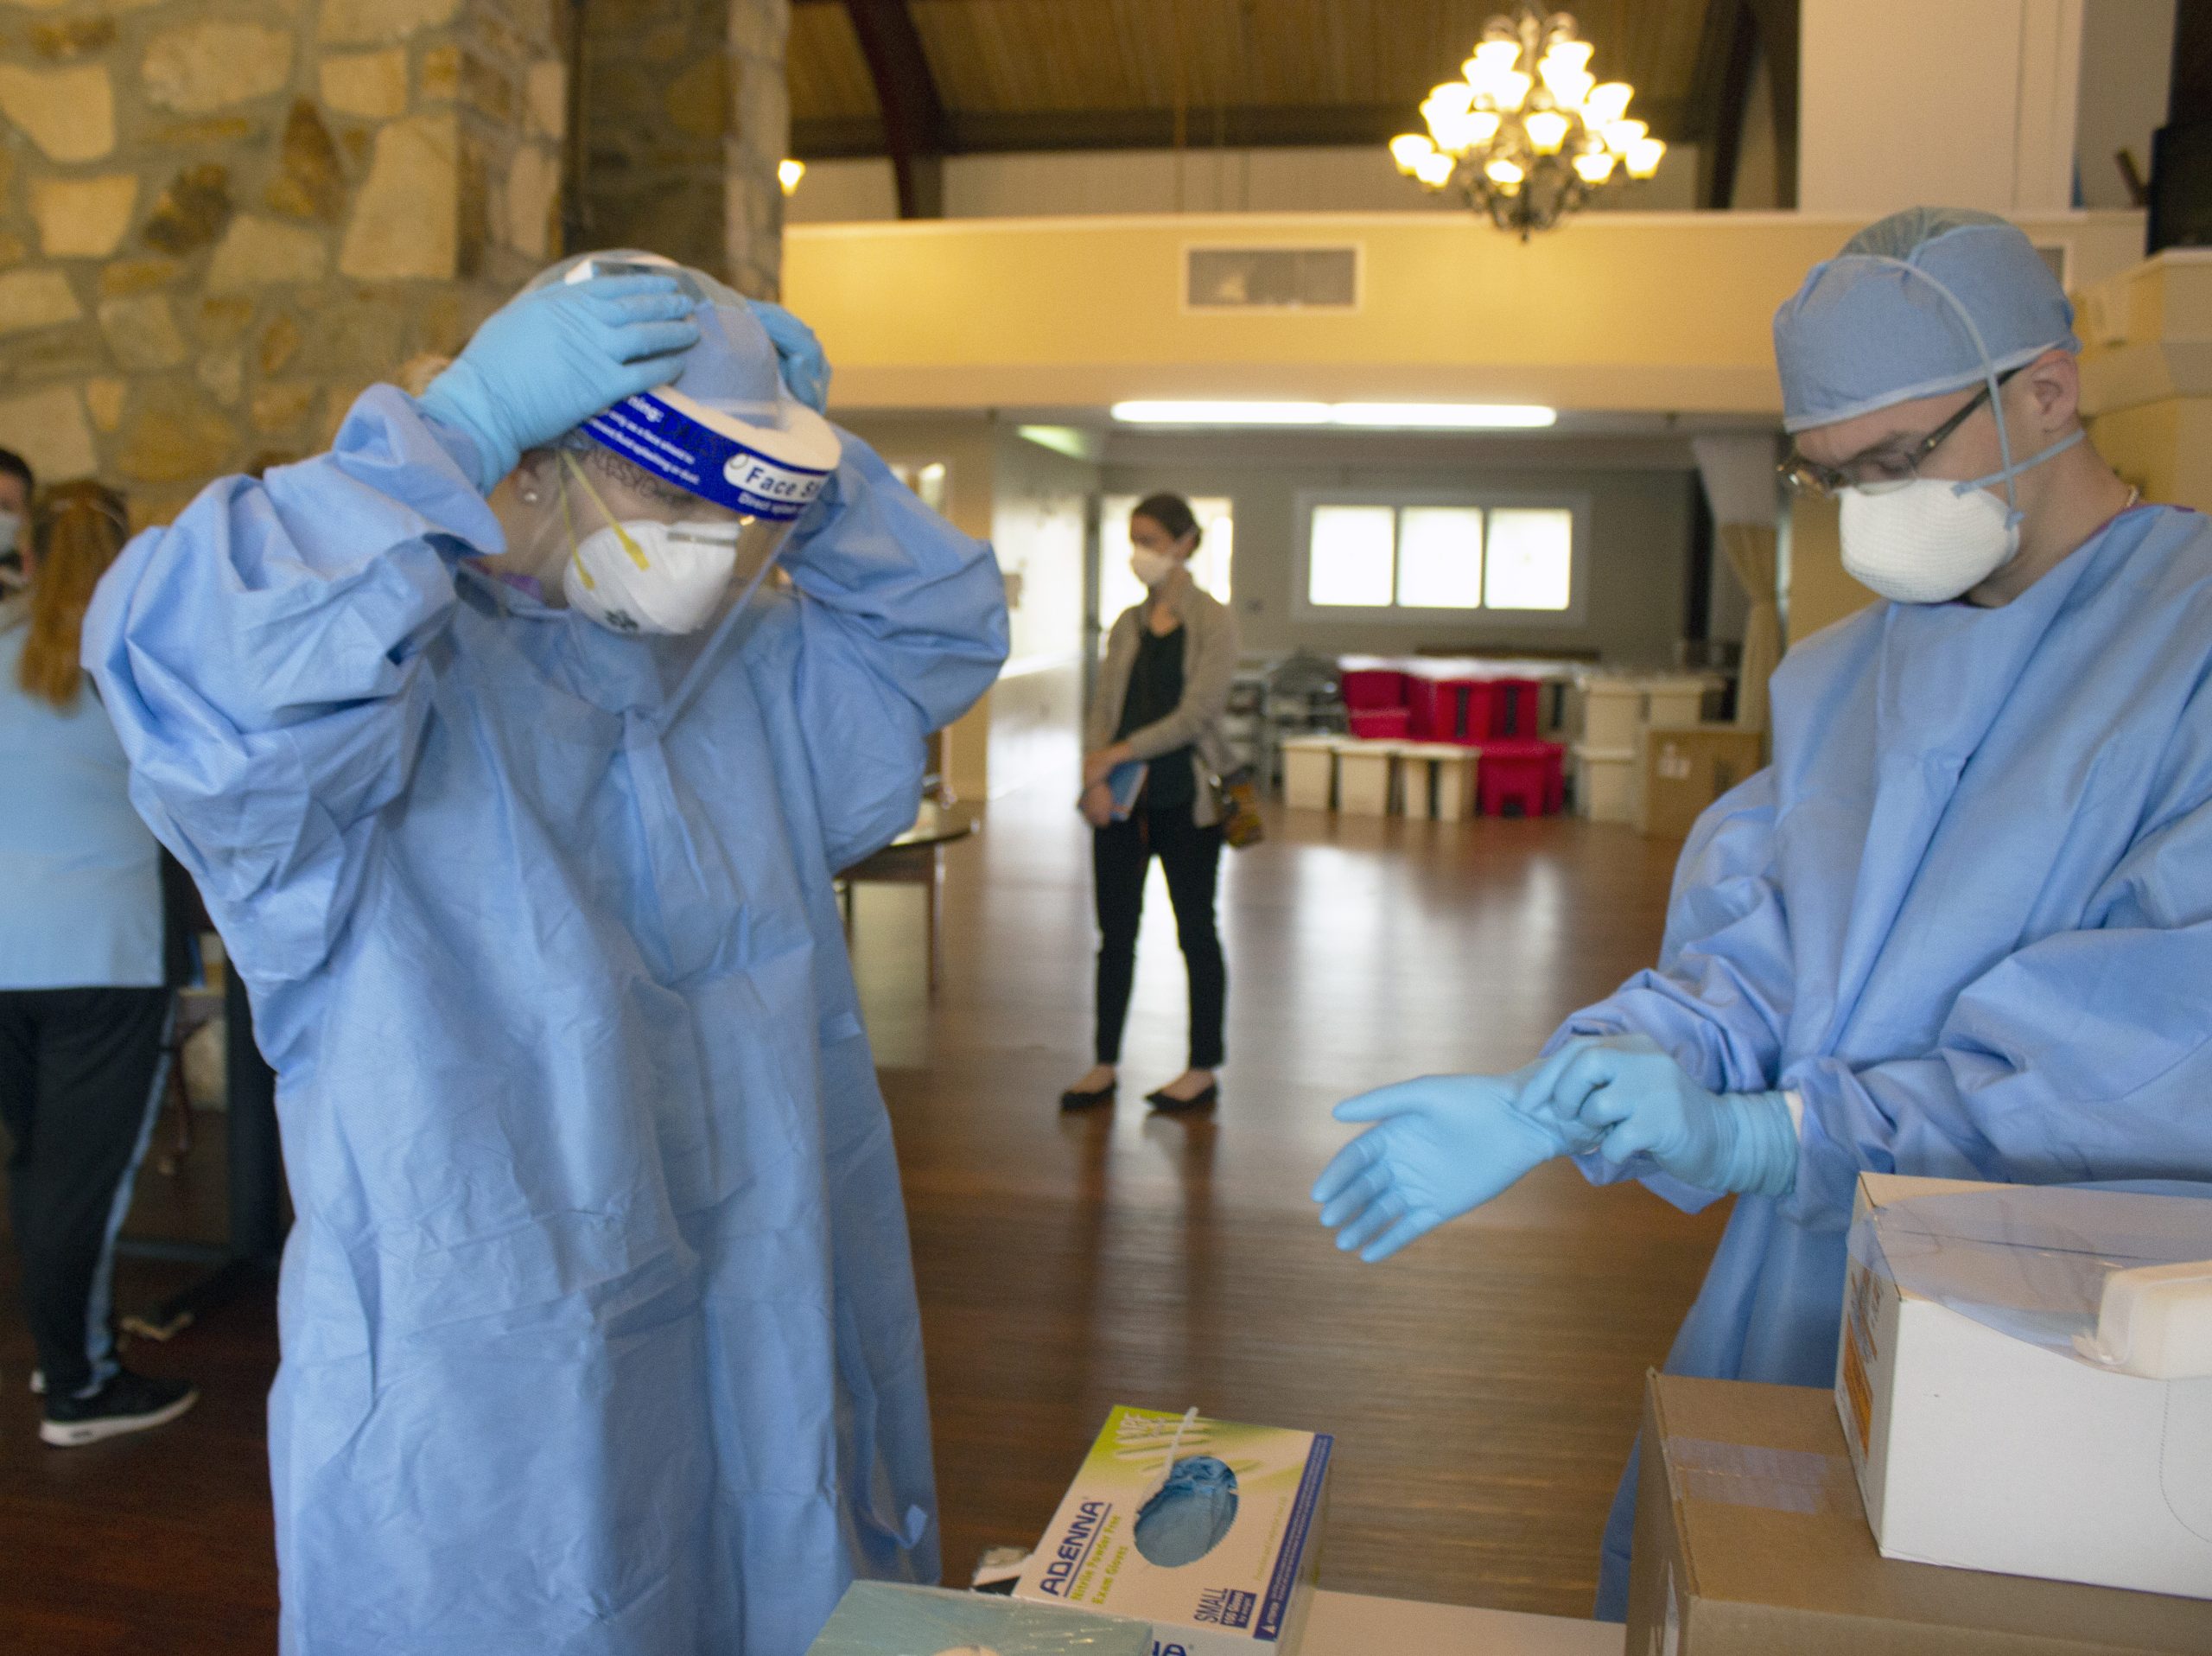
Medical asepsis is a term used to describe measures to prevent the spread of infection in health care agencies. Performing hand hygiene at appropriate times during patient care and applying gloves when there is potential risk for exposure to body fluids are examples of using medical asepsis. Additional precautions are implemented by health care team members when a patient has, or is suspected of having, an infectious disease. These additional precautions are called personal protective equipment (PPE) and are based on how an infection is transmitted, such as by contact, droplet, or airborne routes. Personal protective equipment (PPE) includes gowns, eyewear or goggles, face shields, gloves, and masks. PPE is used along with environmental controls, such as surface cleaning and disinfecting to prevent the transmission of infection.[15] See Figure 1.4[16] for an image of health care team members applying PPE. These precautions are further discussed in the “Aseptic Technique” chapter. For the purpose of this chapter, be sure to perform a general risk assessment before entering a patient’s room and apply the appropriate PPE as needed. This risk assessment includes the following:
- Is there signage posted on the patient’s door that contact, droplet, enhanced barrier, or airborne precautions are in place? If so, follow the instructions provided.
- Does this patient have a confirmed or suspected infection or communicable disease?
- Will your face, hands, skin, mucous membranes, or clothing be potentially exposed to blood or body fluids by spray, coughing, or sneezing?
Introducing Oneself
When initiating care with patients, it is essential to first provide privacy, and then introduce yourself and explain what will be occurring. Providing privacy means taking actions such as talking with the patient privately in a room with the door shut or privacy curtain drawn around the bed. A common framework used to communicate with patients is AIDET, a mnemonic for Acknowledge, Introduce, Duration, Explanation, and Thank You.[17]
- Acknowledge: Greet the patient by the name documented in their medical record. Make eye contact, smile, and acknowledge any family or friends in the room. Ask the patient their preferred way of being addressed (for example, "Mr. Doe," "Jonathon," or "Johnny") and their preferred pronouns (i.e., he/him, she/her, or they/them), as appropriate.
- Introduce: Introduce yourself by your name and role. For example, “I’m John Doe and I am a nursing student working with your nurse to take care of you today.”
- Duration: Estimate a timeline for how long it will take to complete the task you are doing. For example, “I am here to obtain your blood pressure, heart rate, and oxygen saturation levels. This should take about 5 minutes.”
- Explanation: Explain step by step what to expect next and answer questions. For example, “I will be putting this blood pressure cuff on your arm and inflating it. It will feel as if it is squeezing your arm for a few moments.”
- Thank You: At the end of the encounter, thank the patient and ask if anything is needed before you leave. In an acute or long-term care setting, ensure the call light is within reach and the patient knows how to use it. If family members are present, thank them for being there to support the patient as appropriate. For example, “Thank you for taking time to talk with me today. Is there anything I can get for you before I leave the room? Here is the call light (Place within reach). Press the red button if you would like to call the nurse.”
For more information about AIDET, visit AIDET Patient Communication.
Patient Identification
Use at least two patient identifiers before performing assessments, obtaining vital signs, or providing care.
Use two patient identifiers:
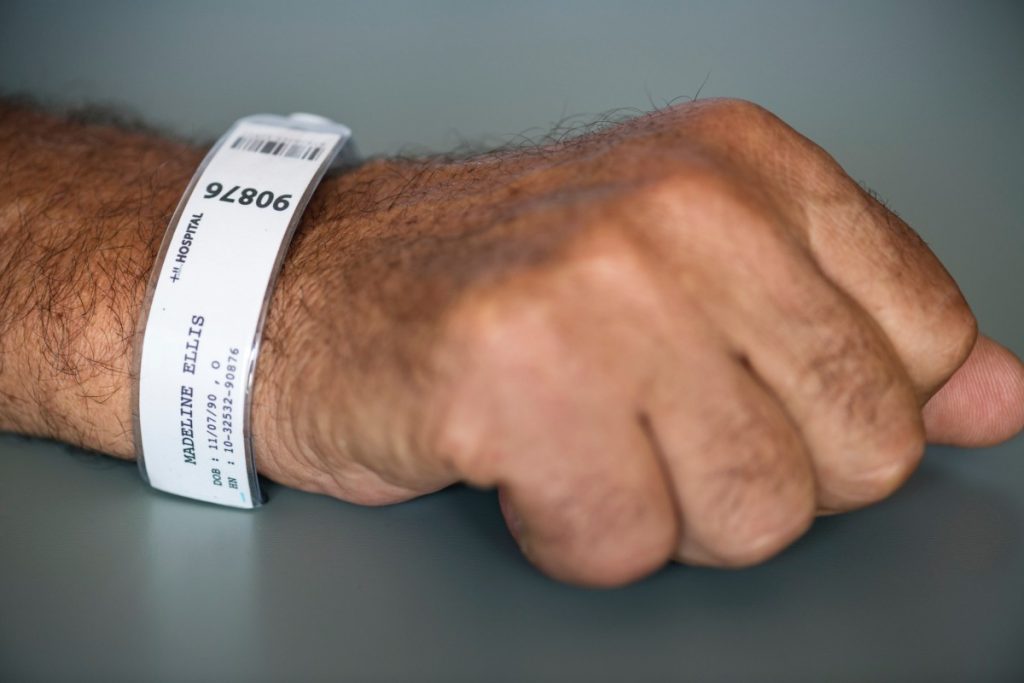
- Ask the patient to state their name and date of birth. If they have an armband, compare the information they are stating to the information on the armband and verify they match. See Figure 1.5[18] for an image of an armband.
- If the patient doesn’t have an armband, confirm the information they are stating to information provided in the chart.
- If the patient is unable to state their name and date of birth, scan their armband or ask another staff member or family member to identify them.
Confirm "two identifiers" with a second source:
- Scan the wristband.
- Compare the name and date of birth to the patient’s chart.
- Ask staff to verify the patient in a long-term care setting.
- Compare the picture on the medication administration record (MAR) to the patient.
- If present, ask a family member to confirm the patient’s name.
Cultural Safety
When initiating patient interaction, it is important to establish cultural safety. Cultural safety refers to the creation of safe spaces for patients to interact with health professionals without judgment or discrimination. See Figure 1.6[19] for an image representing cultural safety. Recognizing that you and all patients bring a cultural context to interactions in a health care setting is helpful when creating cultural safe spaces. If you discover you need more information about a patient’s cultural beliefs to tailor your care, use an open-ended question that allows the patient to share what they believe to be important. For example, you may ask, “I am interested in your cultural background as it relates to your health. Can you share with me what is important about your cultural background that will help me care for you?”[20]
For more information about caring for diverse patients, visit the "Diverse Patients" chapter in the Open RN Nursing Fundamentals textbook.

Adapting to Variations Across the Life Span
It is important to adapt your interactions with patients in accordance with their developmental stage. Developmentalists break the life span into nine stages[21]:
- Prenatal Development
- Infancy and Toddlerhood
- Early Childhood
- Middle Childhood
- Adolescence
- Early Adulthood
- Middle Adulthood
- Late Adulthood
- Death and Dying
A brief overview of the characteristics of each stage of human development is provided in Table 1.2. When caring for infants, toddlers, children, and adolescents, parents or guardians are an important source of information, and family dynamics should be included as part of the general survey assessment. When caring for older adults or those who are dying, other family members may be important to include in the general survey assessment. See Figure 1.7[22] for an image representing patients in various developmental stages of life.

Visit the Human Development Life Span e-book at LibreTexts to read additional information about human development across the life span.
Table 1.2 Variations Across the Life Span
| Stage of Development | Common Characteristics |
|---|---|
| Prenatal Development | Conception occurs, and development begins. All major structures of the body are forming, and the health of the mother is of primary concern. Understanding nutrition, teratogens (environmental factors that can lead to birth defects), and labor and delivery are primary concerns for the mother. |
| Infancy and Toddlerhood | The first year and a half to two years of life are ones of dramatic growth and change. A newborn with a keen sense of hearing but very poor vision is transformed into a walking, talking toddler within a relatively short period of time. Caregivers are also transformed from someone who manages feeding and sleep schedules to a constantly moving guide and safety inspector for a mobile, energetic child. |
| Early Childhood | Early childhood is also referred to as the preschool years, consisting of the years that follow toddlerhood and precede formal schooling. As a three- to five-year-old, the child is busy learning language, gaining a sense of self and greater independence, and beginning to learn the workings of the physical world. This knowledge does not come quickly however, and preschoolers may have initially interesting conceptions of size, time, space, and distance, such as fearing that they may go down the drain if they sit at the front of the bathtub. A toddler’s fierce determination to do something may give way to a four-year-old’s sense of guilt for doing something that brings the disapproval of others. |
| Middle Childhood | The ages of six through eleven comprise middle childhood, and much of what children experience at this age is connected to their involvement in the early grades of school. Their world becomes filled with learning and testing new academic skills, assessing one’s abilities and accomplishments, and making comparisons between self and others. Schools compare students and make these comparisons public through team sports, test scores, and other forms of recognition. Growth rates slow down, and children are able to refine their motor skills at this point in life. Children begin to learn about social relationships beyond the family through interaction with friends and fellow students. |
| Adolescence | The World Health Organization defines adolescence as a person between the age of 10 and 19. Adolescence is a period of dramatic physical change marked by an overall physical growth spurt and sexual maturation, known as puberty. It is also a time of cognitive change as the adolescent begins to think of new possibilities and to consider abstract concepts such as love, fear, and freedom. Adolescents have a sense of invincibility that puts them at greater risk of injury from high-risk behaviors such as car accidents, drug and alcohol abuse, or contracting sexually transmitted infections that can have lifelong consequences or result in death. |
| Early Adulthood | The twenties and thirties are often thought of as early adulthood. It is a time of physiological peak but also highest risk for involvement in violent crimes and substance abuse. It is a time of focusing on the future and putting a lot of energy into making choices that will help one earn the status of a full adult in the eyes of others. Love and work are primary concerns at this stage of life. |
| Middle Adulthood | The late thirties through the mid-sixties is referred to as middle adulthood. This is a period in which aging processes that began earlier become more noticeable but also a time when many people are at their peak of productivity in love and work. It can also be a time of becoming more realistic about possibilities in life previously considered and of recognizing the difference between what is possible and what is likely to be achieved in their lifetime. |
| Late Adulthood | This period of the life span has increased over the last 100 years. For nurses, patients in this period are referred to as “older adults.” The term “young old” is used to describe people between 65 and 79, and the term “old old” is used for those who are 80 and older. One of the primary differences between these groups is that the young old are very similar to midlife adults because they are still working, still relatively healthy, and still interested in being productive and active. The “old old” may remain productive, active, and independent, but risks of heart disease, lung disease, cancer, and cerebral vascular disease (i.e., strokes) increase substantially for this age group. Issues of housing, health care, and extending active life expectancy are only a few of the topics of concern for this age group. A better way to appreciate the diversity of people in late adulthood is to go beyond chronological age and examine whether a person is experiencing optimal aging (when they are in very good health for their age and continue to have an active, stimulating life), normal aging (when the changes in health are similar to most of those of the same age), or impaired aging (when more physical challenges and diseases occur compared to others of the same age). |
| Death and Dying | Death is the final stage of life. Dying with dignity allows an individual to make choices about treatment, say goodbyes, and take care of final arrangements. When caring for patients who are actively dying, nurses can advocate for care that allows that person to die with dignity according to their wishes. |
Before every patient interaction, the nurse must perform hand hygiene and consider the use of additional personal protective equipment, introduce themselves, and identify the patient using two different identifiers. It is also important to provide a culturally safe space for interaction and to consider the developmental stage of the patient.
Hand Hygiene and Infection Prevention
Before initiating care with a patient, hand hygiene is required, and a risk assessment should be performed to determine the need for personal protective equipment (PPE). This is important for protection of both patient and nurse.
Hand Hygiene
Hand hygiene is a simple but effective way to prevent infection when performed correctly and at the appropriate times when providing patient care. See Figure 1.3.[23] for an image about hand hygiene from the Centers for Disease Control (CDC).[24] Use the information below to learn more and watch a video about effective handwashing.
Key points from the CDC about hand hygiene include the following[25]:
- In general, hand sanitizers are as effective as washing with soap and water and are less drying to the skin. When using hand sanitizer, use enough gel to cover both hands and rub for approximately 20 seconds, coating all surfaces of both hands until your hands feel dry. Go directly to the patient without putting your hands into pockets or touching anything else.[26]
- Be sure to wash with soap and water if your hands are visibly soiled or the patient has diarrhea from suspected or confirmed C. Difficile (C-diff).
- Clean all areas of the hands, including the front and back, the fingertips, the thumbs, and between fingers.
- Gloves are not a substitute for cleaning your hands. Wash your hands after removing gloves.
- Hand hygiene should be performed at these times:
- Immediately before touching a patient
- Before performing an aseptic task (e.g., placing an indwelling device) or handling invasive medical devices
- Before moving from working on a soiled body site to a clean body site on the same patient
- After contact with blood, body fluids, or contaminated surfaces
- Before donning gloves and immediately after glove removal
- When leaving the area after touching a patient or their immediate environment

Checklists for performing handwashing and using hand sanitizer are located in Appendix A.
Visit the Center for Disease Control and Prevention's website to read more about Hand Hygiene in Healthcare Settings.
Download a PDF factsheet from the Centers for Disease Control and Prevention called Clean Hands Count.
View supplementary videos on hand hygiene:
Clean Hands Count on YouTube[27]
Hand Washing Technique on YouTube[28]
Hand Sanitizing Technique on YouTube[29]
Personal Protective Equipment (PPE)
Medical asepsis is a term used to describe measures to prevent the spread of infection in health care agencies. Performing hand hygiene at appropriate times during patient care and applying gloves when there is potential risk for exposure to body fluids are examples of using medical asepsis. Additional precautions are implemented by health care team members when a patient has, or is suspected of having, an infectious disease. These additional precautions are called personal protective equipment (PPE) and are based on how an infection is transmitted, such as by contact, droplet, or airborne routes. Personal protective equipment (PPE) includes gowns, eyewear or goggles, face shields, gloves, and masks. PPE is used along with environmental controls, such as surface cleaning and disinfecting to prevent the transmission of infection.[30] See Figure 1.4[31] for an image of health care team members applying PPE. These precautions are further discussed in the “Aseptic Technique” chapter. For the purpose of this chapter, be sure to perform a general risk assessment before entering a patient’s room and apply the appropriate PPE as needed. This risk assessment includes the following:
- Is there signage posted on the patient’s door that contact, droplet, enhanced barrier, or airborne precautions are in place? If so, follow the instructions provided.
- Does this patient have a confirmed or suspected infection or communicable disease?
- Will your face, hands, skin, mucous membranes, or clothing be potentially exposed to blood or body fluids by spray, coughing, or sneezing?

Introducing Oneself
When initiating care with patients, it is essential to first provide privacy, and then introduce yourself and explain what will be occurring. Providing privacy means taking actions such as talking with the patient privately in a room with the door shut or privacy curtain drawn around the bed. A common framework used to communicate with patients is AIDET, a mnemonic for Acknowledge, Introduce, Duration, Explanation, and Thank You.[32]
- Acknowledge: Greet the patient by the name documented in their medical record. Make eye contact, smile, and acknowledge any family or friends in the room. Ask the patient their preferred way of being addressed (for example, "Mr. Doe," "Jonathon," or "Johnny") and their preferred pronouns (i.e., he/him, she/her, or they/them), as appropriate.
- Introduce: Introduce yourself by your name and role. For example, “I’m John Doe and I am a nursing student working with your nurse to take care of you today.”
- Duration: Estimate a timeline for how long it will take to complete the task you are doing. For example, “I am here to obtain your blood pressure, heart rate, and oxygen saturation levels. This should take about 5 minutes.”
- Explanation: Explain step by step what to expect next and answer questions. For example, “I will be putting this blood pressure cuff on your arm and inflating it. It will feel as if it is squeezing your arm for a few moments.”
- Thank You: At the end of the encounter, thank the patient and ask if anything is needed before you leave. In an acute or long-term care setting, ensure the call light is within reach and the patient knows how to use it. If family members are present, thank them for being there to support the patient as appropriate. For example, “Thank you for taking time to talk with me today. Is there anything I can get for you before I leave the room? Here is the call light (Place within reach). Press the red button if you would like to call the nurse.”
For more information about AIDET, visit AIDET Patient Communication.
Patient Identification
Use at least two patient identifiers before performing assessments, obtaining vital signs, or providing care.
Use two patient identifiers:
- Ask the patient to state their name and date of birth. If they have an armband, compare the information they are stating to the information on the armband and verify they match. See Figure 1.5[33] for an image of an armband.
- If the patient doesn’t have an armband, confirm the information they are stating to information provided in the chart.
- If the patient is unable to state their name and date of birth, scan their armband or ask another staff member or family member to identify them.
Confirm "two identifiers" with a second source:
- Scan the wristband.
- Compare the name and date of birth to the patient’s chart.
- Ask staff to verify the patient in a long-term care setting.
- Compare the picture on the medication administration record (MAR) to the patient.
- If present, ask a family member to confirm the patient’s name.

Cultural Safety
When initiating patient interaction, it is important to establish cultural safety. Cultural safety refers to the creation of safe spaces for patients to interact with health professionals without judgment or discrimination. See Figure 1.6[34] for an image representing cultural safety. Recognizing that you and all patients bring a cultural context to interactions in a health care setting is helpful when creating cultural safe spaces. If you discover you need more information about a patient’s cultural beliefs to tailor your care, use an open-ended question that allows the patient to share what they believe to be important. For example, you may ask, “I am interested in your cultural background as it relates to your health. Can you share with me what is important about your cultural background that will help me care for you?”[35]
For more information about caring for diverse patients, visit the "Diverse Patients" chapter in the Open RN Nursing Fundamentals textbook.

Adapting to Variations Across the Life Span
It is important to adapt your interactions with patients in accordance with their developmental stage. Developmentalists break the life span into nine stages[36]:
- Prenatal Development
- Infancy and Toddlerhood
- Early Childhood
- Middle Childhood
- Adolescence
- Early Adulthood
- Middle Adulthood
- Late Adulthood
- Death and Dying
A brief overview of the characteristics of each stage of human development is provided in Table 1.2. When caring for infants, toddlers, children, and adolescents, parents or guardians are an important source of information, and family dynamics should be included as part of the general survey assessment. When caring for older adults or those who are dying, other family members may be important to include in the general survey assessment. See Figure 1.7[37] for an image representing patients in various developmental stages of life.

Visit the Human Development Life Span e-book at LibreTexts to read additional information about human development across the life span.
Table 1.2 Variations Across the Life Span
| Stage of Development | Common Characteristics |
|---|---|
| Prenatal Development | Conception occurs, and development begins. All major structures of the body are forming, and the health of the mother is of primary concern. Understanding nutrition, teratogens (environmental factors that can lead to birth defects), and labor and delivery are primary concerns for the mother. |
| Infancy and Toddlerhood | The first year and a half to two years of life are ones of dramatic growth and change. A newborn with a keen sense of hearing but very poor vision is transformed into a walking, talking toddler within a relatively short period of time. Caregivers are also transformed from someone who manages feeding and sleep schedules to a constantly moving guide and safety inspector for a mobile, energetic child. |
| Early Childhood | Early childhood is also referred to as the preschool years, consisting of the years that follow toddlerhood and precede formal schooling. As a three- to five-year-old, the child is busy learning language, gaining a sense of self and greater independence, and beginning to learn the workings of the physical world. This knowledge does not come quickly however, and preschoolers may have initially interesting conceptions of size, time, space, and distance, such as fearing that they may go down the drain if they sit at the front of the bathtub. A toddler’s fierce determination to do something may give way to a four-year-old’s sense of guilt for doing something that brings the disapproval of others. |
| Middle Childhood | The ages of six through eleven comprise middle childhood, and much of what children experience at this age is connected to their involvement in the early grades of school. Their world becomes filled with learning and testing new academic skills, assessing one’s abilities and accomplishments, and making comparisons between self and others. Schools compare students and make these comparisons public through team sports, test scores, and other forms of recognition. Growth rates slow down, and children are able to refine their motor skills at this point in life. Children begin to learn about social relationships beyond the family through interaction with friends and fellow students. |
| Adolescence | The World Health Organization defines adolescence as a person between the age of 10 and 19. Adolescence is a period of dramatic physical change marked by an overall physical growth spurt and sexual maturation, known as puberty. It is also a time of cognitive change as the adolescent begins to think of new possibilities and to consider abstract concepts such as love, fear, and freedom. Adolescents have a sense of invincibility that puts them at greater risk of injury from high-risk behaviors such as car accidents, drug and alcohol abuse, or contracting sexually transmitted infections that can have lifelong consequences or result in death. |
| Early Adulthood | The twenties and thirties are often thought of as early adulthood. It is a time of physiological peak but also highest risk for involvement in violent crimes and substance abuse. It is a time of focusing on the future and putting a lot of energy into making choices that will help one earn the status of a full adult in the eyes of others. Love and work are primary concerns at this stage of life. |
| Middle Adulthood | The late thirties through the mid-sixties is referred to as middle adulthood. This is a period in which aging processes that began earlier become more noticeable but also a time when many people are at their peak of productivity in love and work. It can also be a time of becoming more realistic about possibilities in life previously considered and of recognizing the difference between what is possible and what is likely to be achieved in their lifetime. |
| Late Adulthood | This period of the life span has increased over the last 100 years. For nurses, patients in this period are referred to as “older adults.” The term “young old” is used to describe people between 65 and 79, and the term “old old” is used for those who are 80 and older. One of the primary differences between these groups is that the young old are very similar to midlife adults because they are still working, still relatively healthy, and still interested in being productive and active. The “old old” may remain productive, active, and independent, but risks of heart disease, lung disease, cancer, and cerebral vascular disease (i.e., strokes) increase substantially for this age group. Issues of housing, health care, and extending active life expectancy are only a few of the topics of concern for this age group. A better way to appreciate the diversity of people in late adulthood is to go beyond chronological age and examine whether a person is experiencing optimal aging (when they are in very good health for their age and continue to have an active, stimulating life), normal aging (when the changes in health are similar to most of those of the same age), or impaired aging (when more physical challenges and diseases occur compared to others of the same age). |
| Death and Dying | Death is the final stage of life. Dying with dignity allows an individual to make choices about treatment, say goodbyes, and take care of final arrangements. When caring for patients who are actively dying, nurses can advocate for care that allows that person to die with dignity according to their wishes. |
Vital signs are typically obtained prior to performing a physical assessment. Vital signs include temperature recorded in Celsius or Fahrenheit, pulse, respiratory rate, blood pressure, and oxygen saturation using a pulse oximeter. See Figure 1.8[38] for an image of a nurse obtaining vital signs. Obtaining vital signs may be delegated to unlicensed assistive personnel (UAP) for stable patients, depending on the state's Nurse Practice Act, agency policy, and appropriate training. However, the nurse is always accountable for analyzing the vital signs and instituting appropriate follow-up for out-of-range findings. See Appendix A to review a checklist for obtaining vital signs.

The order of obtaining vital signs is based on the patient and their situation. Health care professionals often place the pulse oximeter probe on the patient while proceeding to obtain their pulse, respirations, blood pressure, and temperature. However, in some situations this order is modified based on the urgency of their condition. For example, if a person loses consciousness, the assessment begins with checking their carotid pulse to determine if cardiopulmonary resuscitation (CPR) is required.[39]
Temperature
Accurate temperature measurements provide information about a patient’s health status and guide clinical decisions. Methods of measuring body temperature vary based on the patient’s developmental age, cognitive functioning, level of consciousness, and health status, as well as agency policy. Common methods of temperature measurement include oral, tympanic, axillary, temporal, no touch, and rectal routes. It is important to document the route used to obtain a patient’s temperature because of normal variations in temperature in different locations of the body. Body temperature is typically measured and documented in health care agencies in degrees Celsius (ºC).[40]
Oral Temperature
Normal oral temperature is 35.8 – 37.3ºC (96.4 – 99.1ºF). An oral thermometer is shown in Figure 1.9.[41] The device has blue coloring, indicating it is an oral or axillary thermometer, as opposed to a rectal thermometer that has red coloring. Oral temperature is reliable when it is obtained close to the sublingual artery.[42]
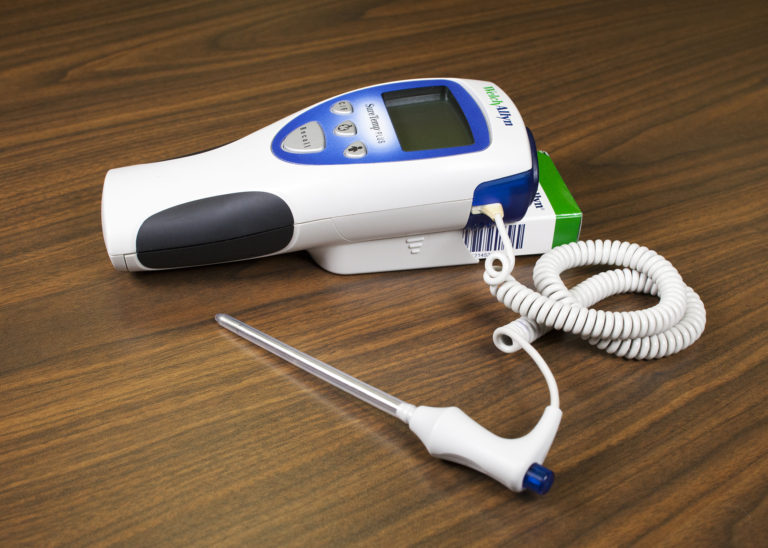
Technique
Remove the probe from the device and slide a probe cover (from the attached box) onto the oral thermometer without touching the probe cover with your hands. Place the thermometer in the posterior sublingual pocket under the tongue, slightly off-center. Instruct the patient to keep their mouth closed but not bite on the thermometer. Leave the thermometer in place for as long as is indicated by the device manufacturer. The thermometer typically beeps within a few seconds when the temperature has been taken. Read the digital display of the results. Discard the probe cover in the garbage (without touching the cover) and place the probe back into the device.[43] See Figure 1.10[44] of an oral temperature being taken.
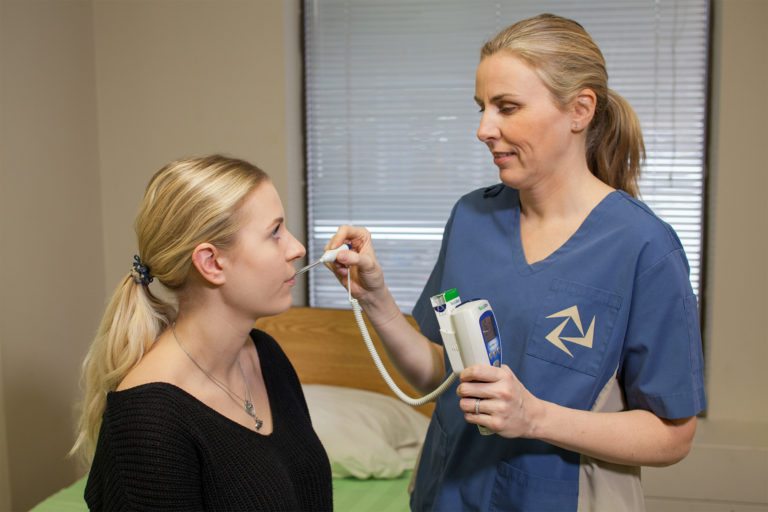
Some factors can cause an inaccurate measurement using the oral route. For example, if the patient recently consumed a hot or cold food or beverage, chewed gum, or smoked prior to measurement, a falsely elevated or decreased reading may be obtained. Oral temperature should be taken 15 to 25 minutes following consumption of a hot or cold beverage or food or 5 minutes after chewing gum or smoking.[45]
Tympanic Temperature
The tympanic temperature is typically 0.3 – 0.6°C or 0.5 - 1°F higher than an oral temperature. It is an accurate measurement because the tympanic membrane shares the same vascular artery that perfuses the hypothalamus (the part of the brain that regulates the body’s temperature). See Figure 1.11[46] of a tympanic thermometer. The tympanic method should not be used if the patient has a suspected ear infection.[47] Accumulation of cerumen, earwax, may also reduce the accuracy of tympanic readings.
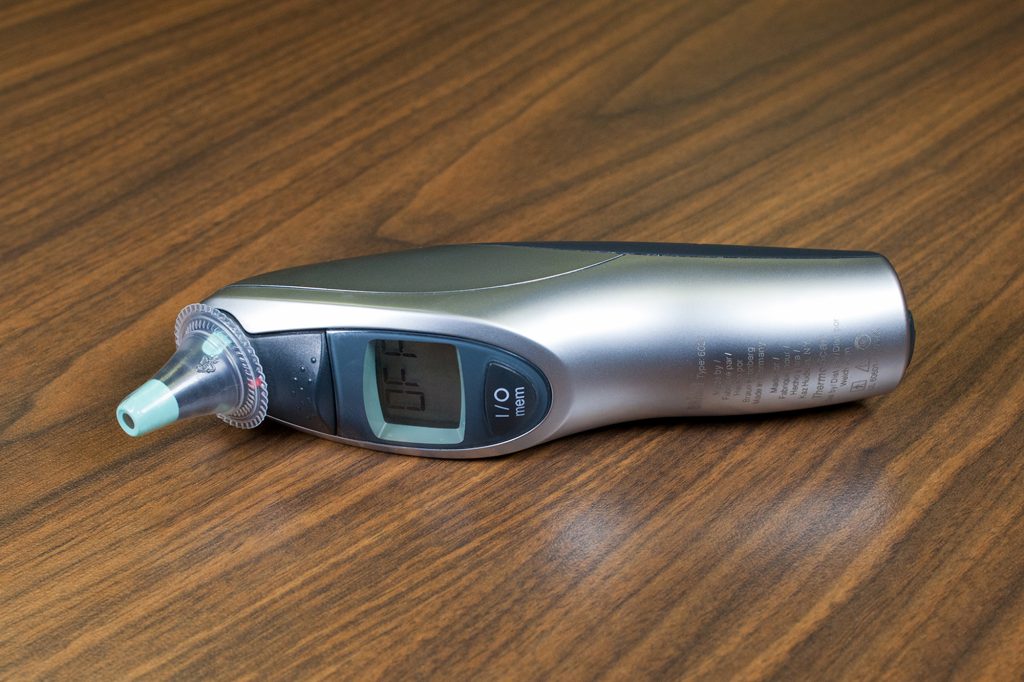
Technique
Remove the tympanic thermometer from its holder and place a probe cover on the thermometer tip without touching the probe cover with your hands. Turn the device on. Ask the patient to keep their head still. For an adult or older child, gently pull the helix (outer ear) up and back to visualize the ear canal. For an infant or child under age 3, gently pull the helix down. Insert the probe just inside the ear canal but never force the thermometer into the ear. The device will beep within a few seconds after the temperature is measured. Read the results displayed, discard the probe cover in the garbage (without touching the cover), and then place the device back into the holder.[48] See Figure 1.12[49] for an image of a tympanic temperature being taken.
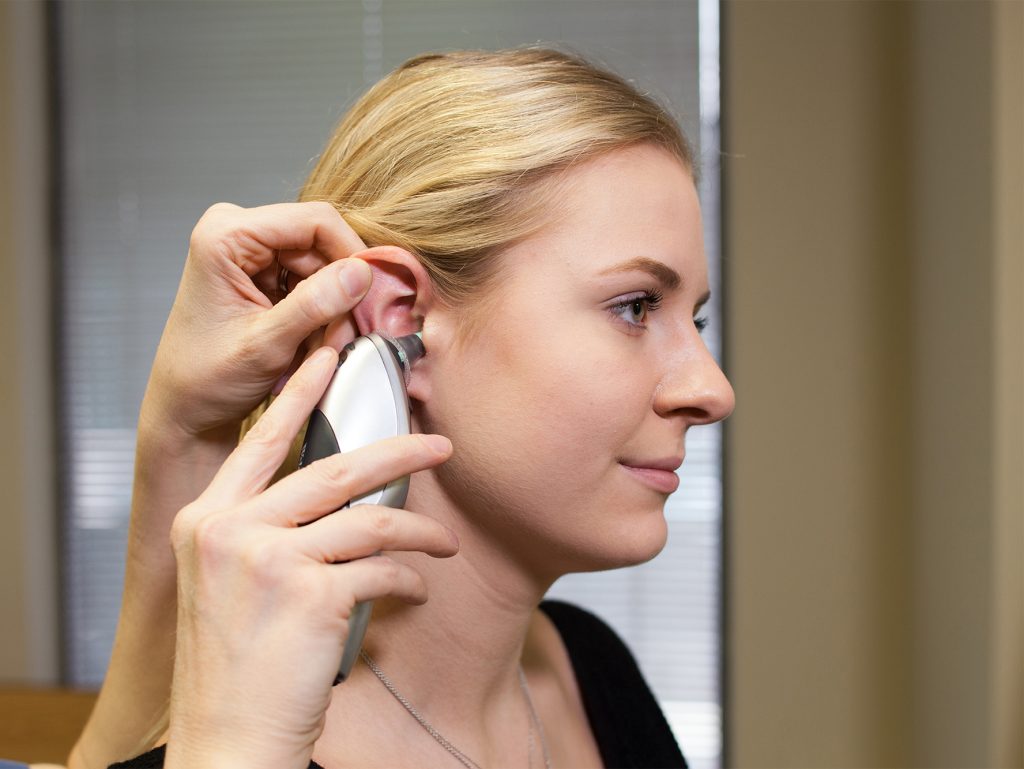
Axillary Temperature
The axillary method is a minimally invasive way to measure temperature and is commonly used in children. It uses the same electronic device as an oral thermometer (with blue coloring). However, the axillary temperature can be as much as 1ºC lower than the oral temperature.[50] An armpit (axillary) temperature is usually 0.3⁰ C (0.5⁰ F) to 0.6⁰ C (1⁰ F) lower than an oral temperature.
Technique
Remove the probe from the device and place a probe cover (from the attached box) on the thermometer without touching the cover with your hands. Ask the patient to raise their arm and place the thermometer probe in their armpit on bare skin as high up into the axilla as possible. The probe should be facing behind the patient. Ask the patient to lower their arm and leave the device in place until it beeps, usually about 10–20 seconds. Read the displayed results, discard the probe cover in the garbage (without touching the cover), and then place the probe back into the device. See Figure 1.13[51] for an image of an axillary temperature.[52]
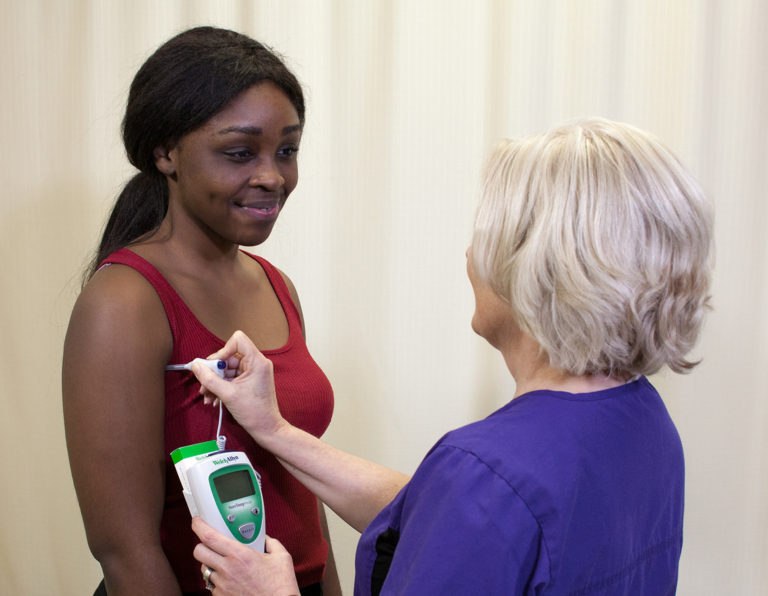
Rectal Temperature
Measuring rectal temperature is an invasive method. Some sources suggest its use only when other methods are not appropriate. However, when measuring infant temperature, it is considered a gold standard because of its accuracy. A rectal temperature is 0.5°F (0.3°C) to 1°F (0.6°C) higher than an oral temperature.[53] See Figure 1.14[54] for an image of a rectal thermometer.
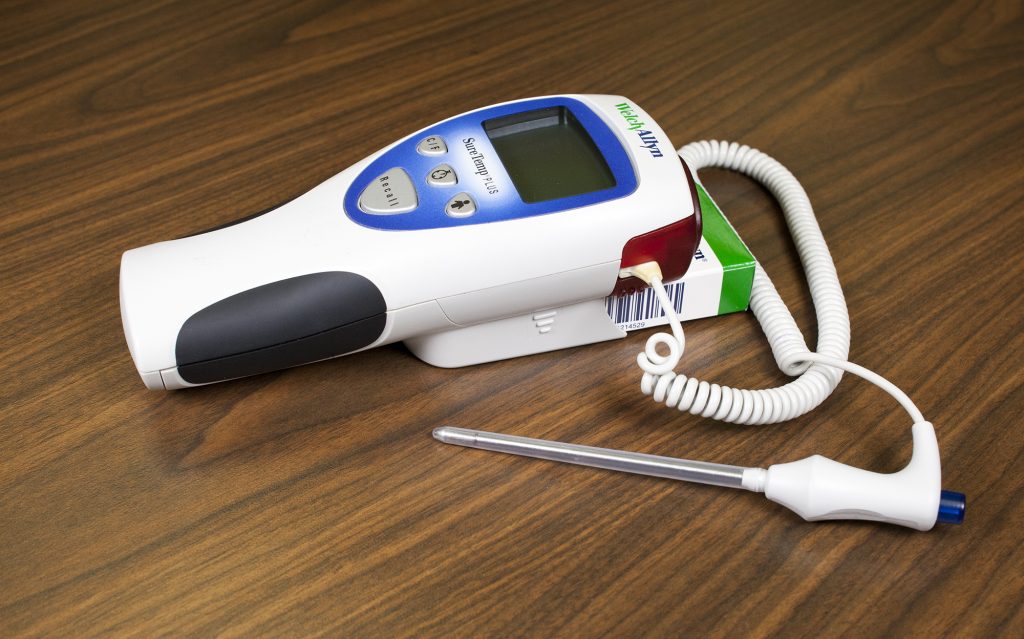
Technique
Before taking a rectal temperature, ensure the patient’s privacy. Wash your hands and put on gloves. For infants, place them in a supine position and raise their legs upwards toward their chest. Parents may be encouraged to hold the infant to decrease movement and provide a sense of safety. When taking a rectal temperature in older children and adults, assist them into a side lying position and explain the procedure. Remove the probe from the device and place a probe cover (from the attached box) on the thermometer. Lubricate the cover with a water-based lubricant, and then gently insert the probe 2–3 cm (approximately 0.5 in for babies less than 6 months old to 1 inch) into the anus or less, depending on the patient’s size.[55] Remove the probe when the device beeps. Read the result and then discard the probe cover in the trash can without touching it. Cleanse the device as indicated by agency policy. Remove gloves and perform hand hygiene.
Temporal Temperature
Temporal temperature is taken by using a device placed on the forehead. Temporal thermometers contain an infrared scanner that measures the heat on the surface of the skin resulting from blood moving through the temporal artery in the forehead. Temporal temperature is typically 0.5°F (0.3°C) to 1°F (0.6°C) lower than an oral temperature. It is a quick, noninvasive method, but accurate measurement is dependent on good contact with the skin and good placement on the forehead.
See Table 1.3a for normal temperature ranges for various routes.
Table 1.3 Normal Temperature Ranges[56]
| Method | Normal Range |
|---|---|
| Oral | 35.8 – 37.3ºC (96.4 -99.1ºF) |
| Axillary | 34.8 – 36.3ºC (96.4 -97.3ºF) |
| Tympanic | 36.1 – 37.9ºC (97.0 -100.2ºF) |
| Rectal | 36.8 – 38.2ºC (98.2 -100.8ºF) |
| Temporal | 35.2 - 37.0ºC (95.4 - 98.6ºF) |
Pulse
Pulse refers to the pressure wave that expands and recoils arteries when the left ventricle of the heart contracts. It is palpated at many points throughout the body. The most common locations to palpate pulses as part of vital sign measurement include radial, brachial, carotid, and apical areas as indicated in Figure 1.15.[57]
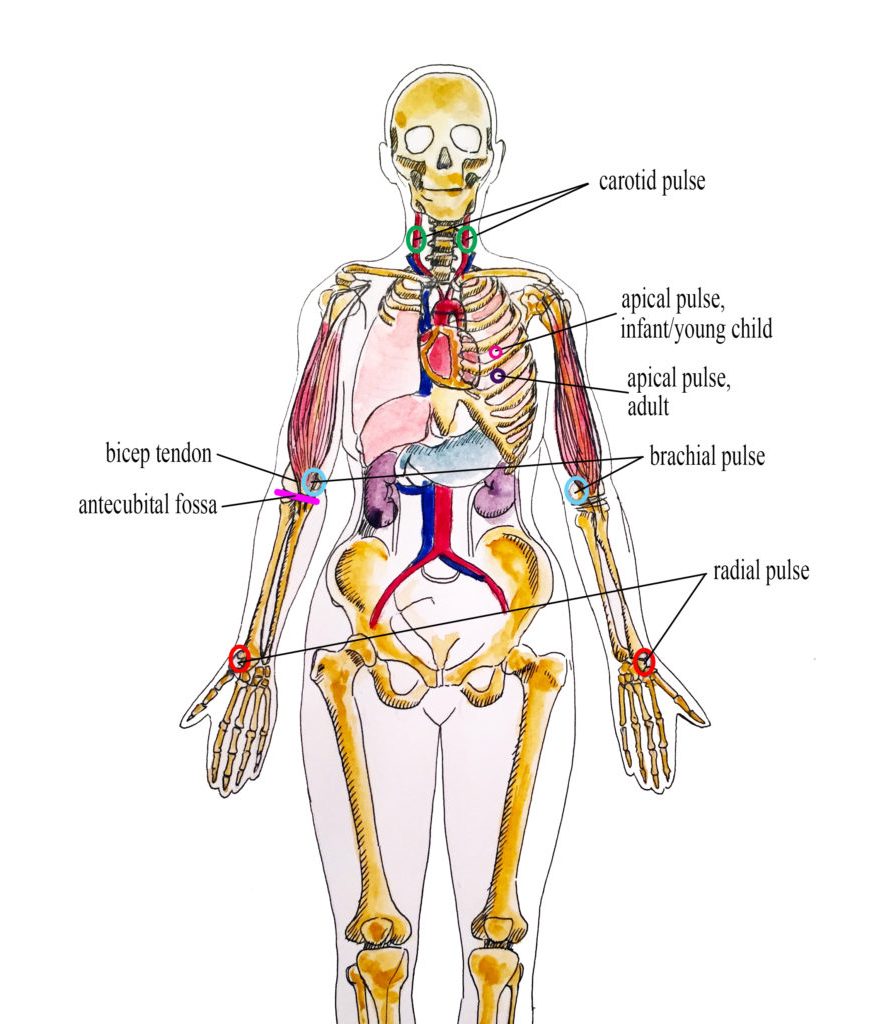
Pulse is measured in beats per minute wherever a pulse can be palpated. The normal adult pulse rate (heart rate) at rest is 60–100 beats per minute with different ranges according to age. The pulse rate is a measurement of the number of times the heart beats per minute. The pulse rate may differ from the heart rate if the force of the heart contraction is not strong enough to generate a pulse because the pulse is palpated whereas the heart rate is typically auscultated. See Table 1.3b for normal heart rate ranges by age. It is important to consider each patient situation when analyzing if their heart rate is within normal range. Begin by reviewing their documented baseline heart rate. Consider other factors if the pulse is elevated, such as the presence of pain or crying in an infant. It is best to complete the assessment when a patient is resting and comfortable, but if this is not feasible, document the circumstances surrounding the assessment and reassess as needed.[58] For example, pulse rate may be artificially elevated when individuals experience physical or mental stress. Therefore, it is best to collect a pulse rate assessment when the patient is resting.
Table 1.3b Normal Heart Rate by Age
| Age Group | Heart Rate |
|---|---|
| Preterm | 120 - 180 |
| Newborn (0 to 1 month) | 100 - 160 |
| Infant (1 to 12 months) | 80 - 140 |
| Toddler (1 to 3 years) | 80 - 130 |
| Preschool (3 to 5 years) | 80 - 110 |
| School Age (6 to 12 years) | 70 - 100 |
| Adolescents (13 to 18 years) and Adults | 60 - 100 |
Pulse Characteristics
When assessing pulses, the characteristics of rhythm, rate, force, and equality are included in the documentation.
Pulse Rhythm
A normal pulse has a regular rhythm, meaning the frequency of the pulsation felt by your fingers is an even tempo with equal intervals between pulsations. For example, if you compare the palpation of pulses to listening to music, it follows a constant beat at the same tempo that does not speed up or slow down. Some cardiovascular conditions, such as atrial fibrillation, cause an irregular heart rhythm. If a pulse has an irregular rhythm, document if it is “regularly irregular” (e.g., three regular beats are followed by one missed and this pattern is repeated) or if it is “irregularly irregular” (e.g., there is no rhythm to the irregularity).[59]
Pulse Rate
The pulse rate is counted with the first beat felt by your fingers as “One.” It is considered best practice to assess a patient’s pulse for a full 60 seconds, especially if there is an irregularity to the rhythm.[60]
Pulse Force
The pulse force is the strength of the pulsation felt on palpation. Pulse force can range from absent to bounding. The volume of blood, the heart’s functioning, and the arteries’ elastic properties affect a person’s pulse force.[61] Pulse force is documented using a four-point scale:
- 3+: Full, bounding
- 2+: Normal/strong
- 1+: Weak, diminished, thready
- 0: Absent/nonpalpable
If a pulse is absent, a Doppler ultrasound device is typically used to verify perfusion of the limbs. The Doppler is a handheld device that allows the examiner to hear the whooshing sound of the pulse. This device is also commonly used when assessing peripheral pulses in the lower extremities, such as the dorsalis pedis pulse or the posterior tibial pulse. See the following video demonstrating the use of a Doppler device.
Pulse Equality
Pulse equality refers to a comparison of the pulse forces on both sides of the body. For example, a nurse often palpates the radial pulse on a patient’s right and left wrists at the same time and compares if the pulse forces are equal. However, the carotid pulses should never be palpated at the same time because this can decrease blood flow to the brain. Pulse equality provides data about medical conditions such as peripheral vascular disease and arterial obstruction.[63]
Radial Pulse
Use the pads of your first three fingers to gently palpate the radial pulse. The pads of the fingers are placed along the radius bone on the lateral side of the wrist (i.e., the thumb side). Fingertips are placed close to the flexor aspect of the wrist (i.e., where the wrist meets the hand and bends). See Figure 1.16[64] for correct placement of fingers in obtaining a radial pulse. Press down with your fingers until you can feel the pulsation, but not so forcefully that you are obliterating the wave of the force passing through the artery. Note that radial pulses are difficult to palpate on newborns and children under the age of five, so the brachial or apical pulses are typically obtained in these populations.[65]
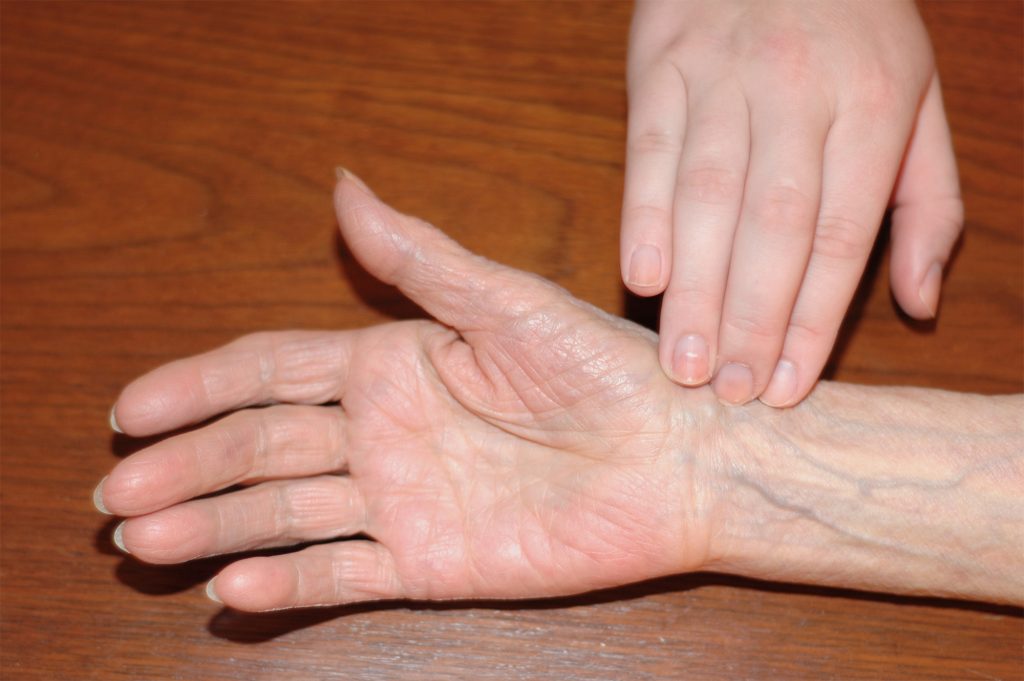
Carotid Pulse
The carotid pulse is typically palpated during medical emergencies because it is the last pulse to disappear when the heart is not pumping an adequate amount of blood.[66]
Technique
Locate the carotid artery medial to the sternomastoid muscle, between the muscle and the trachea, in the middle third of the neck. In order to palpate the carotid, place the index and middle fingers on the patient's neck to the side of individual's trachea. With the pads of your three fingers, gently palpate one carotid artery at a time so as not to compromise blood flow to the brain. See Figure 1.17[67] for correct placement of fingers in a seated patient.[68]
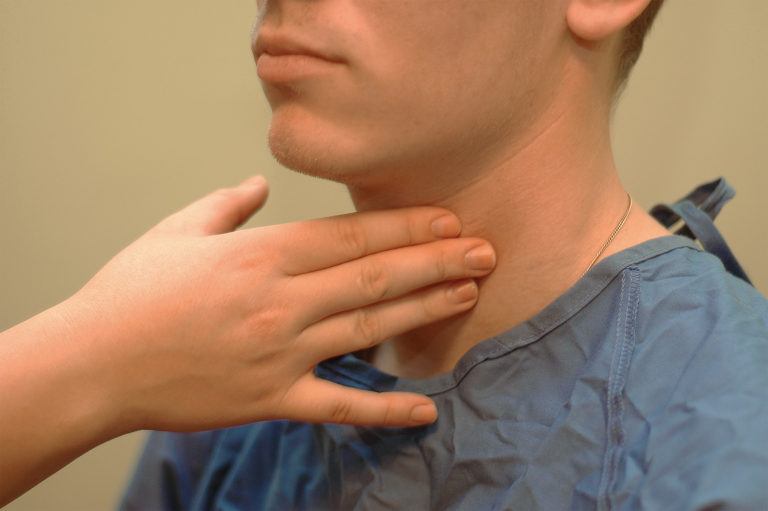
Brachial Pulse
A brachial pulse is typically assessed in infants and children because it can be difficult to feel the radial pulse in these populations. If needed, a Doppler ultrasound device can be used to obtain the pulse.
Technique
The brachial pulse is located by feeling the bicep tendon in the area of the antecubital fossa. Move the pads of your three fingers medially from the tendon about 1 inch (2 cm) just above the antecubital fossa. It can be helpful to hyperextend the patient’s arm to accentuate the brachial pulse so that you can better feel it. You may need to move your fingers around slightly to locate the best place to accurately feel the pulse. You typically need to press fairly firmly to palpate the brachial pulse.[69] See Figure 1.18[70] for correct placement of fingers along the brachial artery.
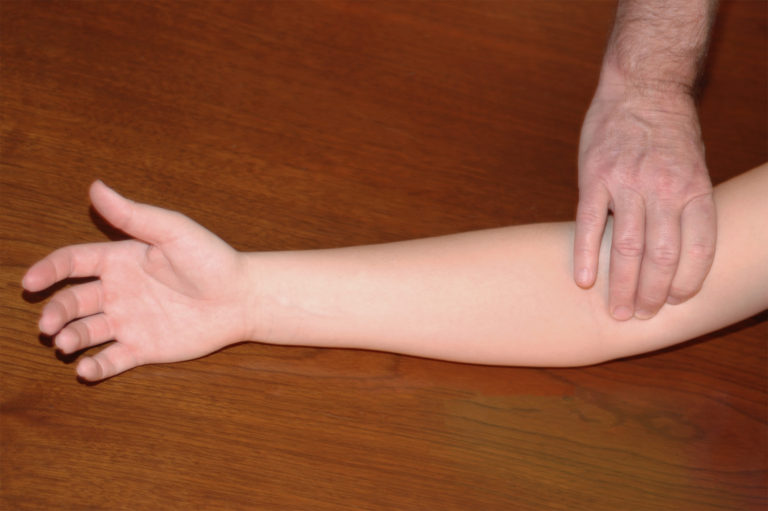
Apical Pulse
The apical pulse rate is considered the most accurate pulse and is indicated when obtaining assessments prior to administering cardiac medications. It is obtained by listening with a stethoscope over a specific position on the patient’s chest wall. Read more about listening to the apical pulse and other heart sounds in the “Cardiovascular Assessment” section.
Respiratory Rate
Respiration refers to a person’s breathing and the movement of air into and out of the lungs. Inspiration refers to the process causing air to enter the lungs, and expiration refers to the process causing air to leave the lungs. A respiratory cycle (i.e., one breath while measuring respiratory rate) is one sequence of inspiration and expiration.[71]
When obtaining a respiratory rate, the respirations are also assessed for quality, rhythm, and rate. The quality of a person’s breathing is normally relaxed and silent. However, loud breathing, nasal flaring, or the use of accessory muscles in the neck, chest, or intercostal spaces indicate respiratory distress. People experiencing respiratory distress also often move into a tripod position, meaning they are leaning forward and placing their arms or elbows on their knees or on a bedside table. If a patient is demonstrating new signs of respiratory distress as you are obtaining their vital signs, it is vital to immediately notify the health care provider or follow agency protocol.
Respirations normally have a regular rhythm in children and adults who are awake. A regular rhythm means that the frequency of the respiration follows an even tempo with equal intervals between each respiration. However, newborns and infants commonly exhibit an irregular respiratory rhythm.
Normal respiratory rates vary based on age. The normal resting respiratory rate for adults is 10–20 breaths per minute, whereas infants younger than one year old normally have a respiratory rate of 30–60 breaths per minute. See Table 1.3c for ranges of normal respiratory rates by age. It is also important to consider factors such as sleep cycle, presence of pain, and crying when assessing a patient’s respiratory rate.[72]
Read more about assessing a patient’s respiratory status in the “Respiratory Assessment” section.
Table 1.3c Normal Respiratory Rate by Age[73]
| Age | Normal Range |
|---|---|
| Newborn to one month | 30 - 60 |
| One month to one year | 26 - 60 |
| 1-10 years of age | 14 - 50 |
| 11-18 years of age | 12 - 22 |
| Adult (ages 18 and older) | 10 - 20 |
Oxygen Saturation
A patient’s oxygenation status is routinely assessed using pulse oximetry, referred to as SpO2. SpO2 is an estimated oxygenation level based on the saturation of hemoglobin measured by a pulse oximeter. Because the majority of oxygen carried in the blood is attached to hemoglobin within the red blood cells, SpO2 estimates how much hemoglobin is “saturated” with oxygen. The target range of SpO2 for an adult is 94-100%. For patients with chronic respiratory conditions, such as chronic obstructive pulmonary disease (COPD), the target range for SpO2 is often lower at 88% to 92%. Although SpO2 is an efficient, noninvasive method to assess a patient’s oxygenation status, it is an estimate and not always accurate. For example, if a patient is severely anemic and has a decreased level of hemoglobin in the blood, the SpO2 reading is affected. Decreased peripheral circulation can also cause a misleading low SpO2 level.
A pulse oximeter includes a sensor that measures light absorption of hemoglobin. See Figure 1.19[74] for an image of a pulse oximeter. The sensor can be attached to the patient using a variety of devices. For intermittent measurement of oxygen saturation, a spring-loaded clip is attached to a patient’s finger or toe. However, this clip is too large for use on newborns and young children; therefore, for this population, the sensor is typically taped to a finger or toe. An earlobe clip is another alternative for patients who cannot tolerate the finger or toe clip or have a condition, such as vasoconstriction or poor peripheral perfusion, that could affect the results.
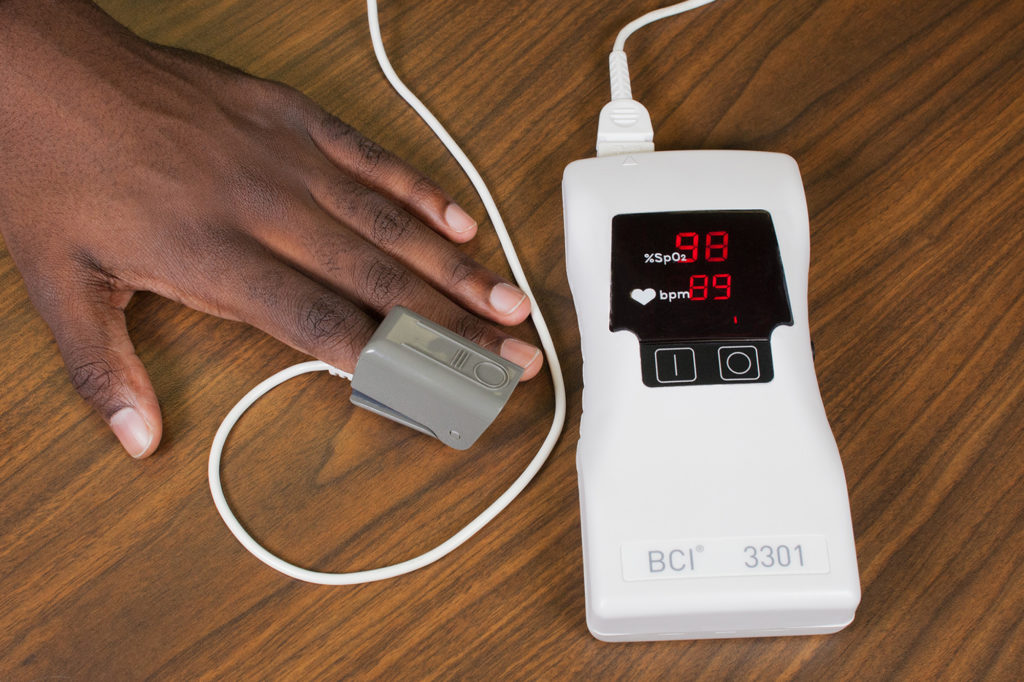
Read more about pulse oximetry in the “Oxygen Therapy” chapter.
Technique
Nail polish or artificial nails can affect the absorption of light waves from the pulse oximeter and decrease the accuracy of the SpO2 measurement when using a probe clipped on the finger. An alternative sensor that does not use the finger should be used for these patients or the nail polish should be removed. If a patient’s hands or feet are cold, it is helpful to clip the sensor to the earlobe or tape it to the forehead.
Blood Pressure
Read information about how to accurately obtain blood pressure measurement in the “Blood Pressure” chapter.
Interpreting Results
After obtaining a patient’s vital signs, it is important to immediately analyze the results, recognize deviations from expected normal ranges, and report deviations appropriately. As a nursing student, it is vital to immediately notify your instructor and/or collaborating nurse caring for the patient of any vital sign measurement out of normal range.
Vital signs are typically obtained prior to performing a physical assessment. Vital signs include temperature recorded in Celsius or Fahrenheit, pulse, respiratory rate, blood pressure, and oxygen saturation using a pulse oximeter. See Figure 1.8[75] for an image of a nurse obtaining vital signs. Obtaining vital signs may be delegated to unlicensed assistive personnel (UAP) for stable patients, depending on the state's Nurse Practice Act, agency policy, and appropriate training. However, the nurse is always accountable for analyzing the vital signs and instituting appropriate follow-up for out-of-range findings. See Appendix A to review a checklist for obtaining vital signs.

The order of obtaining vital signs is based on the patient and their situation. Health care professionals often place the pulse oximeter probe on the patient while proceeding to obtain their pulse, respirations, blood pressure, and temperature. However, in some situations this order is modified based on the urgency of their condition. For example, if a person loses consciousness, the assessment begins with checking their carotid pulse to determine if cardiopulmonary resuscitation (CPR) is required.[76]
Temperature
Accurate temperature measurements provide information about a patient’s health status and guide clinical decisions. Methods of measuring body temperature vary based on the patient’s developmental age, cognitive functioning, level of consciousness, and health status, as well as agency policy. Common methods of temperature measurement include oral, tympanic, axillary, temporal, no touch, and rectal routes. It is important to document the route used to obtain a patient’s temperature because of normal variations in temperature in different locations of the body. Body temperature is typically measured and documented in health care agencies in degrees Celsius (ºC).[77]
Oral Temperature
Normal oral temperature is 35.8 – 37.3ºC (96.4 – 99.1ºF). An oral thermometer is shown in Figure 1.9.[78] The device has blue coloring, indicating it is an oral or axillary thermometer, as opposed to a rectal thermometer that has red coloring. Oral temperature is reliable when it is obtained close to the sublingual artery.[79]

Technique
Remove the probe from the device and slide a probe cover (from the attached box) onto the oral thermometer without touching the probe cover with your hands. Place the thermometer in the posterior sublingual pocket under the tongue, slightly off-center. Instruct the patient to keep their mouth closed but not bite on the thermometer. Leave the thermometer in place for as long as is indicated by the device manufacturer. The thermometer typically beeps within a few seconds when the temperature has been taken. Read the digital display of the results. Discard the probe cover in the garbage (without touching the cover) and place the probe back into the device.[80] See Figure 1.10[81] of an oral temperature being taken.

Some factors can cause an inaccurate measurement using the oral route. For example, if the patient recently consumed a hot or cold food or beverage, chewed gum, or smoked prior to measurement, a falsely elevated or decreased reading may be obtained. Oral temperature should be taken 15 to 25 minutes following consumption of a hot or cold beverage or food or 5 minutes after chewing gum or smoking.[82]
Tympanic Temperature
The tympanic temperature is typically 0.3 – 0.6°C or 0.5 - 1°F higher than an oral temperature. It is an accurate measurement because the tympanic membrane shares the same vascular artery that perfuses the hypothalamus (the part of the brain that regulates the body’s temperature). See Figure 1.11[83] of a tympanic thermometer. The tympanic method should not be used if the patient has a suspected ear infection.[84] Accumulation of cerumen, earwax, may also reduce the accuracy of tympanic readings.

Technique
Remove the tympanic thermometer from its holder and place a probe cover on the thermometer tip without touching the probe cover with your hands. Turn the device on. Ask the patient to keep their head still. For an adult or older child, gently pull the helix (outer ear) up and back to visualize the ear canal. For an infant or child under age 3, gently pull the helix down. Insert the probe just inside the ear canal but never force the thermometer into the ear. The device will beep within a few seconds after the temperature is measured. Read the results displayed, discard the probe cover in the garbage (without touching the cover), and then place the device back into the holder.[85] See Figure 1.12[86] for an image of a tympanic temperature being taken.

Axillary Temperature
The axillary method is a minimally invasive way to measure temperature and is commonly used in children. It uses the same electronic device as an oral thermometer (with blue coloring). However, the axillary temperature can be as much as 1ºC lower than the oral temperature.[87] An armpit (axillary) temperature is usually 0.3⁰ C (0.5⁰ F) to 0.6⁰ C (1⁰ F) lower than an oral temperature.
Technique
Remove the probe from the device and place a probe cover (from the attached box) on the thermometer without touching the cover with your hands. Ask the patient to raise their arm and place the thermometer probe in their armpit on bare skin as high up into the axilla as possible. The probe should be facing behind the patient. Ask the patient to lower their arm and leave the device in place until it beeps, usually about 10–20 seconds. Read the displayed results, discard the probe cover in the garbage (without touching the cover), and then place the probe back into the device. See Figure 1.13[88] for an image of an axillary temperature.[89]

Rectal Temperature
Measuring rectal temperature is an invasive method. Some sources suggest its use only when other methods are not appropriate. However, when measuring infant temperature, it is considered a gold standard because of its accuracy. A rectal temperature is 0.5°F (0.3°C) to 1°F (0.6°C) higher than an oral temperature.[90] See Figure 1.14[91] for an image of a rectal thermometer.

Technique
Before taking a rectal temperature, ensure the patient’s privacy. Wash your hands and put on gloves. For infants, place them in a supine position and raise their legs upwards toward their chest. Parents may be encouraged to hold the infant to decrease movement and provide a sense of safety. When taking a rectal temperature in older children and adults, assist them into a side lying position and explain the procedure. Remove the probe from the device and place a probe cover (from the attached box) on the thermometer. Lubricate the cover with a water-based lubricant, and then gently insert the probe 2–3 cm (approximately 0.5 in for babies less than 6 months old to 1 inch) into the anus or less, depending on the patient’s size.[92] Remove the probe when the device beeps. Read the result and then discard the probe cover in the trash can without touching it. Cleanse the device as indicated by agency policy. Remove gloves and perform hand hygiene.
Temporal Temperature
Temporal temperature is taken by using a device placed on the forehead. Temporal thermometers contain an infrared scanner that measures the heat on the surface of the skin resulting from blood moving through the temporal artery in the forehead. Temporal temperature is typically 0.5°F (0.3°C) to 1°F (0.6°C) lower than an oral temperature. It is a quick, noninvasive method, but accurate measurement is dependent on good contact with the skin and good placement on the forehead.
See Table 1.3a for normal temperature ranges for various routes.
Table 1.3 Normal Temperature Ranges[93]
| Method | Normal Range |
|---|---|
| Oral | 35.8 – 37.3ºC (96.4 -99.1ºF) |
| Axillary | 34.8 – 36.3ºC (96.4 -97.3ºF) |
| Tympanic | 36.1 – 37.9ºC (97.0 -100.2ºF) |
| Rectal | 36.8 – 38.2ºC (98.2 -100.8ºF) |
| Temporal | 35.2 - 37.0ºC (95.4 - 98.6ºF) |
Pulse
Pulse refers to the pressure wave that expands and recoils arteries when the left ventricle of the heart contracts. It is palpated at many points throughout the body. The most common locations to palpate pulses as part of vital sign measurement include radial, brachial, carotid, and apical areas as indicated in Figure 1.15.[94]

Pulse is measured in beats per minute wherever a pulse can be palpated. The normal adult pulse rate (heart rate) at rest is 60–100 beats per minute with different ranges according to age. The pulse rate is a measurement of the number of times the heart beats per minute. The pulse rate may differ from the heart rate if the force of the heart contraction is not strong enough to generate a pulse because the pulse is palpated whereas the heart rate is typically auscultated. See Table 1.3b for normal heart rate ranges by age. It is important to consider each patient situation when analyzing if their heart rate is within normal range. Begin by reviewing their documented baseline heart rate. Consider other factors if the pulse is elevated, such as the presence of pain or crying in an infant. It is best to complete the assessment when a patient is resting and comfortable, but if this is not feasible, document the circumstances surrounding the assessment and reassess as needed.[95] For example, pulse rate may be artificially elevated when individuals experience physical or mental stress. Therefore, it is best to collect a pulse rate assessment when the patient is resting.
Table 1.3b Normal Heart Rate by Age
| Age Group | Heart Rate |
|---|---|
| Preterm | 120 - 180 |
| Newborn (0 to 1 month) | 100 - 160 |
| Infant (1 to 12 months) | 80 - 140 |
| Toddler (1 to 3 years) | 80 - 130 |
| Preschool (3 to 5 years) | 80 - 110 |
| School Age (6 to 12 years) | 70 - 100 |
| Adolescents (13 to 18 years) and Adults | 60 - 100 |
Pulse Characteristics
When assessing pulses, the characteristics of rhythm, rate, force, and equality are included in the documentation.
Pulse Rhythm
A normal pulse has a regular rhythm, meaning the frequency of the pulsation felt by your fingers is an even tempo with equal intervals between pulsations. For example, if you compare the palpation of pulses to listening to music, it follows a constant beat at the same tempo that does not speed up or slow down. Some cardiovascular conditions, such as atrial fibrillation, cause an irregular heart rhythm. If a pulse has an irregular rhythm, document if it is “regularly irregular” (e.g., three regular beats are followed by one missed and this pattern is repeated) or if it is “irregularly irregular” (e.g., there is no rhythm to the irregularity).[96]
Pulse Rate
The pulse rate is counted with the first beat felt by your fingers as “One.” It is considered best practice to assess a patient’s pulse for a full 60 seconds, especially if there is an irregularity to the rhythm.[97]
Pulse Force
The pulse force is the strength of the pulsation felt on palpation. Pulse force can range from absent to bounding. The volume of blood, the heart’s functioning, and the arteries’ elastic properties affect a person’s pulse force.[98] Pulse force is documented using a four-point scale:
- 3+: Full, bounding
- 2+: Normal/strong
- 1+: Weak, diminished, thready
- 0: Absent/nonpalpable
If a pulse is absent, a Doppler ultrasound device is typically used to verify perfusion of the limbs. The Doppler is a handheld device that allows the examiner to hear the whooshing sound of the pulse. This device is also commonly used when assessing peripheral pulses in the lower extremities, such as the dorsalis pedis pulse or the posterior tibial pulse. See the following video demonstrating the use of a Doppler device.
Pulse Equality
Pulse equality refers to a comparison of the pulse forces on both sides of the body. For example, a nurse often palpates the radial pulse on a patient’s right and left wrists at the same time and compares if the pulse forces are equal. However, the carotid pulses should never be palpated at the same time because this can decrease blood flow to the brain. Pulse equality provides data about medical conditions such as peripheral vascular disease and arterial obstruction.[100]
Radial Pulse
Use the pads of your first three fingers to gently palpate the radial pulse. The pads of the fingers are placed along the radius bone on the lateral side of the wrist (i.e., the thumb side). Fingertips are placed close to the flexor aspect of the wrist (i.e., where the wrist meets the hand and bends). See Figure 1.16[101] for correct placement of fingers in obtaining a radial pulse. Press down with your fingers until you can feel the pulsation, but not so forcefully that you are obliterating the wave of the force passing through the artery. Note that radial pulses are difficult to palpate on newborns and children under the age of five, so the brachial or apical pulses are typically obtained in these populations.[102]

Carotid Pulse
The carotid pulse is typically palpated during medical emergencies because it is the last pulse to disappear when the heart is not pumping an adequate amount of blood.[103]
Technique
Locate the carotid artery medial to the sternomastoid muscle, between the muscle and the trachea, in the middle third of the neck. In order to palpate the carotid, place the index and middle fingers on the patient's neck to the side of individual's trachea. With the pads of your three fingers, gently palpate one carotid artery at a time so as not to compromise blood flow to the brain. See Figure 1.17[104] for correct placement of fingers in a seated patient.[105]

Brachial Pulse
A brachial pulse is typically assessed in infants and children because it can be difficult to feel the radial pulse in these populations. If needed, a Doppler ultrasound device can be used to obtain the pulse.
Technique
The brachial pulse is located by feeling the bicep tendon in the area of the antecubital fossa. Move the pads of your three fingers medially from the tendon about 1 inch (2 cm) just above the antecubital fossa. It can be helpful to hyperextend the patient’s arm to accentuate the brachial pulse so that you can better feel it. You may need to move your fingers around slightly to locate the best place to accurately feel the pulse. You typically need to press fairly firmly to palpate the brachial pulse.[106] See Figure 1.18[107] for correct placement of fingers along the brachial artery.

Apical Pulse
The apical pulse rate is considered the most accurate pulse and is indicated when obtaining assessments prior to administering cardiac medications. It is obtained by listening with a stethoscope over a specific position on the patient’s chest wall. Read more about listening to the apical pulse and other heart sounds in the “Cardiovascular Assessment” section.
Respiratory Rate
Respiration refers to a person’s breathing and the movement of air into and out of the lungs. Inspiration refers to the process causing air to enter the lungs, and expiration refers to the process causing air to leave the lungs. A respiratory cycle (i.e., one breath while measuring respiratory rate) is one sequence of inspiration and expiration.[108]
When obtaining a respiratory rate, the respirations are also assessed for quality, rhythm, and rate. The quality of a person’s breathing is normally relaxed and silent. However, loud breathing, nasal flaring, or the use of accessory muscles in the neck, chest, or intercostal spaces indicate respiratory distress. People experiencing respiratory distress also often move into a tripod position, meaning they are leaning forward and placing their arms or elbows on their knees or on a bedside table. If a patient is demonstrating new signs of respiratory distress as you are obtaining their vital signs, it is vital to immediately notify the health care provider or follow agency protocol.
Respirations normally have a regular rhythm in children and adults who are awake. A regular rhythm means that the frequency of the respiration follows an even tempo with equal intervals between each respiration. However, newborns and infants commonly exhibit an irregular respiratory rhythm.
Normal respiratory rates vary based on age. The normal resting respiratory rate for adults is 10–20 breaths per minute, whereas infants younger than one year old normally have a respiratory rate of 30–60 breaths per minute. See Table 1.3c for ranges of normal respiratory rates by age. It is also important to consider factors such as sleep cycle, presence of pain, and crying when assessing a patient’s respiratory rate.[109]
Read more about assessing a patient’s respiratory status in the “Respiratory Assessment” section.
Table 1.3c Normal Respiratory Rate by Age[110]
| Age | Normal Range |
|---|---|
| Newborn to one month | 30 - 60 |
| One month to one year | 26 - 60 |
| 1-10 years of age | 14 - 50 |
| 11-18 years of age | 12 - 22 |
| Adult (ages 18 and older) | 10 - 20 |
Oxygen Saturation
A patient’s oxygenation status is routinely assessed using pulse oximetry, referred to as SpO2. SpO2 is an estimated oxygenation level based on the saturation of hemoglobin measured by a pulse oximeter. Because the majority of oxygen carried in the blood is attached to hemoglobin within the red blood cells, SpO2 estimates how much hemoglobin is “saturated” with oxygen. The target range of SpO2 for an adult is 94-100%. For patients with chronic respiratory conditions, such as chronic obstructive pulmonary disease (COPD), the target range for SpO2 is often lower at 88% to 92%. Although SpO2 is an efficient, noninvasive method to assess a patient’s oxygenation status, it is an estimate and not always accurate. For example, if a patient is severely anemic and has a decreased level of hemoglobin in the blood, the SpO2 reading is affected. Decreased peripheral circulation can also cause a misleading low SpO2 level.
A pulse oximeter includes a sensor that measures light absorption of hemoglobin. See Figure 1.19[111] for an image of a pulse oximeter. The sensor can be attached to the patient using a variety of devices. For intermittent measurement of oxygen saturation, a spring-loaded clip is attached to a patient’s finger or toe. However, this clip is too large for use on newborns and young children; therefore, for this population, the sensor is typically taped to a finger or toe. An earlobe clip is another alternative for patients who cannot tolerate the finger or toe clip or have a condition, such as vasoconstriction or poor peripheral perfusion, that could affect the results.

Read more about pulse oximetry in the “Oxygen Therapy” chapter.
Technique
Nail polish or artificial nails can affect the absorption of light waves from the pulse oximeter and decrease the accuracy of the SpO2 measurement when using a probe clipped on the finger. An alternative sensor that does not use the finger should be used for these patients or the nail polish should be removed. If a patient’s hands or feet are cold, it is helpful to clip the sensor to the earlobe or tape it to the forehead.
Blood Pressure
Read information about how to accurately obtain blood pressure measurement in the “Blood Pressure” chapter.
Interpreting Results
After obtaining a patient’s vital signs, it is important to immediately analyze the results, recognize deviations from expected normal ranges, and report deviations appropriately. As a nursing student, it is vital to immediately notify your instructor and/or collaborating nurse caring for the patient of any vital sign measurement out of normal range.

