Assessing Wounds
Open Resources for Nursing (Open RN)
Wounds should be assessed and documented at every dressing change. Wound assessment should include the following components:
- Anatomic location
- Type of wound (if known)
- Degree of tissue damage
- Wound bed
- Wound size
- Wound edges and periwound skin
- Signs of infection
- Pain[1]
These components are further discussed in the following sections.
Anatomic Location and Type of Wound
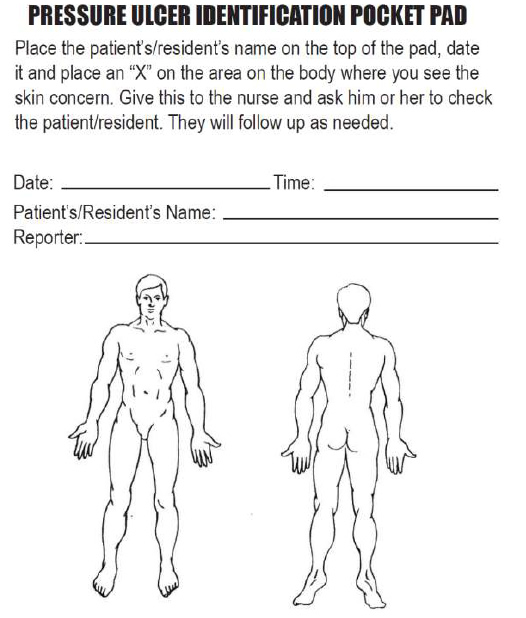
The location of the wound should be documented clearly using correct anatomical terms and numbering. This will ensure that if more than one wound is present, the correct one is being assessed and treated. Many agencies use images to facilitate communication regarding the location of wounds among the health care team. See Figure 20.16[2] for an example of facility documentation that includes images to indicate wound location.
The location of a wound also provides information about the cause and type of a wound. For example, a wound over the sacral area of an immobile patient is likely a pressure injury, and a wound near the ankle of a patient with venous insufficiency is likely a venous ulcer. For successful healing, different types of wounds require different treatments based on the cause of the wound.
Degree of Tissue Damage
It is important to continually assess the degree of tissue damage in pressure injuries because the level of damage can worsen if they are not treated appropriately. Refer to the “Staging” subsection of “Pressure Injuries” in the “Basic Concepts Related to Wounds” section for more information about tissue damage.
Wound Base
Assess the color of the wound base. Recall that healthy granulation tissue appears pink due to the new capillary formation. It is moist, painless to the touch, and may appear “bumpy.” Conversely, unhealthy granulation tissue is dark red and painful. It bleeds easily with minimal contact and may be covered with biofilm. The appearance of slough (yellow) or eschar (black) in the wound base should be documented and communicated to the health care provider because it likely will need to be removed for healing. Tunneling and undermining should also be assessed, documented, and communicated.
Type and Amount of Exudate
The color, consistency, and amount of exudate (drainage) should be assessed and documented at every dressing change. The amount of drainage from wounds is categorized as scant, small/minimal, moderate, or large/copious. Use the following descriptions to select the appropriate terms[3]:
- No exudate: The wound base is dry.
- Scant amount of exudate: The wound is moist, but no measurable amount of exudate appears on the dressing.
- Minimal amount of exudate: Exudate covers less than 25% of the size of the bandage.
- Moderate amount of drainage: Wound tissue is wet, and drainage covers 25% to 75% of the size of the bandage.
- Large or copious amount of drainage: Wound tissue is filled with fluid, and exudate covers more than 75% of the bandage.[4]
The type of wound drainage should be described using medical terms such as serosanguinous, sanguineous, serous, or purulent.
- Sanguineous: Sanguineous exudate is fresh bleeding.[5]
- Serous: Serous drainage is clear, thin, watery plasma. It’s normal during the inflammatory stage of wound healing, and small amounts are considered normal wound drainage.[6]
- Serosanguinous: Serosanguineous exudate contains serous drainage with small amounts of blood present.[7]
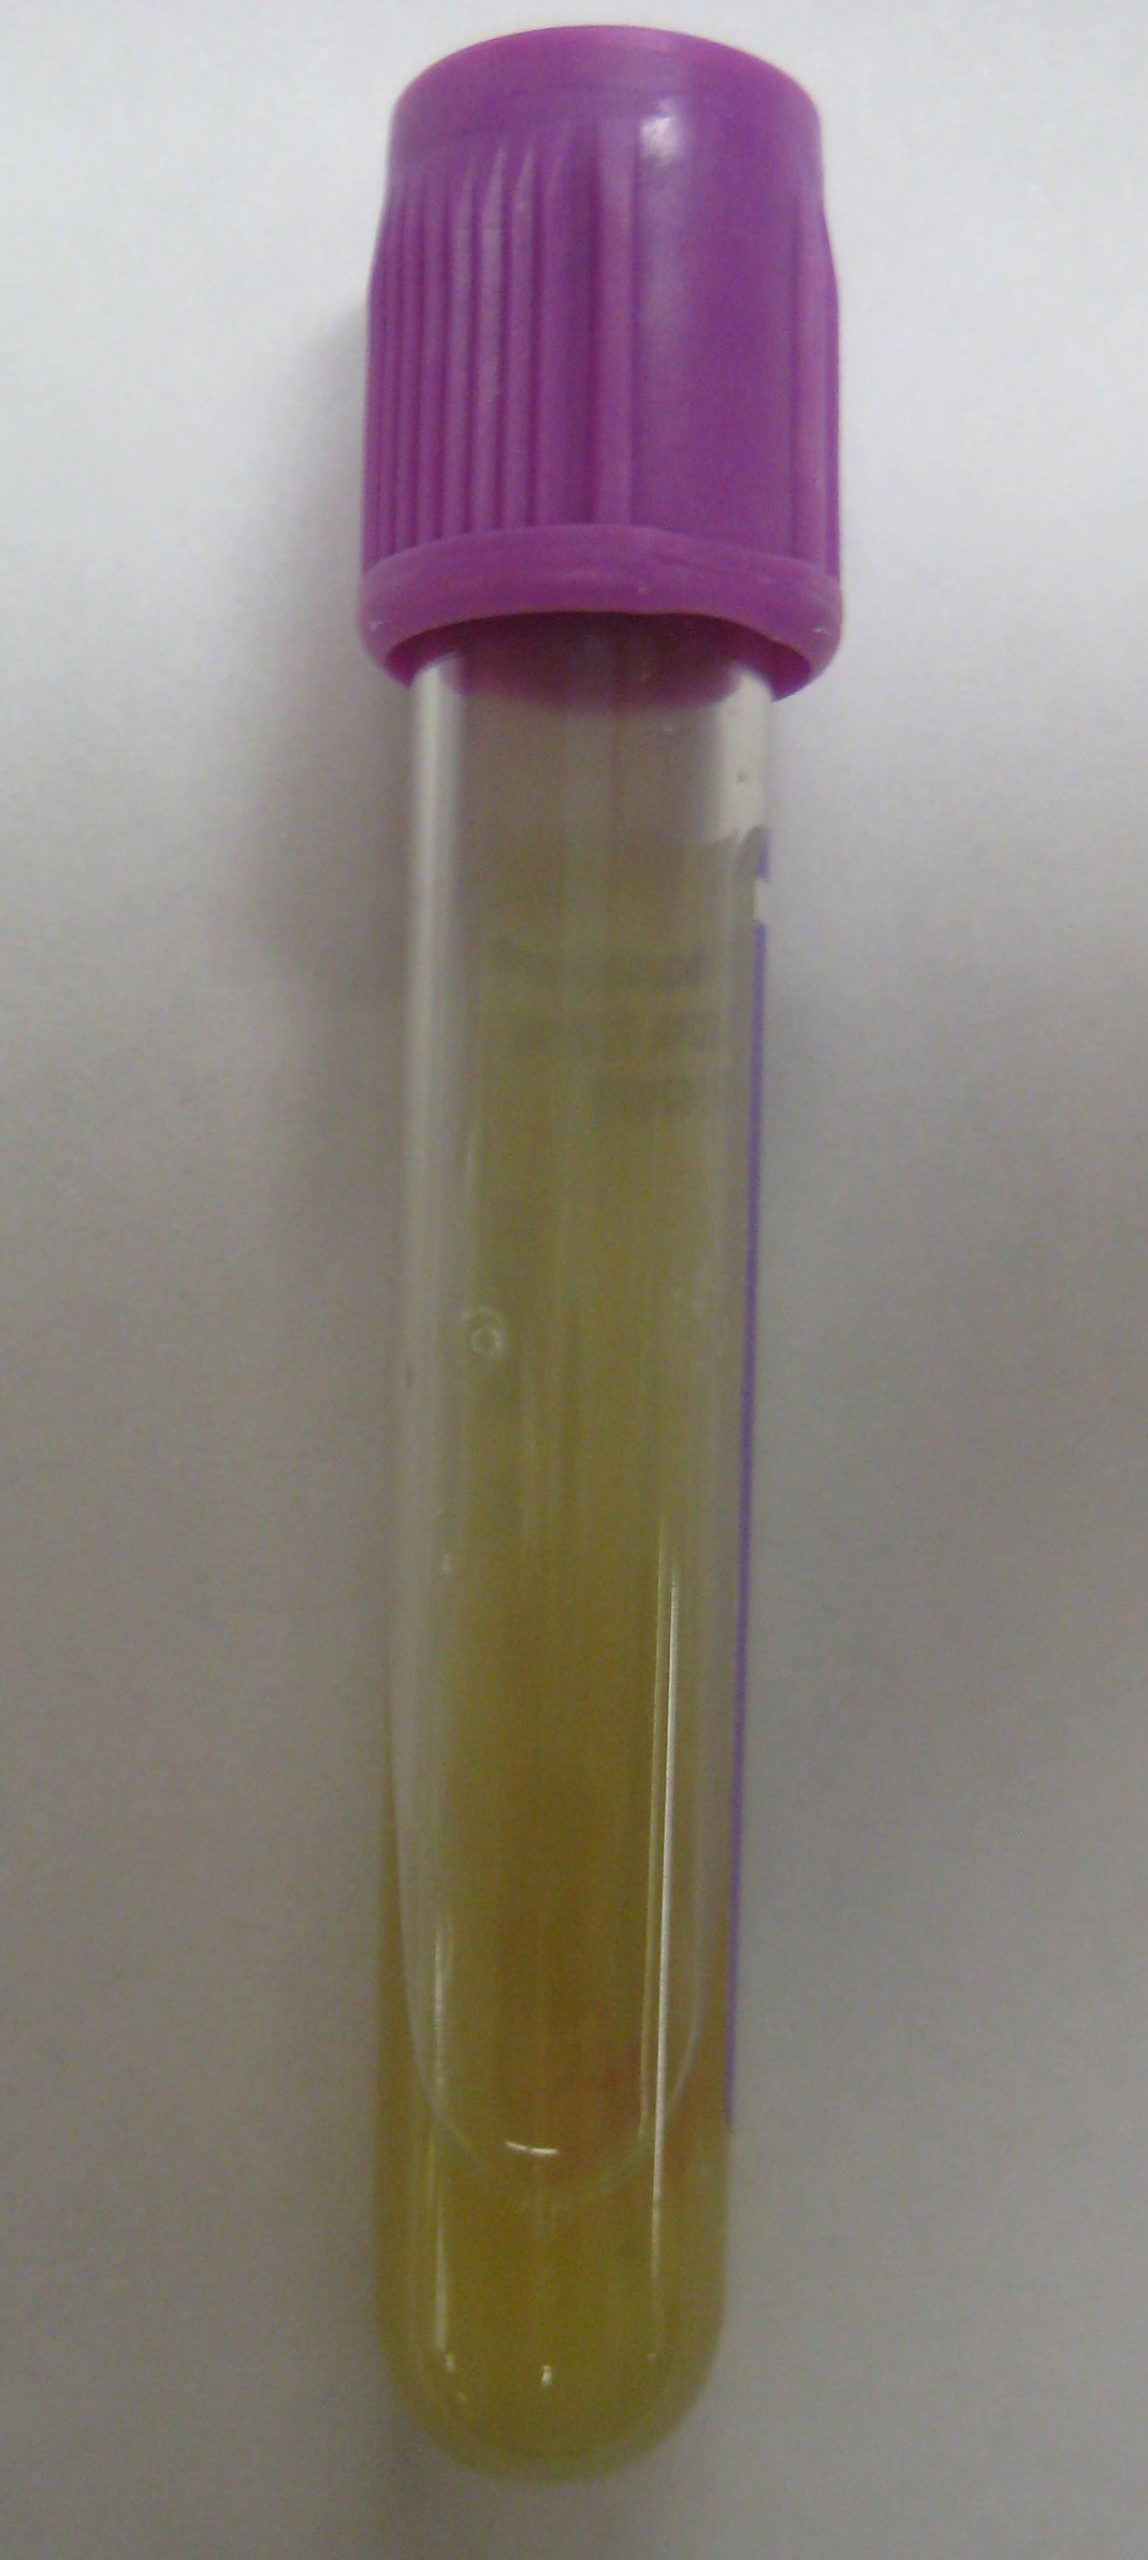
- Purulent: Purulent exudate is thick and opaque. It can be tan, yellow, green, or brown. It is never considered normal in a wound bed, and new purulent drainage should always be reported to the health care provider.[8] See Figure 20.17[9] for an image of purulent drainage.
Wound Size
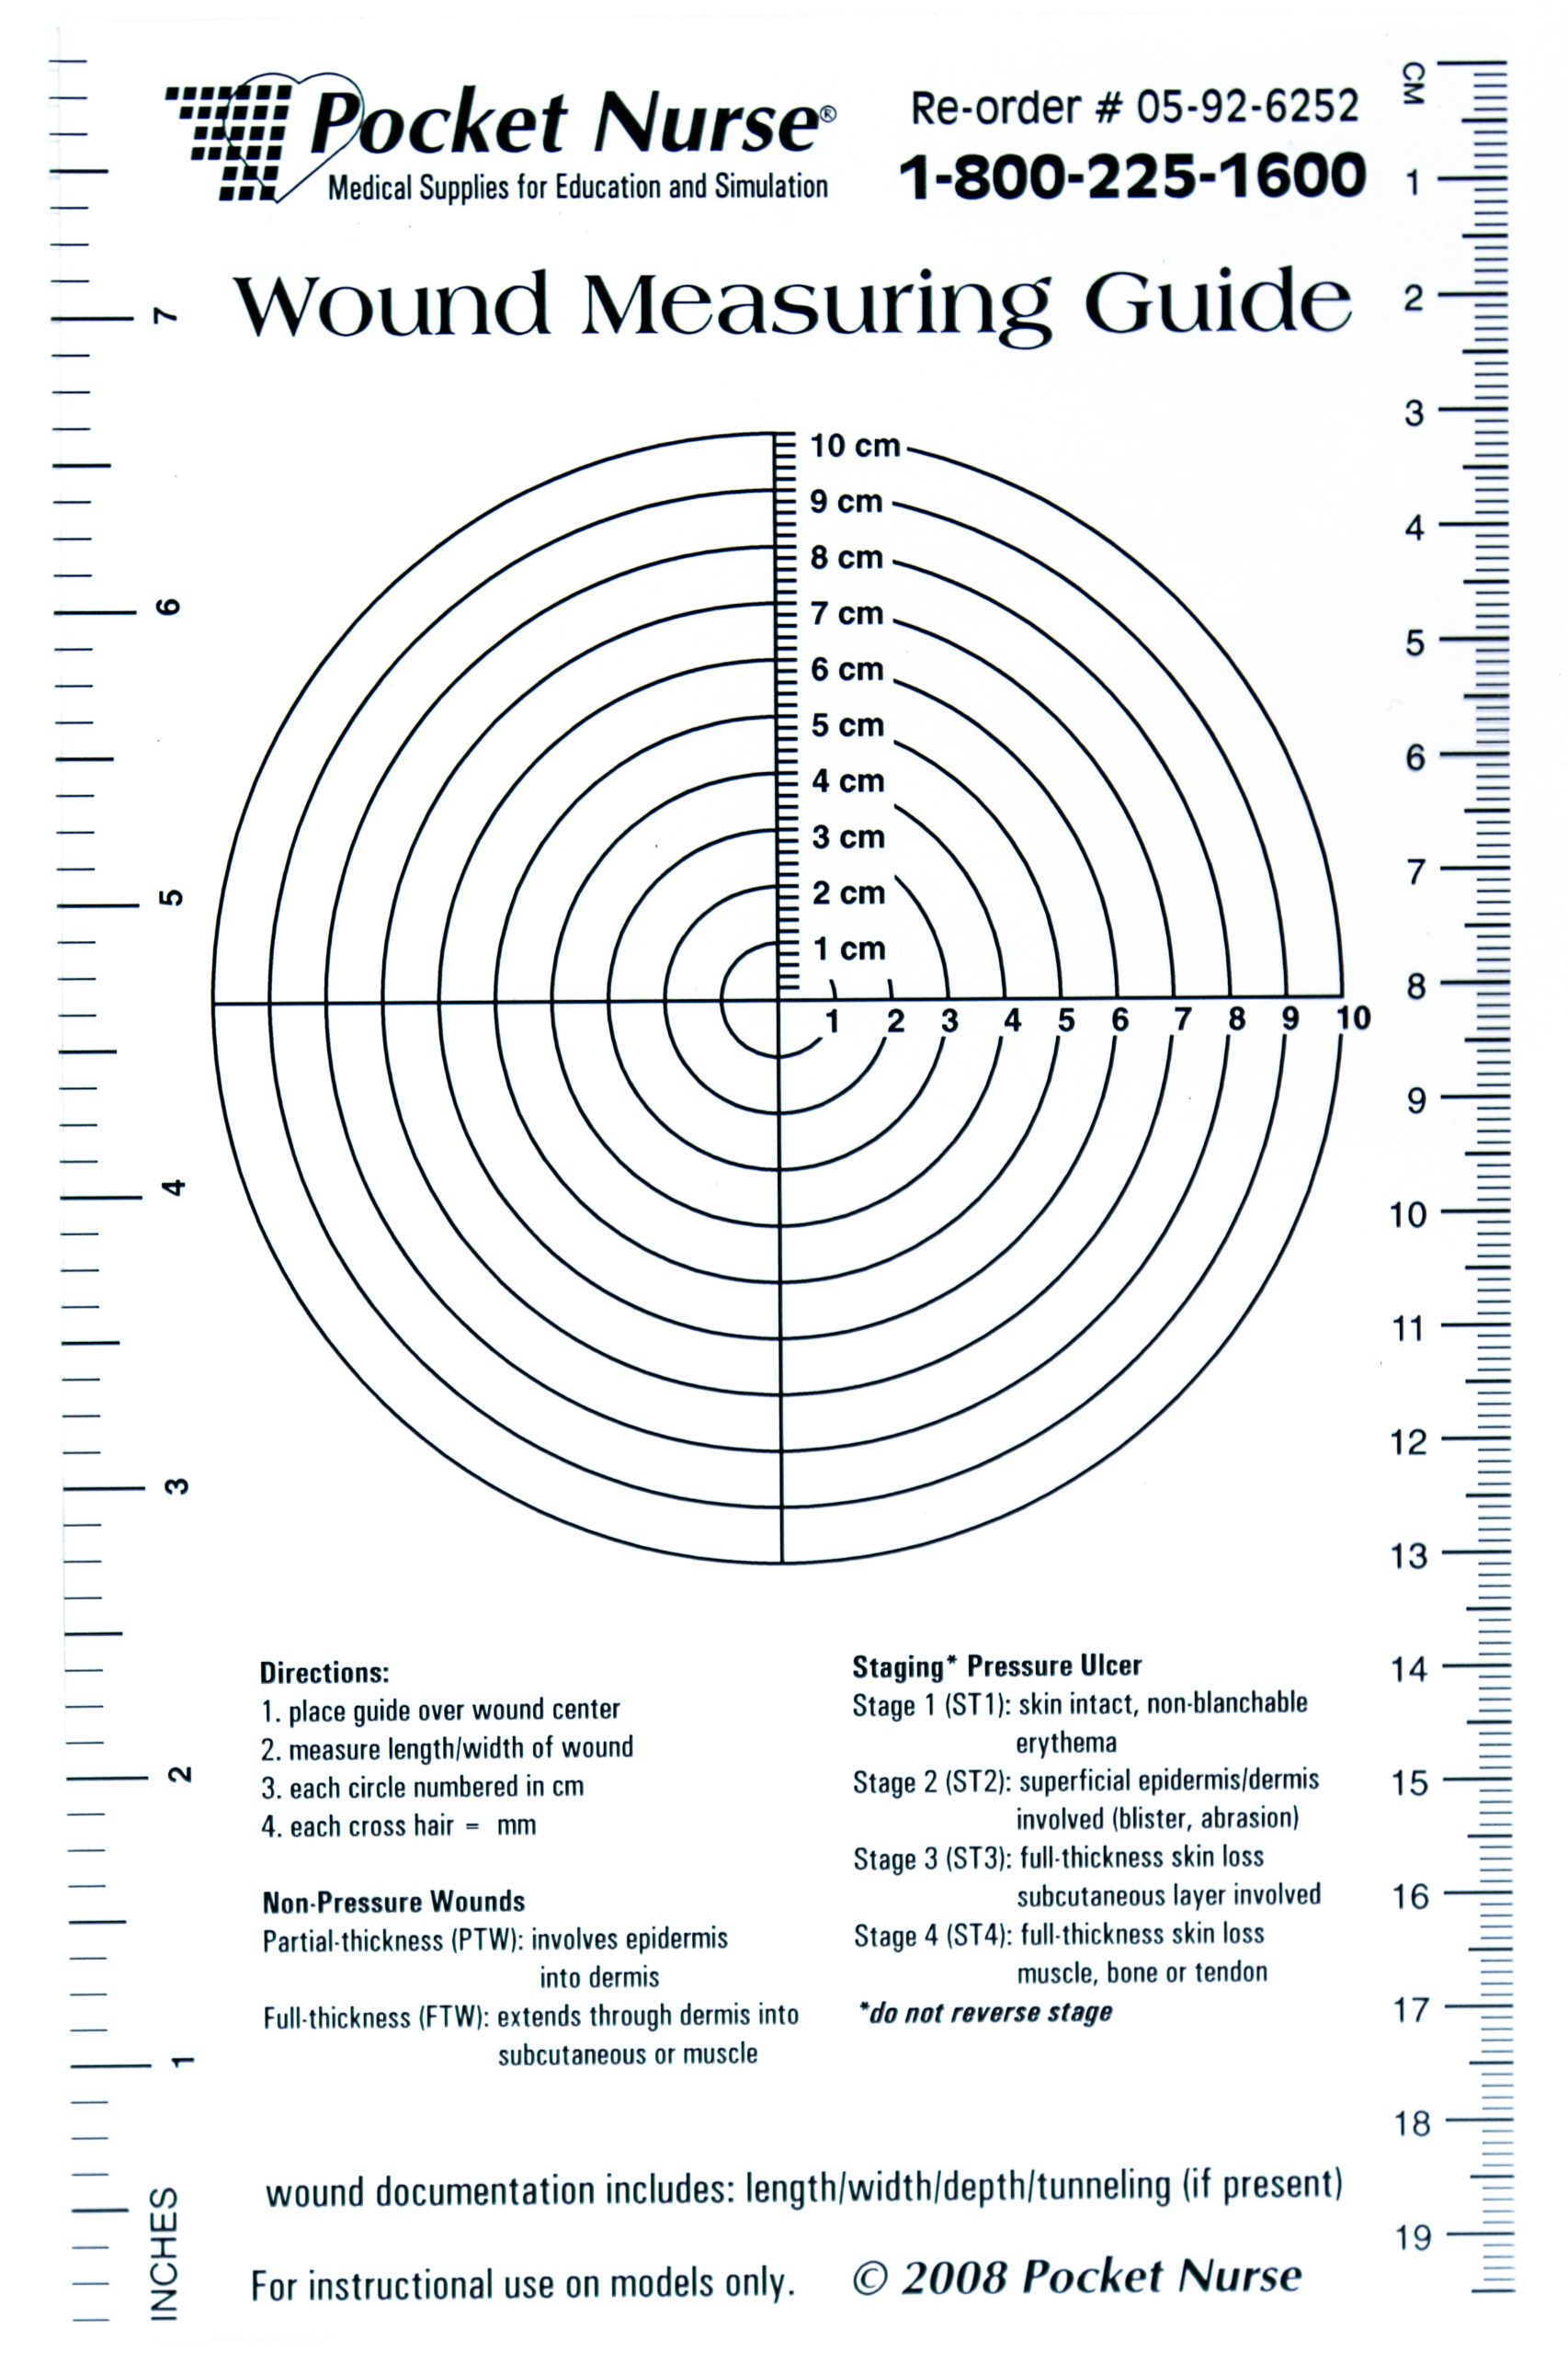
Wounds should be measured on admission and during every dressing change to evaluate for signs of healing. Accurate wound measurements are vital for monitoring wound healing. Measurements should be taken in the same manner by all clinicians to maintain consistent and accurate documentation of wound progress. This can be difficult to accomplish with oddly shaped wounds because there can be confusion about how consistently to measure them. Wounds should be described by length by width, with the length of the wound based on the head-to-toe axis. The width of a wound should be measured from side to side laterally. If a wound is deep, the deepest point of the wound should be measured to the wound surface using a sterile, cotton-tipped applicator. Many facilities use disposable, clear plastic measurement tools to measure the area of a wound healing by secondary intention. Measurements are typically documented in centimeters. See Figure 20.18[10] for an image of a wound measurement tool.
Tunneling can occur in a full-thickness wound that can lead to abscess formation. The depth of a tunneling can be measured by gently probing the tunneled area with a sterile, cotton-tipped applicator from the wound base to the end of the tract. When probing a tunnel, it is imperative to not force the swab but only insert until resistance is felt to prevent further damage to the area. The location of the tunnel in the wound should be documented using the analogy of a clock face, with 12:00 pointing toward the patient’s head.[11]
Undermining occurs when the tissue under the wound edges becomes eroded, resulting in a pocket beneath the skin at the wound’s edge. Undermining is measured by inserting a probe under the wound edge directed almost parallel to the wound surface until resistance is felt. The amount of undermining is the distance from the probe tip to the point at which the probe is level with the wound edge. Clock terms are also used to identify the area of undermining.[12]
Wound Edges and Periwound Skin
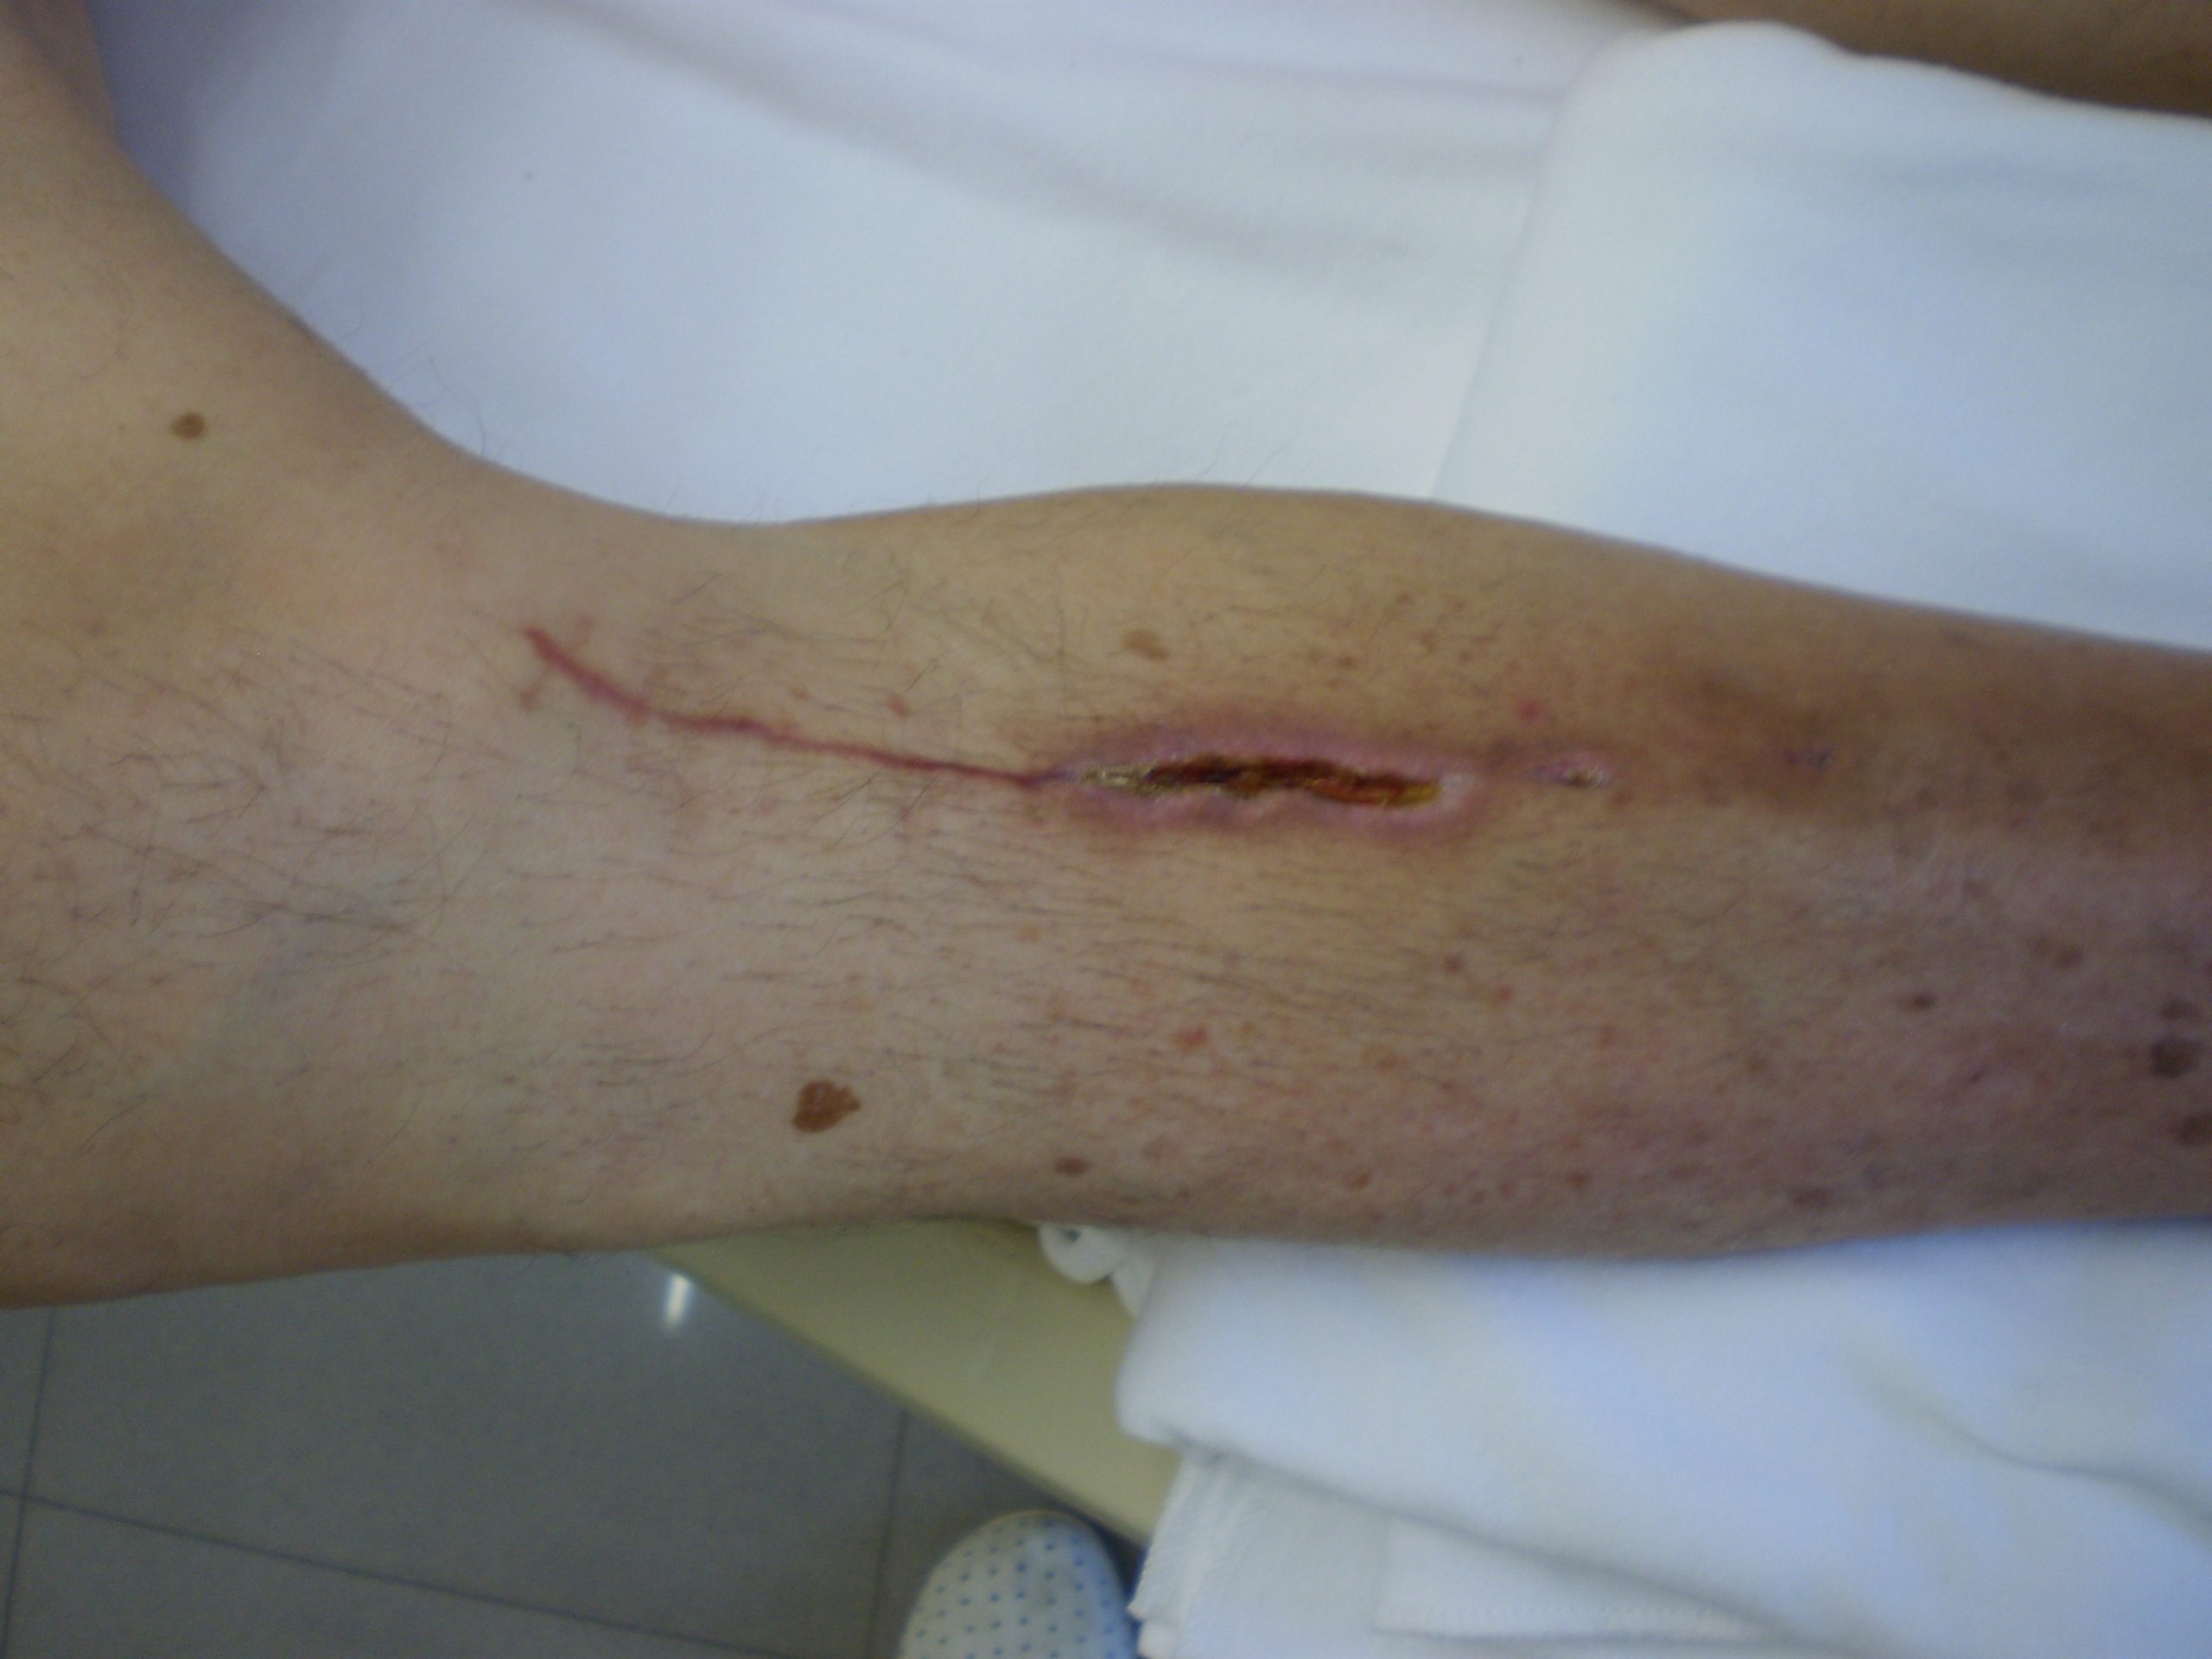
If the wound is healing by primary intention, it should be documented if the wound edges are well-approximated (closed together) or if there are any signs of dehiscence. The skin outside the outer edges of the wound, called the periwound skin, provides information related to wound development or healing. For example, a venous ulcer often has excess wound drainage that macerates the periwound skin, giving it a wet, waterlogged appearance that is soft and grayish white in color.[13] See Figure 20.19[14] for an image of erythematous periwound with partial dehiscence.
Signs of Infection
Wounds should be continually monitored for signs of infection. Signs of localized wound infection include erythema (redness), induration (area of hardened tissue), pain, edema, purulent exudate (yellow or green drainage), and wound odor.[15] New signs of infection should be reported to the health care provider with an anticipated order for a wound culture.
Pain
The intensity of pain that a patient is experiencing with a wound should be assessed and documented. If a patient experiences pain during dressing changes, it should be managed with administration of pain medication before scheduled dressing changes. Be aware that the degree of pain may not correlate to the extent of tissue damage. For example, skin tears are often painful because the nerve endings are exposed in the dermal layer, whereas patients with severe diabetic ulcers on their feet may experience little or no pain because of existing neuropathic damage.[16]
Media Attributions
- putool7bfig
- Purulant_knee_aspirate
- Sample Wound Measuring Guide
- OLYMPUS DIGITAL CAMERA
- Cox, J. (2019). Wound care 101. Nursing, 49(10). https://doi.org/10.1097/01.nurse.0000580632.58318.08 ↵
- “putool7bfig.jpg” by unknown is in the Public Domain. Access for free at https://www.ahrq.gov/patient-safety/settings/hospital/resource/pressureulcer/tool/pu7b.html ↵
- Wound Care Advisor. (n.d.). Exudate amounts. https://woundcareadvisor.com/exudate-amounts/#:~:text=Small%20or%20minimal%20amount%20of,than%2075%25%20of%20the%20bandage ↵
- Wound Care Advisor. (n.d.). Exudate amounts. https://woundcareadvisor.com/exudate-amounts/#:~:text=Small%20or%20minimal%20amount%20of,than%2075%25%20of%20the%20bandage ↵
- Wound Care Advisor. (n.d.). Exudate amounts. https://woundcareadvisor.com/exudate-amounts/#:~:text=Small%20or%20minimal%20amount%20of,than%2075%25%20of%20the%20bandage ↵
- Wound Care Advisor. (n.d.). Exudate amounts. https://woundcareadvisor.com/exudate-amounts/#:~:text=Small%20or%20minimal%20amount%20of,than%2075%25%20of%20the%20bandage ↵
- Wound Care Advisor. (n.d.). Exudate amounts. https://woundcareadvisor.com/exudate-amounts/#:~:text=Small%20or%20minimal%20amount%20of,than%2075%25%20of%20the%20bandage ↵
- Wound Care Advisor. (n.d.). Exudate amounts. https://woundcareadvisor.com/exudate-amounts/#:~:text=Small%20or%20minimal%20amount%20of,than%2075%25%20of%20the%20bandage ↵
- “Purulant knee aspirate.JPG” by James Heilman, MD is licensed under CC BY 3.0 ↵
- “Sample Wound Measuring Guide.jpg” by Deanna Hoyord, Chippewa Valley Technical College is licensed under CC BY 4.0 ↵
- Cox, J. (2019). Wound care 101. Nursing, 49(10). https://doi.org/10.1097/01.nurse.0000580632.58318.08 ↵
- WoundEducators.com. (2016, July 1). Wound undermining. https://woundeducators.com/measure-wound-undermining/#:~:text=Wound%20undermining%20occurs%20when%20the,surface%20until%20resistance%20is%20felt ↵
- Cox, J. (2019). Wound care 101. Nursing, 49(10). https://doi.org/10.1097/01.nurse.0000580632.58318.08 ↵
- “Post operative wound.JPG” by Intermedichbo is licensed under CC BY-SA 3.0 ↵
- Cox, J. (2019). Wound care 101. Nursing, 49(10). https://doi.org/10.1097/01.nurse.0000580632.58318.08 ↵
- Cox, J. (2019). Wound care 101. Nursing, 49(10). https://doi.org/10.1097/01.nurse.0000580632.58318.08 ↵
[latexpage]
Liquid medications are often prescribed based on the patient’s weight. Dimensional analysis can be used to determine the amount of liquid medication the patient will receive based on their weight, the provider order, and the concentration of medication supplied.
Practice Problem: Weight-Based Calculations
Patient Information:
Name: Aidan Smith, DOB: 5/09/20xx, Age 4, Allergies: NKDA, Weight: 22 pounds
Prescription: Tylenol 15mg/kg PO every 4-6 hours for pain or fever
Medication Supplied: See Figure 5.12[1] for the drug label of the medication supplied.
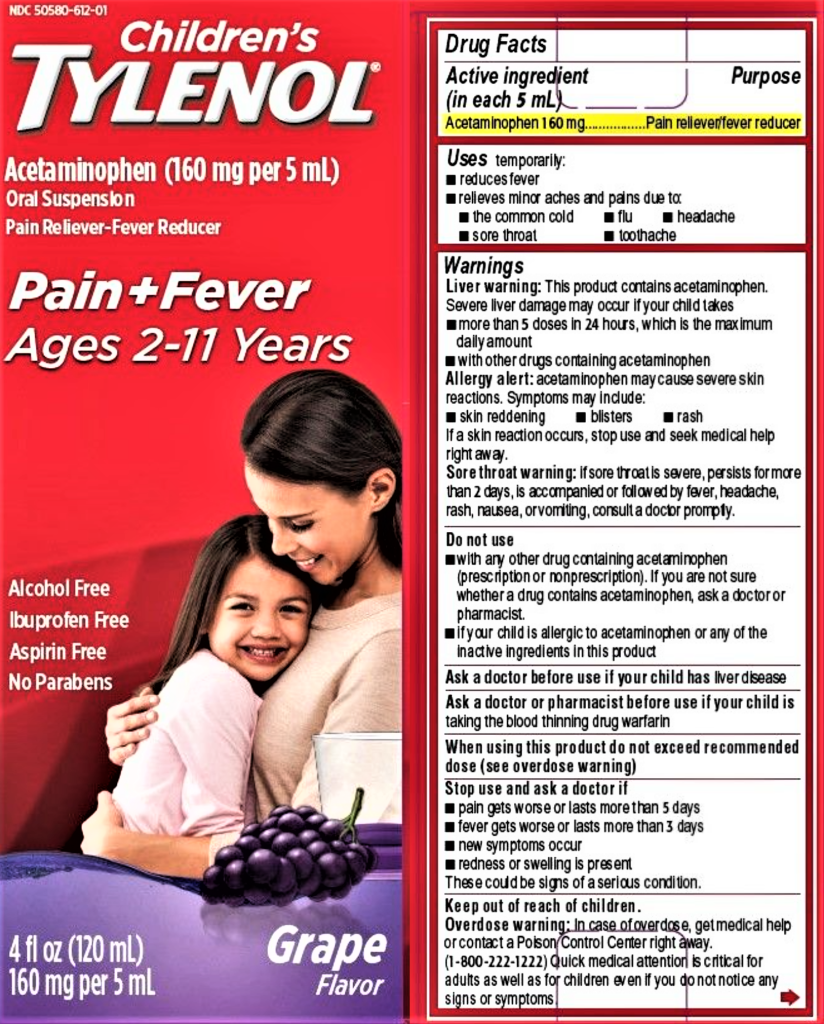
Aidan had his last dose of Tylenol eight hours ago and now has a fever of 38 degrees Celsius. Calculate the amount of Tylenol you will prepare and administer to Aidan using dimensional analysis.
1. Review the medication label. We see that acetaminophen (Tylenol) is supplied in a concentration of 160 mg in 5 mL.
2. Set up the equation by starting with the goal unit for which we are solving, which, in this case, is milliliters of liquid medication to administer:
\[
mL~=~?
\]
3. Set up the first fraction by matching the numerator to mL. Place in the known amount of mL from the drug label, which is 5. Add 160 mg to the denominator because the medication supplied has a known concentration amount of 160 mg in 5 mL:
\[
mL~=~\frac{5~mL}{160~mg}
\]
4. Create the second fraction with the intent to cross out units by placing mg in the numerator. Look for other important information in the problem related to mg. The prescription is for 15 mg of acetaminophen (Tylenol) for each kg of weight. Add 15 the numerator and 1 kg in the denominator because 15 mg of Tylenol are ordered for every 1 kg of patient weight:
\[
mL~=~\frac{5~mL}{160~\cancel{mg}}~x~\frac{15~\cancel{mg}}{1~kg}
\]
5. Create the third fraction with the intent to cross out kg, so place kg in the numerator. Look for important information in the problem related to kg. The patient’s chart tells us their weight is 22 pounds. Add 1 kg to the numerator and then place 2.2 lb (based on a known equivalency) in the denominator:
\[
mL~=~\frac{5~mL}{160~\cancel{mg}}~x~\frac{15~\cancel{mg}}{1~kg}~x~\frac{1~kg}{2.2~lb}
\]
6. Place lb in the numerator of the fourth fraction with the intent to cross out pounds. Look at the information provided and see that the patient weighs 22 pounds. Add 22 pounds in the numerator and 1 in the denominator with the intent to cross off units:
\[
mL~=~\frac{5~mL}{160~\cancel{mg}}~x~\frac{15~\cancel{mg}}{1~kg}~x~\frac{1~\cancel{kg}}{2.2~lb}~x~\frac{22~lb}{1}~=
\]
7. Cancel out units diagonally:
\[
mL~=~\frac{5~mL}{160~\cancel{mg}}~x~\frac{15~\cancel{mg}}{1~kg}~x~\frac{1~\cancel{kg}}{2.2~\cancel{lb}}~x~\frac{22~\cancel{lb}}{1}~=
\]
8. After canceling out similar units, we are left with mL, our goal unit, so we can complete the calculation. Multiply across the numerators and the denominators, and then divide the final fraction for the answer:
\[
mL~=~\frac{5~mL~x~15~x~1~x~22~=}{160~x~1~x~2.2~x ~1~=}~~\frac{1650~mL}{352} ~=~\frac{1650~mL}{352}~=~{4.6875~mL}
\]
9. CCBC Rounding Rules apply. Round your final answer. If answer is less than 1, round the final answer to the hundredth, If answer is greater than 1, round to the tenth, so the final answer is 4.7mL.
Review module 1.12 within SWTC's Dimensional Analysis in Nursing Page for more information about solving weight-based problems.
Practice weight-based calculations with the interactive learning activity below.
[latexpage]
Liquid medications are often prescribed based on the patient’s weight. Dimensional analysis can be used to determine the amount of liquid medication the patient will receive based on their weight, the provider order, and the concentration of medication supplied.
Practice Problem: Weight-Based Calculations
Patient Information:
Name: Aidan Smith, DOB: 5/09/20xx, Age 4, Allergies: NKDA, Weight: 22 pounds
Prescription: Tylenol 15mg/kg PO every 4-6 hours for pain or fever
Medication Supplied: See Figure 5.12[2] for the drug label of the medication supplied.

Aidan had his last dose of Tylenol eight hours ago and now has a fever of 38 degrees Celsius. Calculate the amount of Tylenol you will prepare and administer to Aidan using dimensional analysis.
1. Review the medication label. We see that acetaminophen (Tylenol) is supplied in a concentration of 160 mg in 5 mL.
2. Set up the equation by starting with the goal unit for which we are solving, which, in this case, is milliliters of liquid medication to administer:
\[
mL~=~?
\]
3. Set up the first fraction by matching the numerator to mL. Place in the known amount of mL from the drug label, which is 5. Add 160 mg to the denominator because the medication supplied has a known concentration amount of 160 mg in 5 mL:
\[
mL~=~\frac{5~mL}{160~mg}
\]
4. Create the second fraction with the intent to cross out units by placing mg in the numerator. Look for other important information in the problem related to mg. The prescription is for 15 mg of acetaminophen (Tylenol) for each kg of weight. Add 15 the numerator and 1 kg in the denominator because 15 mg of Tylenol are ordered for every 1 kg of patient weight:
\[
mL~=~\frac{5~mL}{160~\cancel{mg}}~x~\frac{15~\cancel{mg}}{1~kg}
\]
5. Create the third fraction with the intent to cross out kg, so place kg in the numerator. Look for important information in the problem related to kg. The patient’s chart tells us their weight is 22 pounds. Add 1 kg to the numerator and then place 2.2 lb (based on a known equivalency) in the denominator:
\[
mL~=~\frac{5~mL}{160~\cancel{mg}}~x~\frac{15~\cancel{mg}}{1~kg}~x~\frac{1~kg}{2.2~lb}
\]
6. Place lb in the numerator of the fourth fraction with the intent to cross out pounds. Look at the information provided and see that the patient weighs 22 pounds. Add 22 pounds in the numerator and 1 in the denominator with the intent to cross off units:
\[
mL~=~\frac{5~mL}{160~\cancel{mg}}~x~\frac{15~\cancel{mg}}{1~kg}~x~\frac{1~\cancel{kg}}{2.2~lb}~x~\frac{22~lb}{1}~=
\]
7. Cancel out units diagonally:
\[
mL~=~\frac{5~mL}{160~\cancel{mg}}~x~\frac{15~\cancel{mg}}{1~kg}~x~\frac{1~\cancel{kg}}{2.2~\cancel{lb}}~x~\frac{22~\cancel{lb}}{1}~=
\]
8. After canceling out similar units, we are left with mL, our goal unit, so we can complete the calculation. Multiply across the numerators and the denominators, and then divide the final fraction for the answer:
\[
mL~=~\frac{5~mL~x~15~x~1~x~22~=}{160~x~1~x~2.2~x ~1~=}~~\frac{1650~mL}{352} ~=~\frac{1650~mL}{352}~=~{4.6875~mL}
\]
9. CCBC Rounding Rules apply. Round your final answer. If answer is less than 1, round the final answer to the hundredth, If answer is greater than 1, round to the tenth, so the final answer is 4.7mL.
Review module 1.12 within SWTC's Dimensional Analysis in Nursing Page for more information about solving weight-based problems.
Practice weight-based calculations with the interactive learning activity below.
Learning Objectives
- Accurately perform calculations using decimals, fractions, percentages, ratios, and/or proportions
- Convert between the metric and household systems
- Use military time
- Use dimensional analysis
- Accurately solve calculations related to conversions, dosages, liquid concentrations, reconstituted medications, weight-based medications, and intravenous infusions and evaluate final answer to ensure safe medication administration
The Institute of Medicine (IOM) has estimated that the average hospitalized patient experiences at least one medication error each day. Nurses are the last step in the medication administration process before the medication reaches the patient, so they bear the final responsibility to ensure the medication is safe. To safely prepare and administer medications, the nurse performs a variety of mathematical calculations, such as determining the number of tablets, calculating the amount of solution, and setting the rate of an intravenous infusion.[3]
Dosage calculation in clinical practice is more than just solving a math problem. Nurses must perform several tasks during drug calculations, such as reading drug labels for pertinent information, determining what information is needed to set up the math calculation, performing the math calculations, and then critically evaluating the answer to determine if it is within a safe dosage range for that specific patient. Finally, the nurse selects an appropriate measurement device to accurately measure the calculated dose or set the rate of administration.[4] This chapter will explain how to perform these tasks related to dosage calculations using authentic problems that a nurse commonly encounters in practice.
Measuring Devices
Depending on the type and amount of medication that is being administered, there are several devices used for measuring and administering medications.
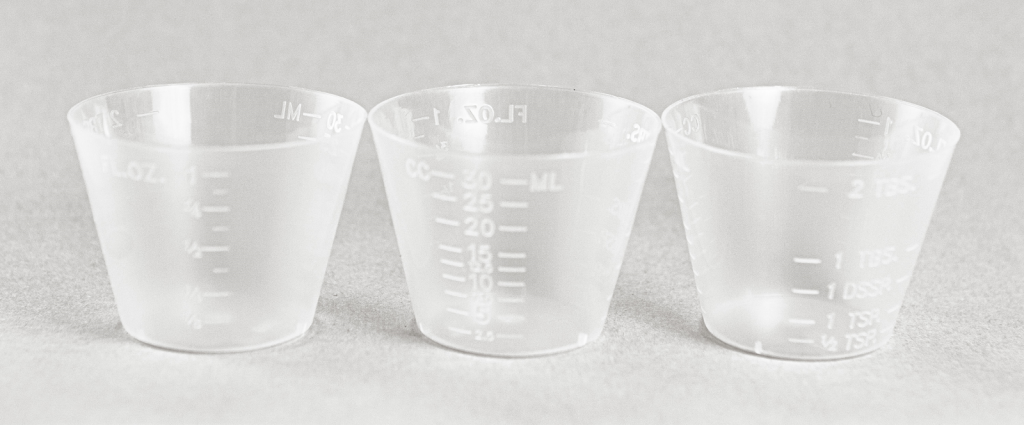
A medication cup that is composed of plastic or paper is used to hold and dispense oral medications to a patient. A paper cup is used to administer nonliquid medications, such as tablets or capsules. A plastic medication cup is used to dispense both liquid and nonliquid medications, and calibrated cups are also used to measure liquid medications prior to administration. Calibrated medication cups have labelled measurements such as ounces (oz), cubic centimeters (cc), milliliters (mL), teaspoons (tsp), and tablespoons (Tbs). See Figure 5.1[5] for an image of a calibrated medication cup.
Oral syringes are used to administer liquid medications via the oral route, especially to children, because they allow for precise measurement of small doses. See Figure 5.2[6] for an image of an oral syringe. Oral syringes have different tips than syringes used for injections.
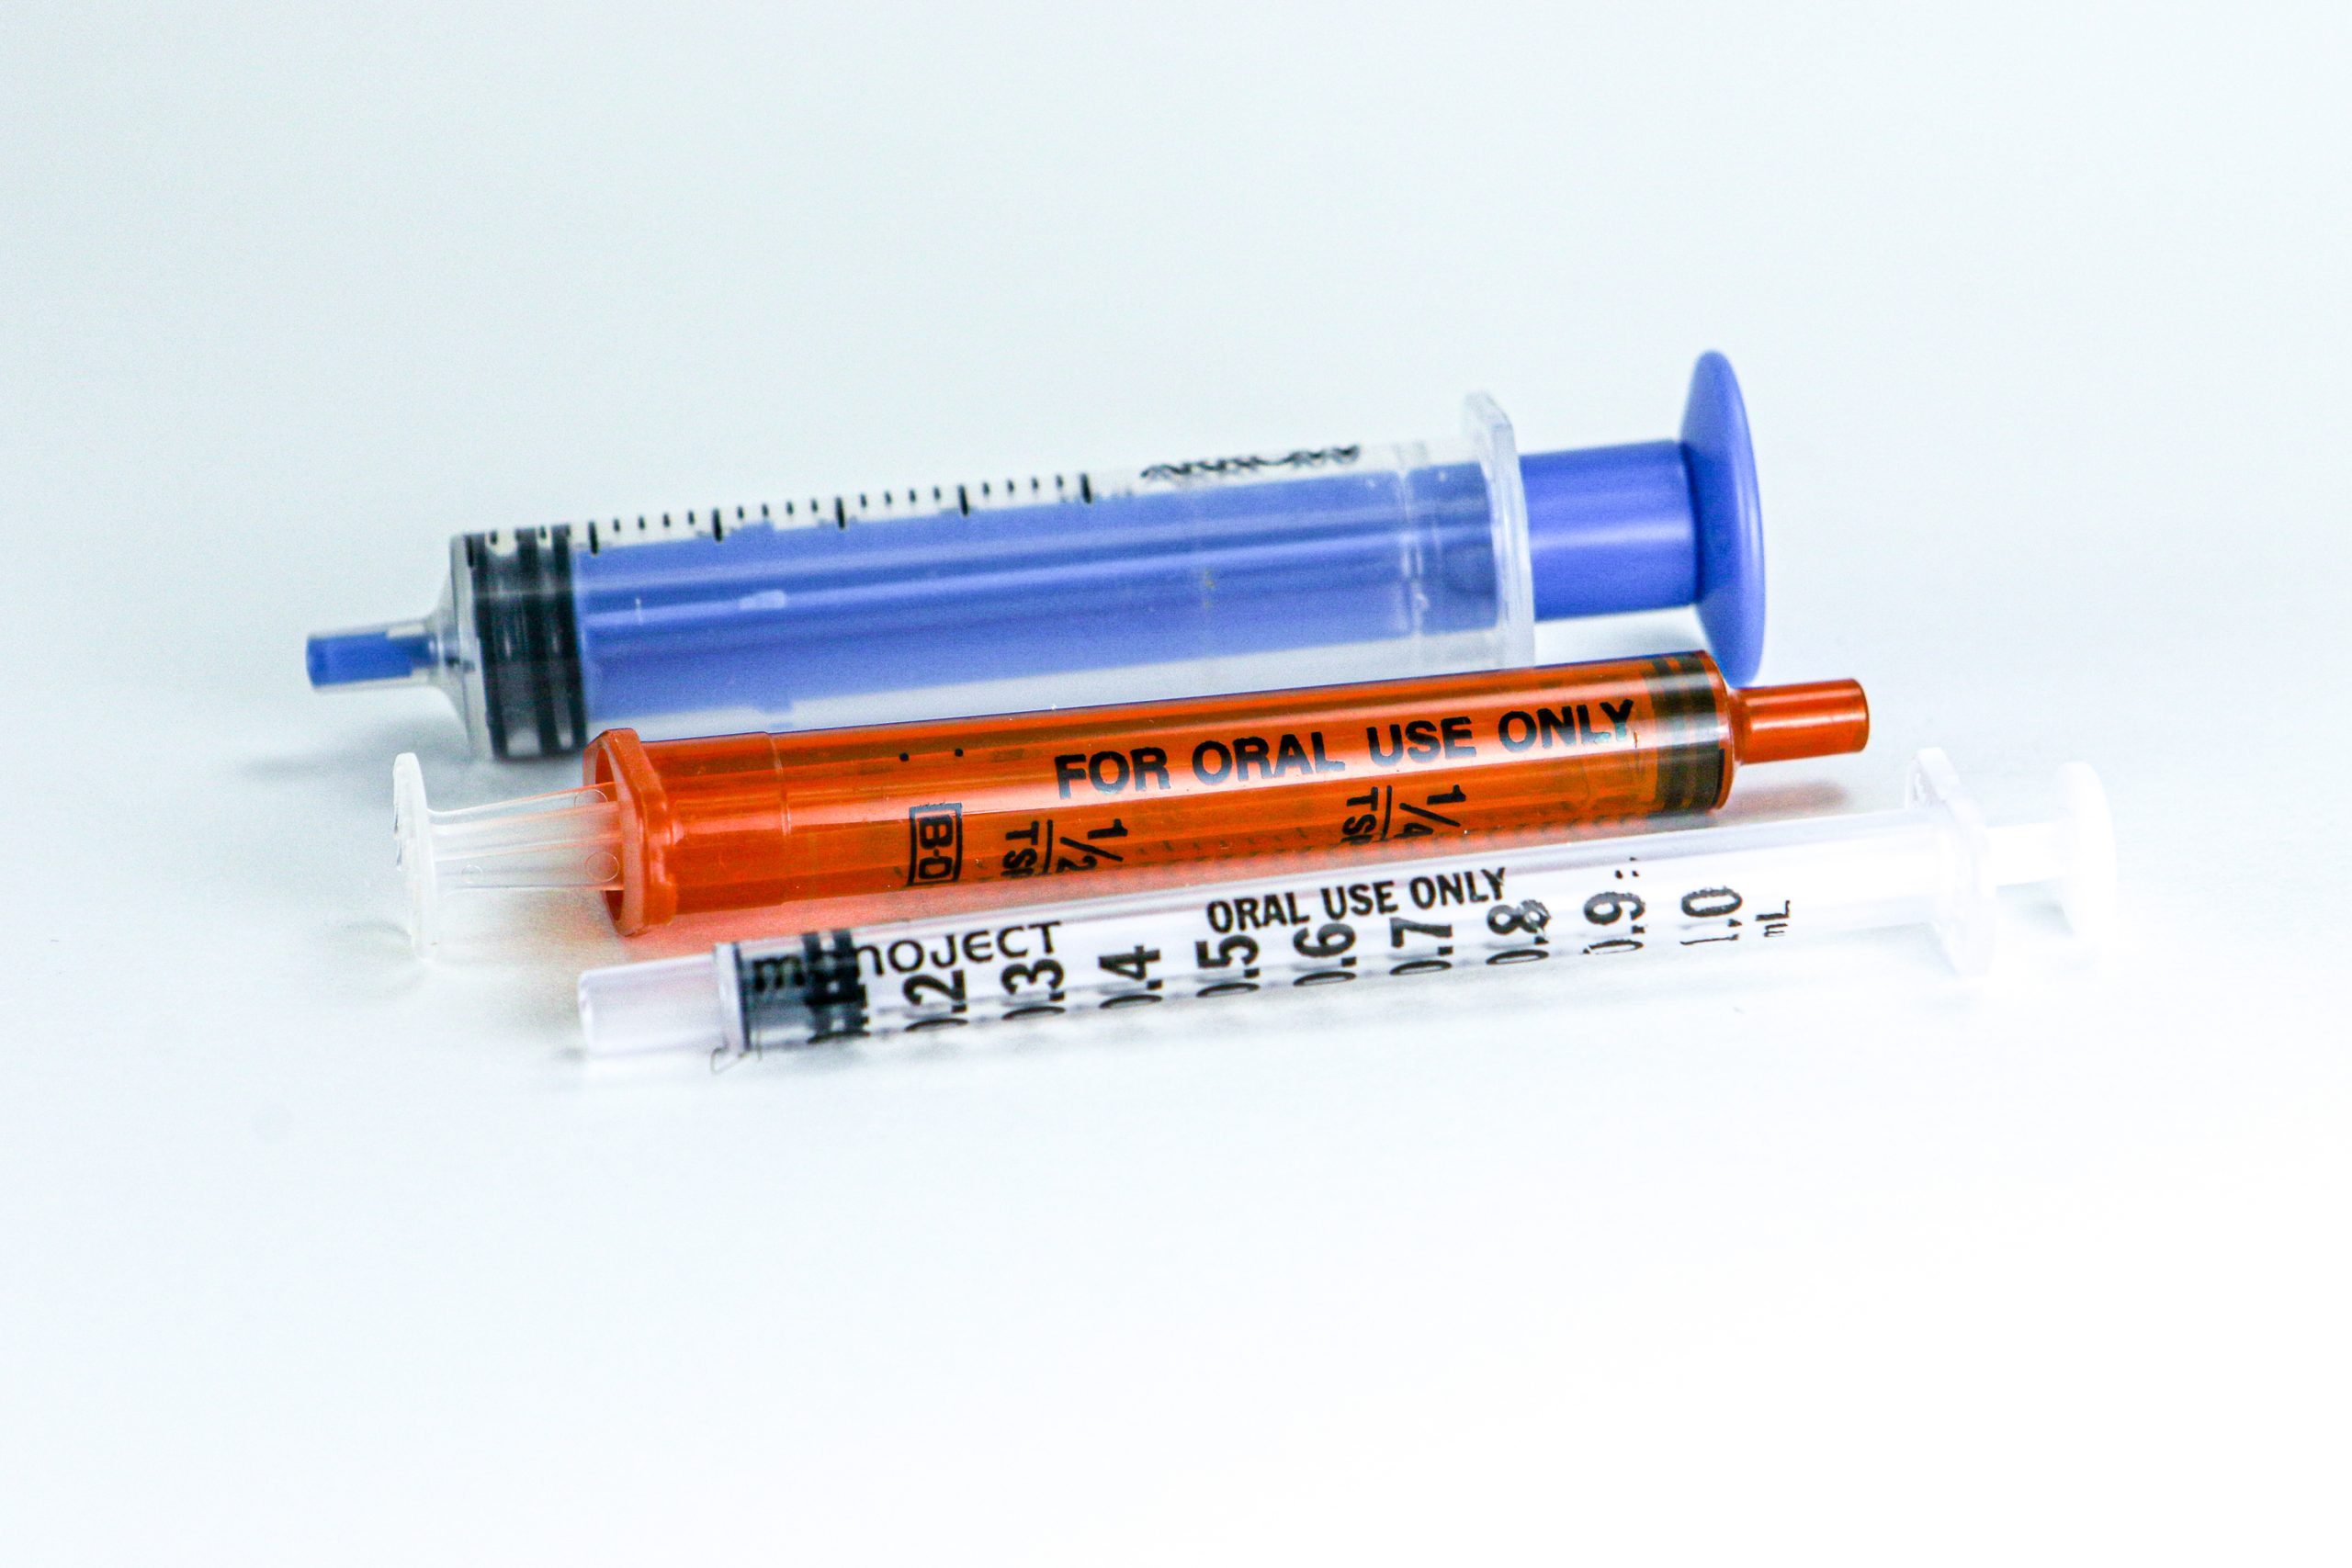
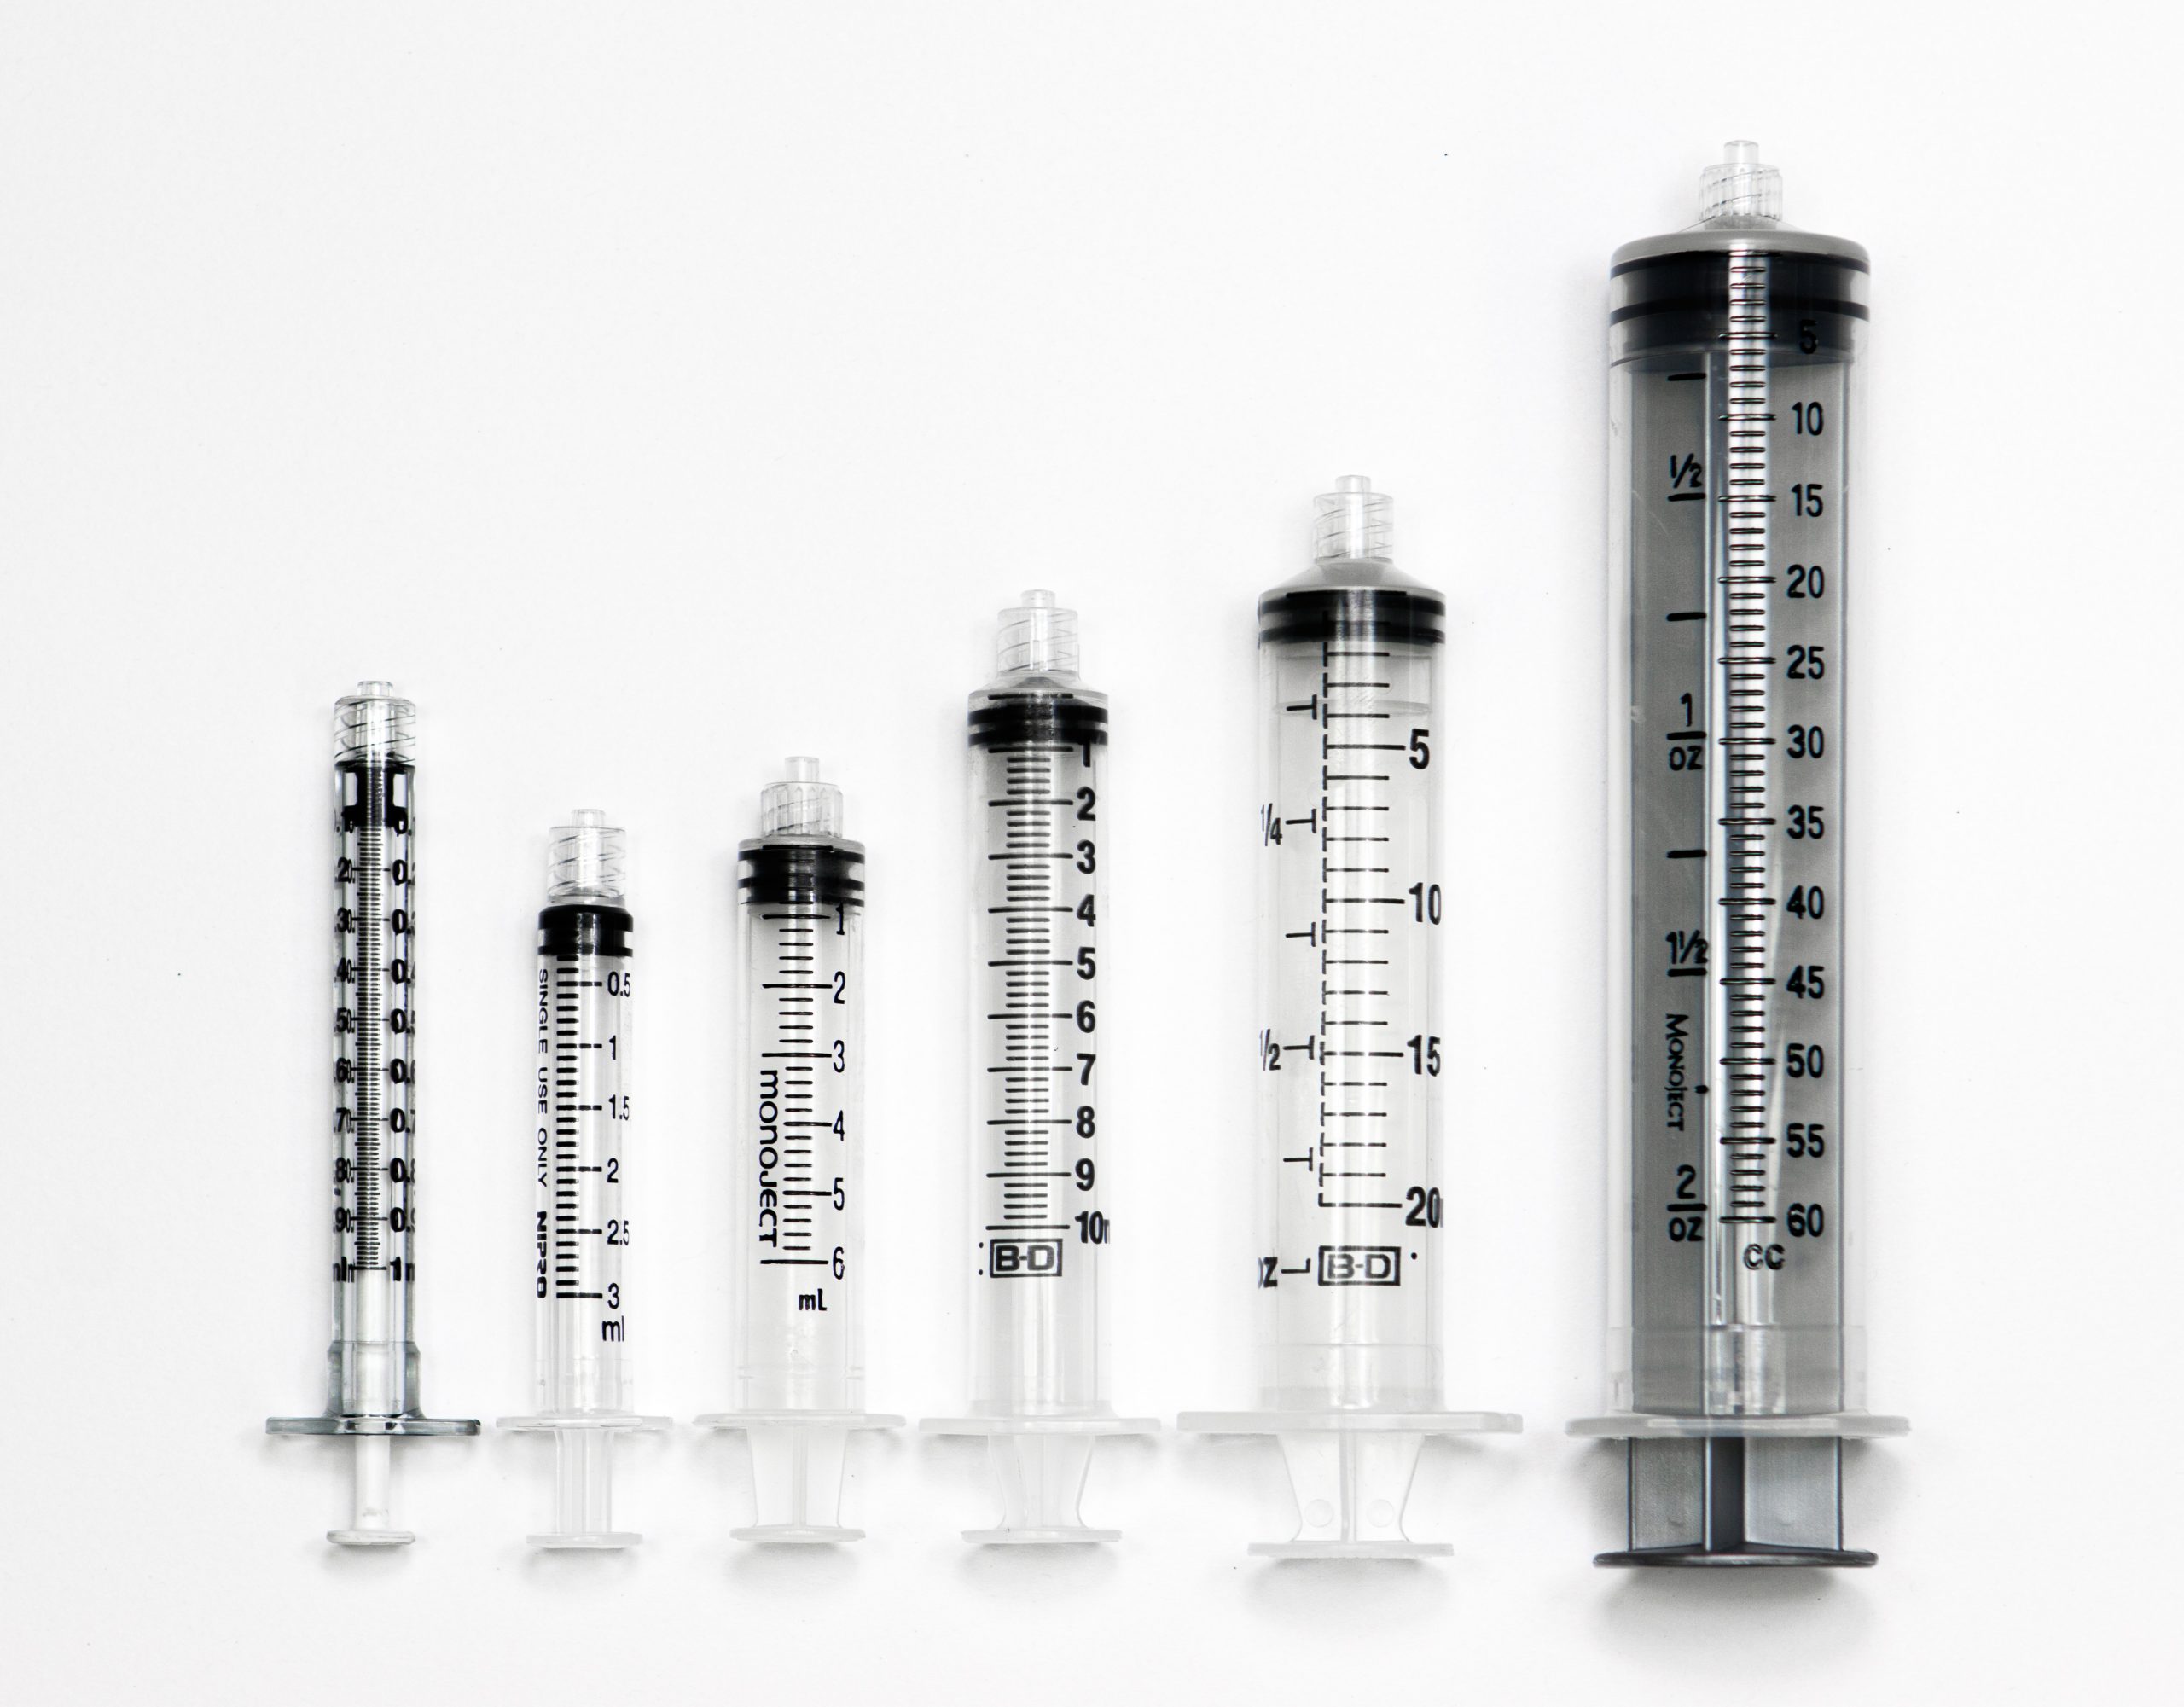
Syringes are used when administering medications through the parenteral route (i.e., intradermally, subcutaneously, intramuscularly, or intravenously). There are also syringes specifically developed for oral medication administration. Oral medication syringes are commonly orange in color and have a tip that will not allow the oral syringe to be connected to an intravenous injection port. Syringes used for injections are available in many sizes and are selected by the nurse based on the type of injection and the type of medication administered. Both Luer lock and slip tip syringes are commonly available for parenteral use. Luer lock syringes have a threaded syringe tip that allow the syringes to be screwed into an injection port. Slip tip syringes do not have a locking mechanism or screw-on connection. Slip tip syringes can be easily attached and removed from different injection devices. Many slip tip syringes are found in Foley catheter insertion kits. Common syringe sizes range from 1 mL to 60 mL. See Figure 5.3[7] for an image comparing various sizes of syringes. Syringes are calibrated based on the volume they hold. For example, a 1-mL syringe is calibrated in hundredths, and a 3-mL syringe is calibrated in tenths. Syringes that hold larger volumes, such as 5-, 10-, and 12-mL syringes, are usually calibrated in fifths (two tenths). Large syringes, such as 60-mL syringes, are calibrated in whole numbers.
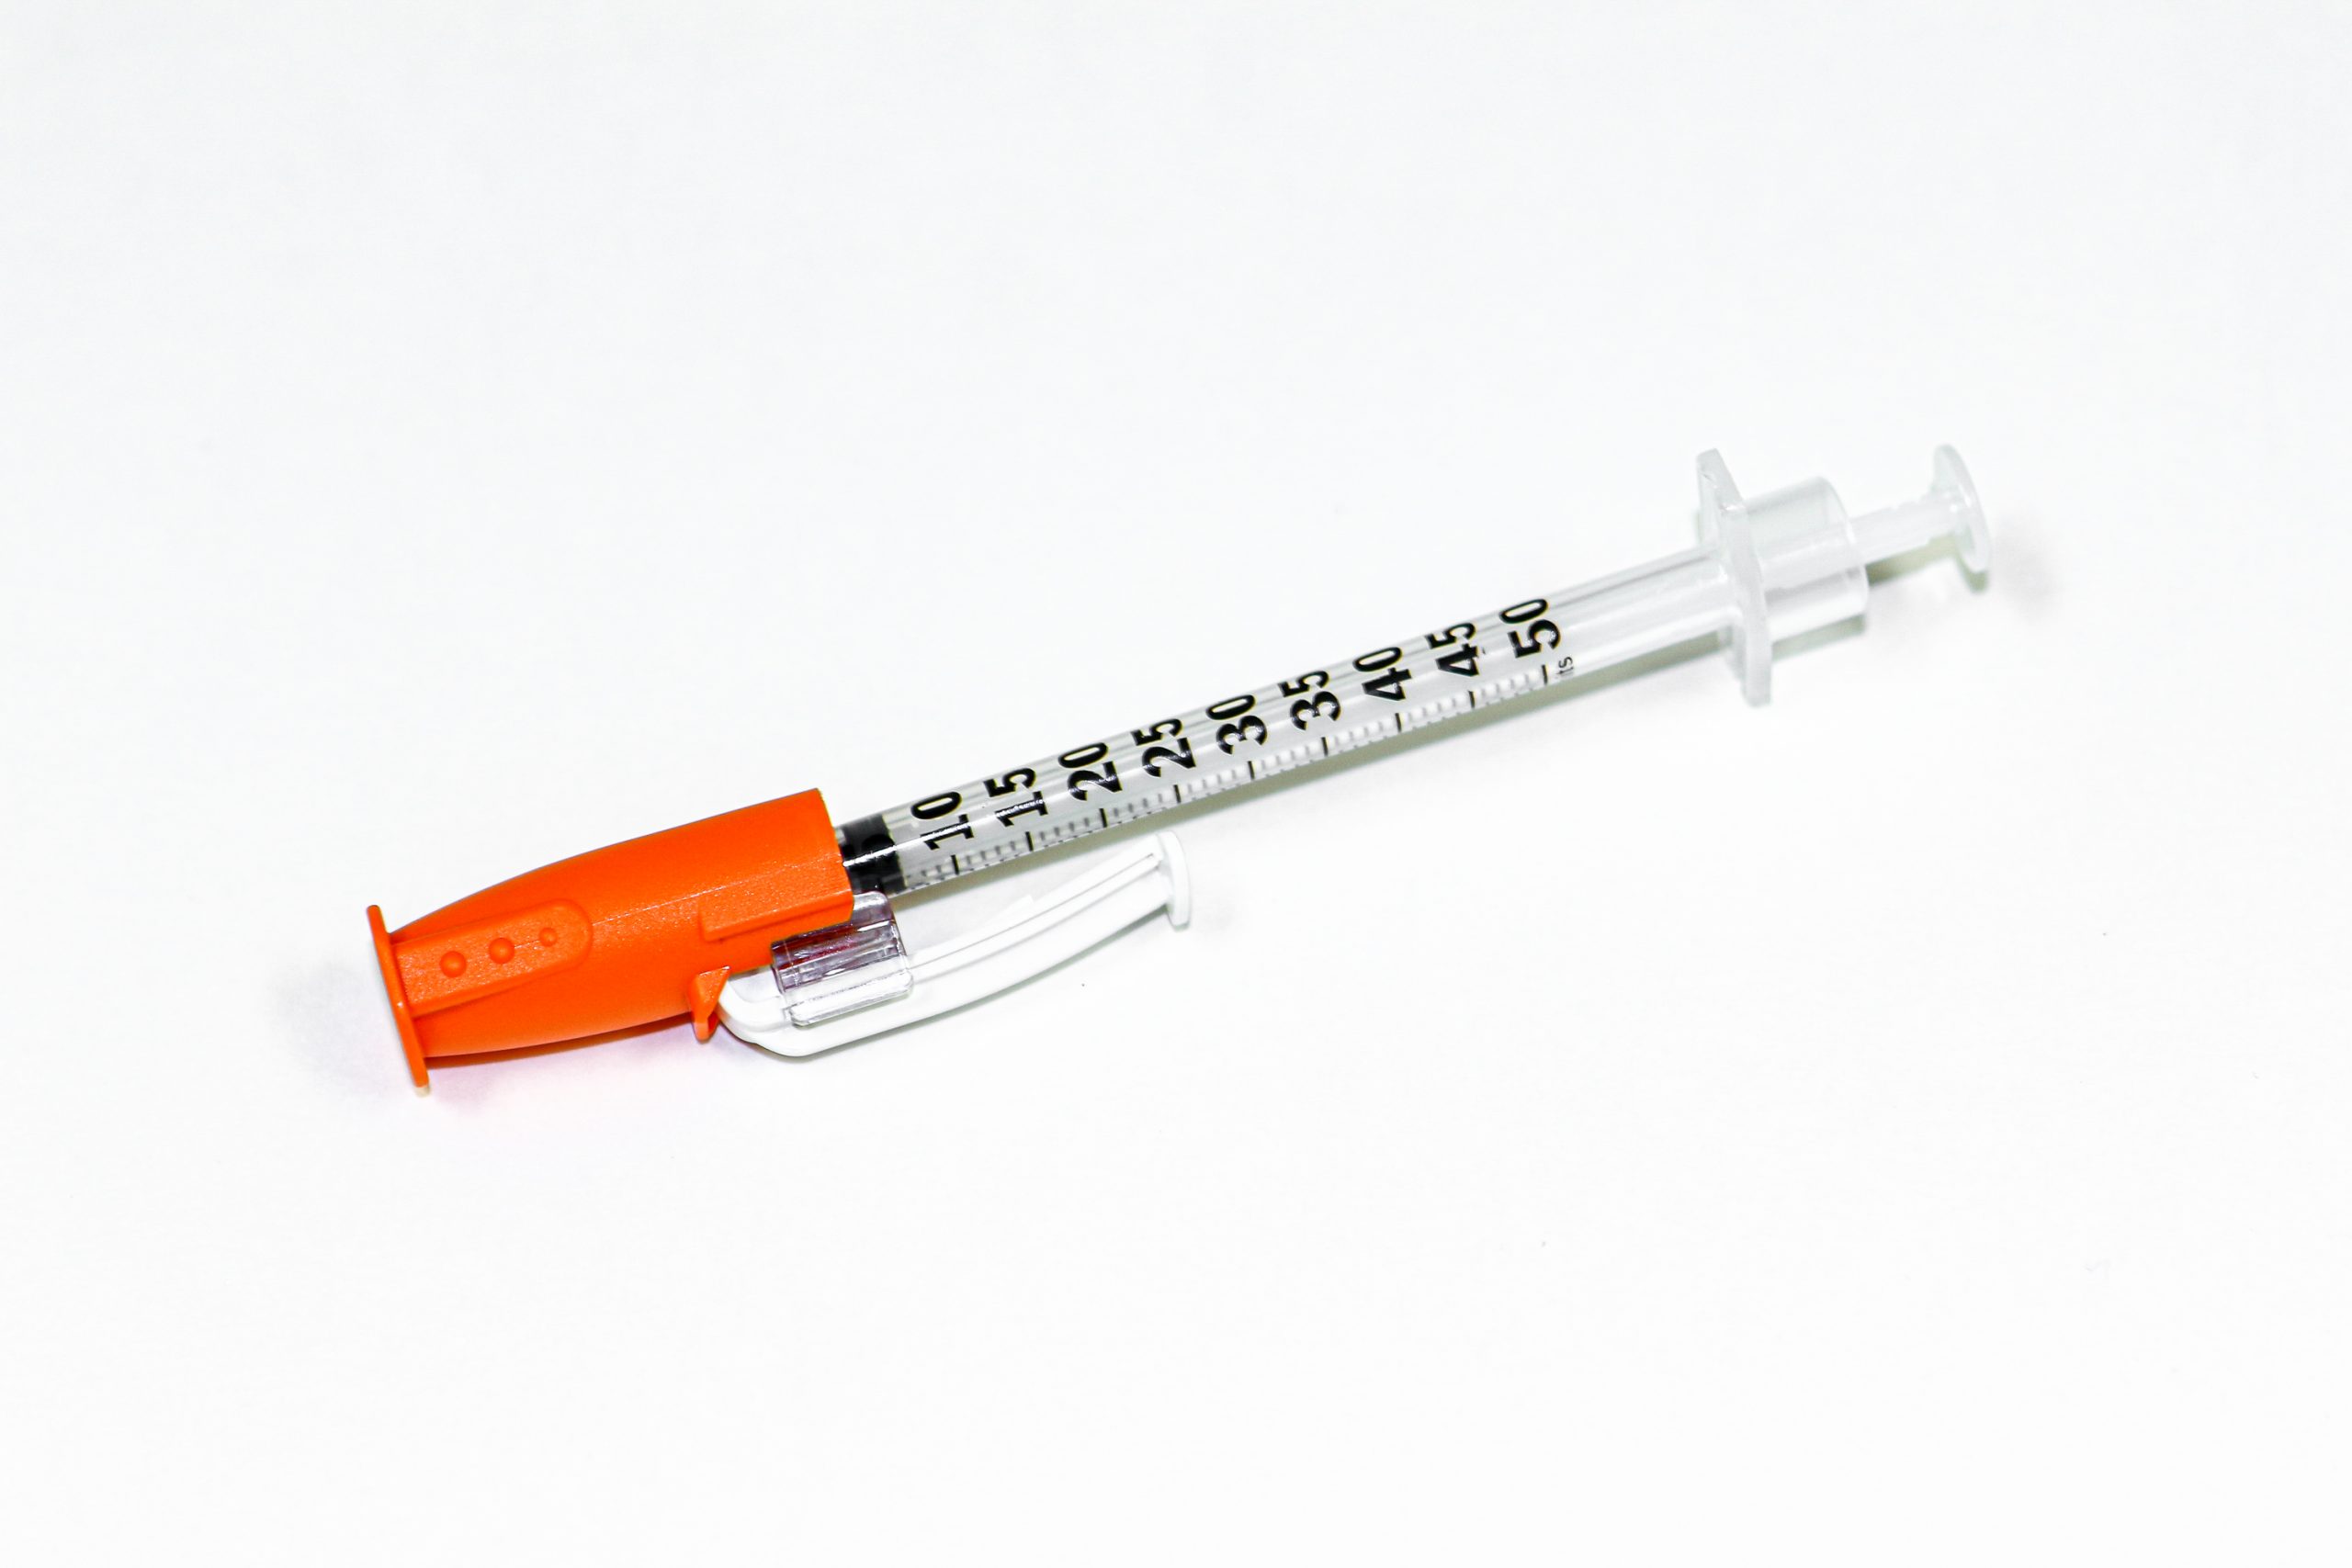
Special syringes are used to administer insulin and are calibrated in units. See Figure 5.4[8] for an image of an insulin syringe. Insulin syringes are easily identified by a standard orange cap.
The nurse performs a variety of calculations in the clinical setting including intake and output conversions, weight conversions, dosages, volumes, and rates. The metric system is typically used when documenting and performing calculations in the clinical setting. Dosages may be calculated and converted into micrograms (mcg), milligrams (mg), milliequivalents (mEq), and grams (gm); volumes may be calculated in cubic centimeters (cc), milliliters (mL), and liters (L); and rates may be calculated in drops per minute (gtt/min), milliliters per hour (mL/hr), or units per hour (units/hr). Each of these types of calculations will be described in the following sections. Let’s begin by discussing equivalencies.
Equivalency is a mathematical term that refers to two values or quantities that are the same amount. For example, one cup is equivalent to eight ounces. Nurses must memorize common household and metric equivalents to perform drug calculations and convert quantities easily.
Household Equivalencies
The household system of measurement is familiar to patients and includes drops, teaspoons, tablespoons, ounces, cups, and pounds. See Table 5.4a for common household measurement conversions and abbreviations that must be memorized by nurses.
Table 5.4a Common Household Conversions
| Measurement and Abbreviation | Common Conversions |
|---|---|
| drop (gtt) | 10, 12, 15, or 20 gtt = 1 mL |
| microdrop (mcgtt) | 60 mcgtt = 1 mL |
| teaspoon (tsp) | 1 tsp = 5 mL |
| tablespoon (Tbsp or Tbs) | 1 Tbsp = 3 tsp = 15 mL |
| ounce (oz) | 1 oz = 30 mL |
| pound (lb) | 1 lb = 16 oz |
| cup (C) | 1 C = 8 oz = 240 mL |
| pint (pt) | 1 pt = 2 C |
| quart (qt) | 1 qt = 4 C |
| gallon (gal) | 1 gal = 4 qt |
Metric Equivalencies
The metric system is organized by units of 10. The basic units of measurement in the metric system include meter for length, liter for volume, and gram for weight. The decimal point is easily moved either to the right or left with multiplication or division in units of 10. For example, there are 1,000 mL in 1 liter, and 0.5 liters is the same as 500 mL. See Table 5.4b for a metric equivalency chart.
When converting to a smaller unit, the decimal moves to the right →→→→→→→→→→
When converting to a larger unit, the decimal moves to the left. ←←←←←←←←←←←
Table 5.4b Common Metric Equivalencies in Health Care
| Kilo-
1000 units |
Hecto-
100 units |
Deca-
10 units |
1
Unit |
Deci-
0.1 units |
Centi-
0.01 units |
Milli-
0.001 units |
|---|
Nurses often need to convert household measurements to metric equivalents or vice versa. See Table 5.4c for common metric conversions that nurses must memorize.
Table 5.4c Common Metric Conversions in Health Care
| Metric Measurement | Common Conversions |
|---|---|
| 1 kilogram (kg) | 1 kg = 2.2 pounds = 1000 grams |
| 1 centimeter (cm) | 1 in = 2.54 cm = 25.4 mm |
| 37 degrees Celsius | 98.6 degrees F |
| 1 liter | 1000 mL = 1000 cc |
| 1 gram | 1000 mg |
| 1 mg | 1000 mcg |
Table 5.4 d Common Standard Conversions in Health Care
| Standard Measurement | Common Conversions |
|---|---|
| 1 tsp | 5 mL |
| 1 Tbsp | 15 mL |
| 1 ounce | 30 mL |
Other Measurements
The nurse encounters other miscellaneous measurements in practice, such as:
- Units (U): Units are used in insulin, heparin, and pitocin dosages.
- International Units (IU): International units are used for vitamins, such as Vitamin D 600 IU.
- Milliequivalents (mEq): Milliequivalents are used in electrolyte replacement, such as Potassium 40 mEq.
- Percentages: Percentages are used in intravenous (IV) fluids, such as 0.9% Normal Saline IV fluid, meaning 9 g of NaCl are diluted in 1000 mL water.
- Ratios: Ratios are used in medications such as Epinephrine 1:1000, meaning 1 gram of Epinephrine is diluted in 1000 mL of fluid (equivalent to 1 mg/mL).
Practice Problems: Household and Metric Equivalents
Practice converting household and metric equivalents using the following problems and referencing Tables 5.4a-c. The answers are found in the Answer Key (Math Calculations Chapter section) at the end of the book.
- A prescription for a child is written as 1 teaspoon every 4 hours. How many milliliters (mL) will you draw up in an oral syringe?
- A patient’s prescription states to administer one ounce of medication. How many milliliters will you measure in the medication cup?
- A patient’s prescription states to administer 0.5 grams of medication. How many milligrams will you administer?
- A baby weighs 3.636 kilograms. How many grams does this convert to?
- A patient’s pupils are 7 mm in size. How many centimeters does this convert to?
With an understanding of the basic structures and primary functions of the respiratory system, the nurse collects subjective and objective data to perform a focused respiratory assessment.
Subjective Assessment
Collect data using interview questions, paying particular attention to what the patient is reporting. The interview should include questions regarding any current and past history of respiratory health conditions or illnesses, medications, and reported symptoms. Consider the patient’s age, gender, family history, race, culture, environmental factors, and current health practices when gathering subjective data. The information discovered during the interview process guides the physical exam and subsequent patient education. See Table 10.3a for sample interview questions to use during a focused respiratory assessment.[11]
Table 10.3a Interview Questions for Subjective Assessment of the Respiratory System
| Interview Questions | Follow-up |
|---|---|
| Have you ever been diagnosed with a respiratory condition, such as asthma, COPD, pneumonia, or allergies?
Do you use oxygen or peak flow meter? Do you use home respiratory equipment like CPAP, BiPAP, or nebulizer devices? |
Please describe the conditions and treatments. |
| Are you currently taking any medications, herbs, or supplements for respiratory concerns? | Please identify what you are taking and the purpose of each. |
| Have you had any feelings of breathlessness
(dyspnea)? |
Note: If the shortness of breath is severe or associated with chest pain, discontinue the interview and obtain emergency assistance.
Are you having any shortness of breath now? If yes, please rate the shortness of breath from 0-10 with "0" being none and "10" being severe? Does anything bring on the shortness of breath (such as activity, animals, food, or dust)? If activity causes the shortness of breath, how much exertion is required to bring on the shortness of breath? When did the shortness of breath start? Is the shortness of breath associated with chest pain or discomfort? How long does the shortness of breath last? What makes the shortness of breath go away? Is the shortness of breath related to a position, like lying down? Do you sleep in a recliner or upright in bed? Do you wake up at night feeling short of breath? How many pillows do you sleep on? How does the shortness of breath affect your daily activities? |
| Do you have a cough? | When you cough, do you bring up anything? What color is the phlegm?
Do you cough up any blood (hemoptysis)? Do you have any associated symptoms with the cough such as fever, chills, or night sweats? How long have you had the cough? Does anything bring on the cough (such as activity, dust, animals, or change in position)? What have you used to treat the cough? Has it been effective? |
| Do you smoke or vape? | What products do you smoke/vape? If cigarettes are smoked, how many packs a day do you smoke?
How long have you smoked/vaped? Have you ever tried to quit smoking/vaping? What strategies gave you the best success? Are you interested in quitting smoking/vaping? If the patient is ready to quit, the five successful interventions are the "5 A's": Ask, Advise, Assess, Assist, and Arrange. Ask - Identify and document smoking status for every patient at every visit. Advise - In a clear, strong, and personalized manner, urge every user to quit. Assess - Is the user willing to make a quitting attempt at this time? Assist - For the patient willing to make a quitting attempt, use counseling and pharmacotherapy to help them quit. Arrange - Schedule follow-up contact, in person or by telephone, preferably within the first week after the quit date.[12] |
Life Span Considerations
Depending on the age and capability of the child, subjective data may also need to be retrieved from a parent and/or legal guardian.
Pediatric
- Is your child up-to-date with recommended immunizations?
- Is your child experiencing any cold symptoms (such as runny nose, cough, or nasal congestion)?
- How is your child’s appetite? Is there any decrease or change recently in appetite or wet diapers?
- Does your child have any hospitalization history related to respiratory illness?
- Did your child have any history of frequent ear infections as an infant?
Older Adult
- Have you noticed a change in your breathing?
- Do you get short of breath with activities that you did not before?
- Can you describe your energy level? Is there any change from previous?
Objective Assessment
A focused respiratory objective assessment includes interpretation of vital signs; inspection of the patient’s breathing pattern, skin color, and respiratory status; palpation to identify abnormalities; and auscultation of lung sounds using a stethoscope. For more information regarding interpreting vital signs, see the “General Survey” chapter. The nurse must have an understanding of what is expected for the patient’s age, gender, development, race, culture, environmental factors, and current health condition to determine the meaning of the data that is being collected.
Evaluate Vital Signs
The vital signs may be taken by the nurse or delegated to unlicensed assistive personnel such as a nursing assistant or medical assistant. Evaluate the respiratory rate and pulse oximetry readings to verify the patient is stable before proceeding with the physical exam. The normal range of a respiratory rate for an adult is 12-20 breaths per minute at rest, and the normal range for oxygen saturation of the blood is 94–98% (SpO₂).[13] Bradypnea is less than 12 breaths per minute, and tachypnea is greater than 20 breaths per minute.
Inspection
Inspection during a focused respiratory assessment includes observation of level of consciousness, breathing rate, pattern and effort, skin color, chest configuration, and symmetry of expansion.
- Assess the level of consciousness. The patient should be alert and cooperative. Hypoxemia (low blood levels of oxygen) or hypercapnia (high blood levels of carbon dioxide) can cause a decreased level of consciousness, irritability, anxiousness, restlessness, or confusion.
- Obtain the respiratory rate over a full minute. The normal range for the respiratory rate of an adult is 12-20 breaths per minute.
- Observe the breathing pattern, including the rhythm, effort, and use of accessory muscles. Breathing effort should be nonlabored and in a regular rhythm. Observe the depth of respiration and note if the respiration is shallow or deep. Pursed-lip breathing, nasal flaring, audible breathing, intercostal retractions, anxiety, and use of accessory muscles are signs of respiratory difficulty. Inspiration should last half as long as expiration unless the patient is active, in which case the inspiration-expiration ratio increases to 1:1.
- Observe the pattern of expiration and patient position. Patients who experience difficulty expelling air, such as those with emphysema, may have prolonged expiration cycles. Some patients may experience difficulty with breathing specifically when lying down. This symptom is known as orthopnea. Additionally, patients who are experiencing significant breathing difficulty may experience most relief while in a “tripod” position. This can be achieved by having the patient sit at the side of the bed with legs dangling toward the floor. The patient can then rest their arms on an overbed table to allow for maximum lung expansion. This position mimics the same position you might take at the end of running a race when you lean over and place your hands on your knees to “catch your breath.”
- Observe the patient’s color in their lips, face, hands, and feet. Patients with light skin tones should be pink in color. For those with darker skin tones, assess for pallor on the palms, conjunctivae, or inner aspect of the lower lip. Cyanosis is a bluish discoloration of the skin, lips, and nail beds, which may indicate decreased perfusion and oxygenation. Pallor is the loss of color, or paleness of the skin or mucous membranes and usually the result of reduced blood flow, oxygenation, or decreased number of red blood cells.
- Inspect the chest for symmetry and configuration. The trachea should be midline, and the clavicles should be symmetrical. See Figure 10.2[14] for visual landmarks when inspecting the thorax anteriorly, posteriorly, and laterally. Note the location of the ribs, sternum, clavicle, and scapula, as well as the underlying lobes of the lungs.
- Chest movement should be symmetrical on inspiration and expiration.
- Observe the anterior-posterior diameter of the patient’s chest and compare to the transverse diameter. The expected anteroposterior-transverse ratio should be 1:2. A patient with a 1:1 ratio is described as barrel-chested. This ratio is often seen in patients with chronic obstructive pulmonary disease due to hyperinflation of the lungs. See Figure 10.3[15] for an image of a patient with a barrel chest.
- Older patients may have changes in their anatomy, such as kyphosis, an outward curvature of the spine.
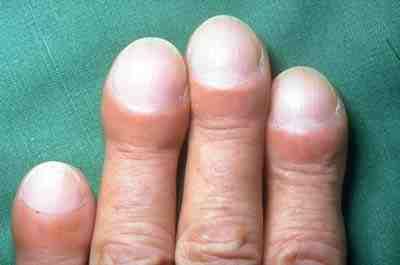
- Inspect the fingers for clubbing if the patient has a history of chronic respiratory disease. Clubbing is a bulbous enlargement of the tips of the fingers due to chronic hypoxia. See Figure 10.4[16] for an image of clubbing.


Palpation
- Palpation of the chest may be performed to investigate for areas of abnormality related to injury or procedural complications. For example, if a patient has a chest tube or has recently had one removed, the nurse may palpate near the tube insertion site to assess for areas of air leak or crepitus. Crepitus feels like a popping or crackling sensation when the skin is palpated and is a sign of air trapped under the subcutaneous tissues. If palpating the chest, use light pressure with the fingertips to examine the anterior and posterior chest wall. Chest palpation may be performed to assess specifically for growths, masses, crepitus, pain, or tenderness.
- Confirm symmetric chest expansion by placing your hands on the anterior or posterior chest at the same level, with thumbs over the sternum anteriorly or the spine posteriorly. As the patient inhales, your thumbs should move apart symmetrically. Unequal expansion can occur with pneumonia, thoracic trauma, such as fractured ribs, or pneumothorax.
Auscultation
Using the diaphragm of the stethoscope, listen to the movement of air through the airways during inspiration and expiration. Instruct the patient to take deep breaths through their mouth. Listen through the entire respiratory cycle because different sounds may be heard on inspiration and expiration. Allow the patient to rest between respiratory cycles, if needed, to avoid fatigue with deep breathing during auscultation. As you move across the different lung fields, the sounds produced by airflow vary depending on the area you are auscultating because the size of the airways change.
Correct placement of the stethoscope during auscultation of lung sounds is important to obtain a quality assessment. The stethoscope should not be placed over clothes or hair because these may create inaccurate sounds from friction. The best position to listen to lung sounds is with the patient sitting upright; however, if the patient is acutely ill or unable to sit upright, turn them side to side in a lying position. Avoid listening over bones, such as the scapulae or clavicles or over the female breasts to ensure you are hearing adequate sound transmission. Listen to sounds from side to side rather than down one side and then down the other side. This side-to-side pattern allows you to compare sounds in symmetrical lung fields. See Figures 10.5[17] and 10.6[18] for landmarks of stethoscope placement over the anterior and posterior chest wall.


Expected Breath Sounds
It is important upon auscultation to have awareness of expected breath sounds in various anatomical locations.
- Bronchial breath sounds are heard over the trachea and larynx and are high-pitched and loud.
- Bronchovesicular sounds are medium-pitched and heard over the major bronchi.
- Vesicular breath sounds are heard over the lung surfaces, are lower-pitched, and often described as soft, rustling sounds.
Adventitious Lung Sounds
Adventitious lung sounds are sounds heard in addition to normal breath sounds. They most often indicate an airway problem or disease, such as accumulation of mucus or fluids in the airways, obstruction, inflammation, or infection. These sounds include rales/crackles, rhonchi/wheezes, stridor, and pleural rub:
- Coarse crackles, also called rhonchi, are low-pitched, loud, continuous sounds frequently heard on expiration. They are a sign of turbulent airflow through secretions in the large airways.
Rhonchi Lung Sounds on YouTube [19]
- Fine crackles, also called rales, are popping or crackling sounds heard on inspiration. They occur in association with conditions that cause fluid to accumulate within the alveolar and interstitial spaces, such as heart failure or pneumonia. Fine crackles are soft, high-pitched, and very brief. For this reason, it is essential to listen to lung sounds with the stethoscope placed on the patient's skin and not over their clothing or hospital gown. The sound is similar to that produced by rubbing strands of hair together close to your ear.
- Wheezes are whistling-type noises produced during expiration (and sometimes inspiration) when air is forced through airways narrowed by bronchoconstriction or associated mucosal edema. For example, patients with asthma commonly have wheezing.
- Stridor is heard only on inspiration. It is associated with mechanical obstruction at the level of the trachea/upper airway.
- Pleural rub may be heard on either inspiration or expiration and sounds like the rubbing together of leather. A pleural rub is heard when there is inflammation of the lung pleura, resulting in friction as the surfaces rub against each other.[20]
Life Span Considerations
Children
There are various respiratory assessment considerations that should be noted with assessment of children.
- The respiratory rate in children less than 12 months of age can range from 30-60 breaths per minute, depending on whether the infant is asleep or active.
- Infants have irregular or periodic newborn breathing in the first few weeks of life; therefore, it is important to count the respirations for a full minute. During this time, you may notice periods of apnea lasting up to 10 seconds. This is not abnormal unless the infant is showing other signs of distress. Signs of respiratory distress in infants and children include nasal flaring and sternal or intercostal retractions.
- Up to three months of age, infants are considered “obligate” nose-breathers, meaning their breathing is primarily through the nose.
- The anteroposterior-transverse ratio is typically 1:1 until the thoracic muscles are fully developed around six years of age.
Older Adults
As the adult person ages, the cartilage and muscle support of the thorax becomes weakened and less flexible, resulting in a decrease in chest expansion. Older adults may also have weakened respiratory muscles, and breathing may become shallower. The anteroposterior-transverse ratio may be 1:1 if there is significant curvature of the spine (kyphosis).
Percussion
Percussion is an advanced respiratory assessment technique that is used by advanced practice nurses and other health care providers to gather additional data in the underlying lung tissue. By striking the fingers of one hand over the fingers of the other hand, a sound is produced over the lung fields that helps determine if fluid is present. Dull sounds are heard with high-density areas, such as pneumonia or atelectasis, whereas clear, low-pitched, hollow sounds are heard in normal lung tissue.
![]()
- Because infants breathe primarily through the nose, nasal congestion can limit the amount of air getting into the lungs.
- Attempt to assess an infant’s respiratory rate while the infant is at rest and content rather than when the infant is crying. Counting respirations by observing abdominal breathing movements may be easier for the novice nurse than counting breath sounds, as it can be difficult to differentiate lung and heart sounds when auscultating newborns.
- Auscultation of lungs during crying is not a problem. It will enhance breath sounds.
- The older patient may have a weakening of muscles that support respiration and breathing. Therefore, the patient may report tiring easily during the assessment when taking deep breaths. Break up the assessment by listening to the anterior lung sounds and then the heart sounds and allowing the patient to rest before listening to the posterior lung sounds.
- Patients with end-stage COPD may have diminished lung sounds due to decreased air movement. This abnormal assessment finding may be the patient’s baseline or normal and might also include wheezes and fine crackles as a result of chronic excess secretions and/or bronchoconstriction.[21],[22]
Expected Versus Unexpected Findings
See Table 10.3b for a comparison of expected versus unexpected findings when assessing the respiratory system.[23]
Table 10.3b Expected Versus Unexpected Respiratory Assessment Findings
| Assessment | Expected Findings | Unexpected Findings (Document and notify provider if a new finding*) |
|---|---|---|
| Inspection | Work of breathing effortless
Regular breathing pattern Respiratory rate within normal range for age Chest expansion symmetrical Absence of cyanosis or pallor Absence of accessory muscle use, retractions, and/or nasal flaring Anteroposterior: transverse diameter ratio 1:2 |
Labored breathing
Irregular rhythm Increased or decreased respiratory rate Accessory muscle use, pursed-lip breathing, nasal flaring (infants), and/or retractions Presence of cyanosis or pallor Asymmetrical chest expansion Clubbing of fingernails |
| Palpation | No pain or tenderness with palpation. Skin warm and dry; no crepitus or masses | Pain or tenderness with palpation, crepitus, palpable masses, or lumps |
| Percussion | Clear, low-pitched, hollow sound in normal lung tissue | Dull sounds heard with high-density areas, such as pneumonia or atelectasis |
| Auscultation | Bronchovesicular and vesicular sounds heard over appropriate areas
Absence of adventitious lung sounds |
Diminished lung sounds
Adventitious lung sounds, such as fine crackles/rales, wheezing, stridor, or pleural rub |
| *CRITICAL CONDITIONS to report immediately | Decreased oxygen saturation <92%[24]
Pain Worsening dyspnea Decreased level of consciousness, restlessness, anxiousness, and/or irritability |
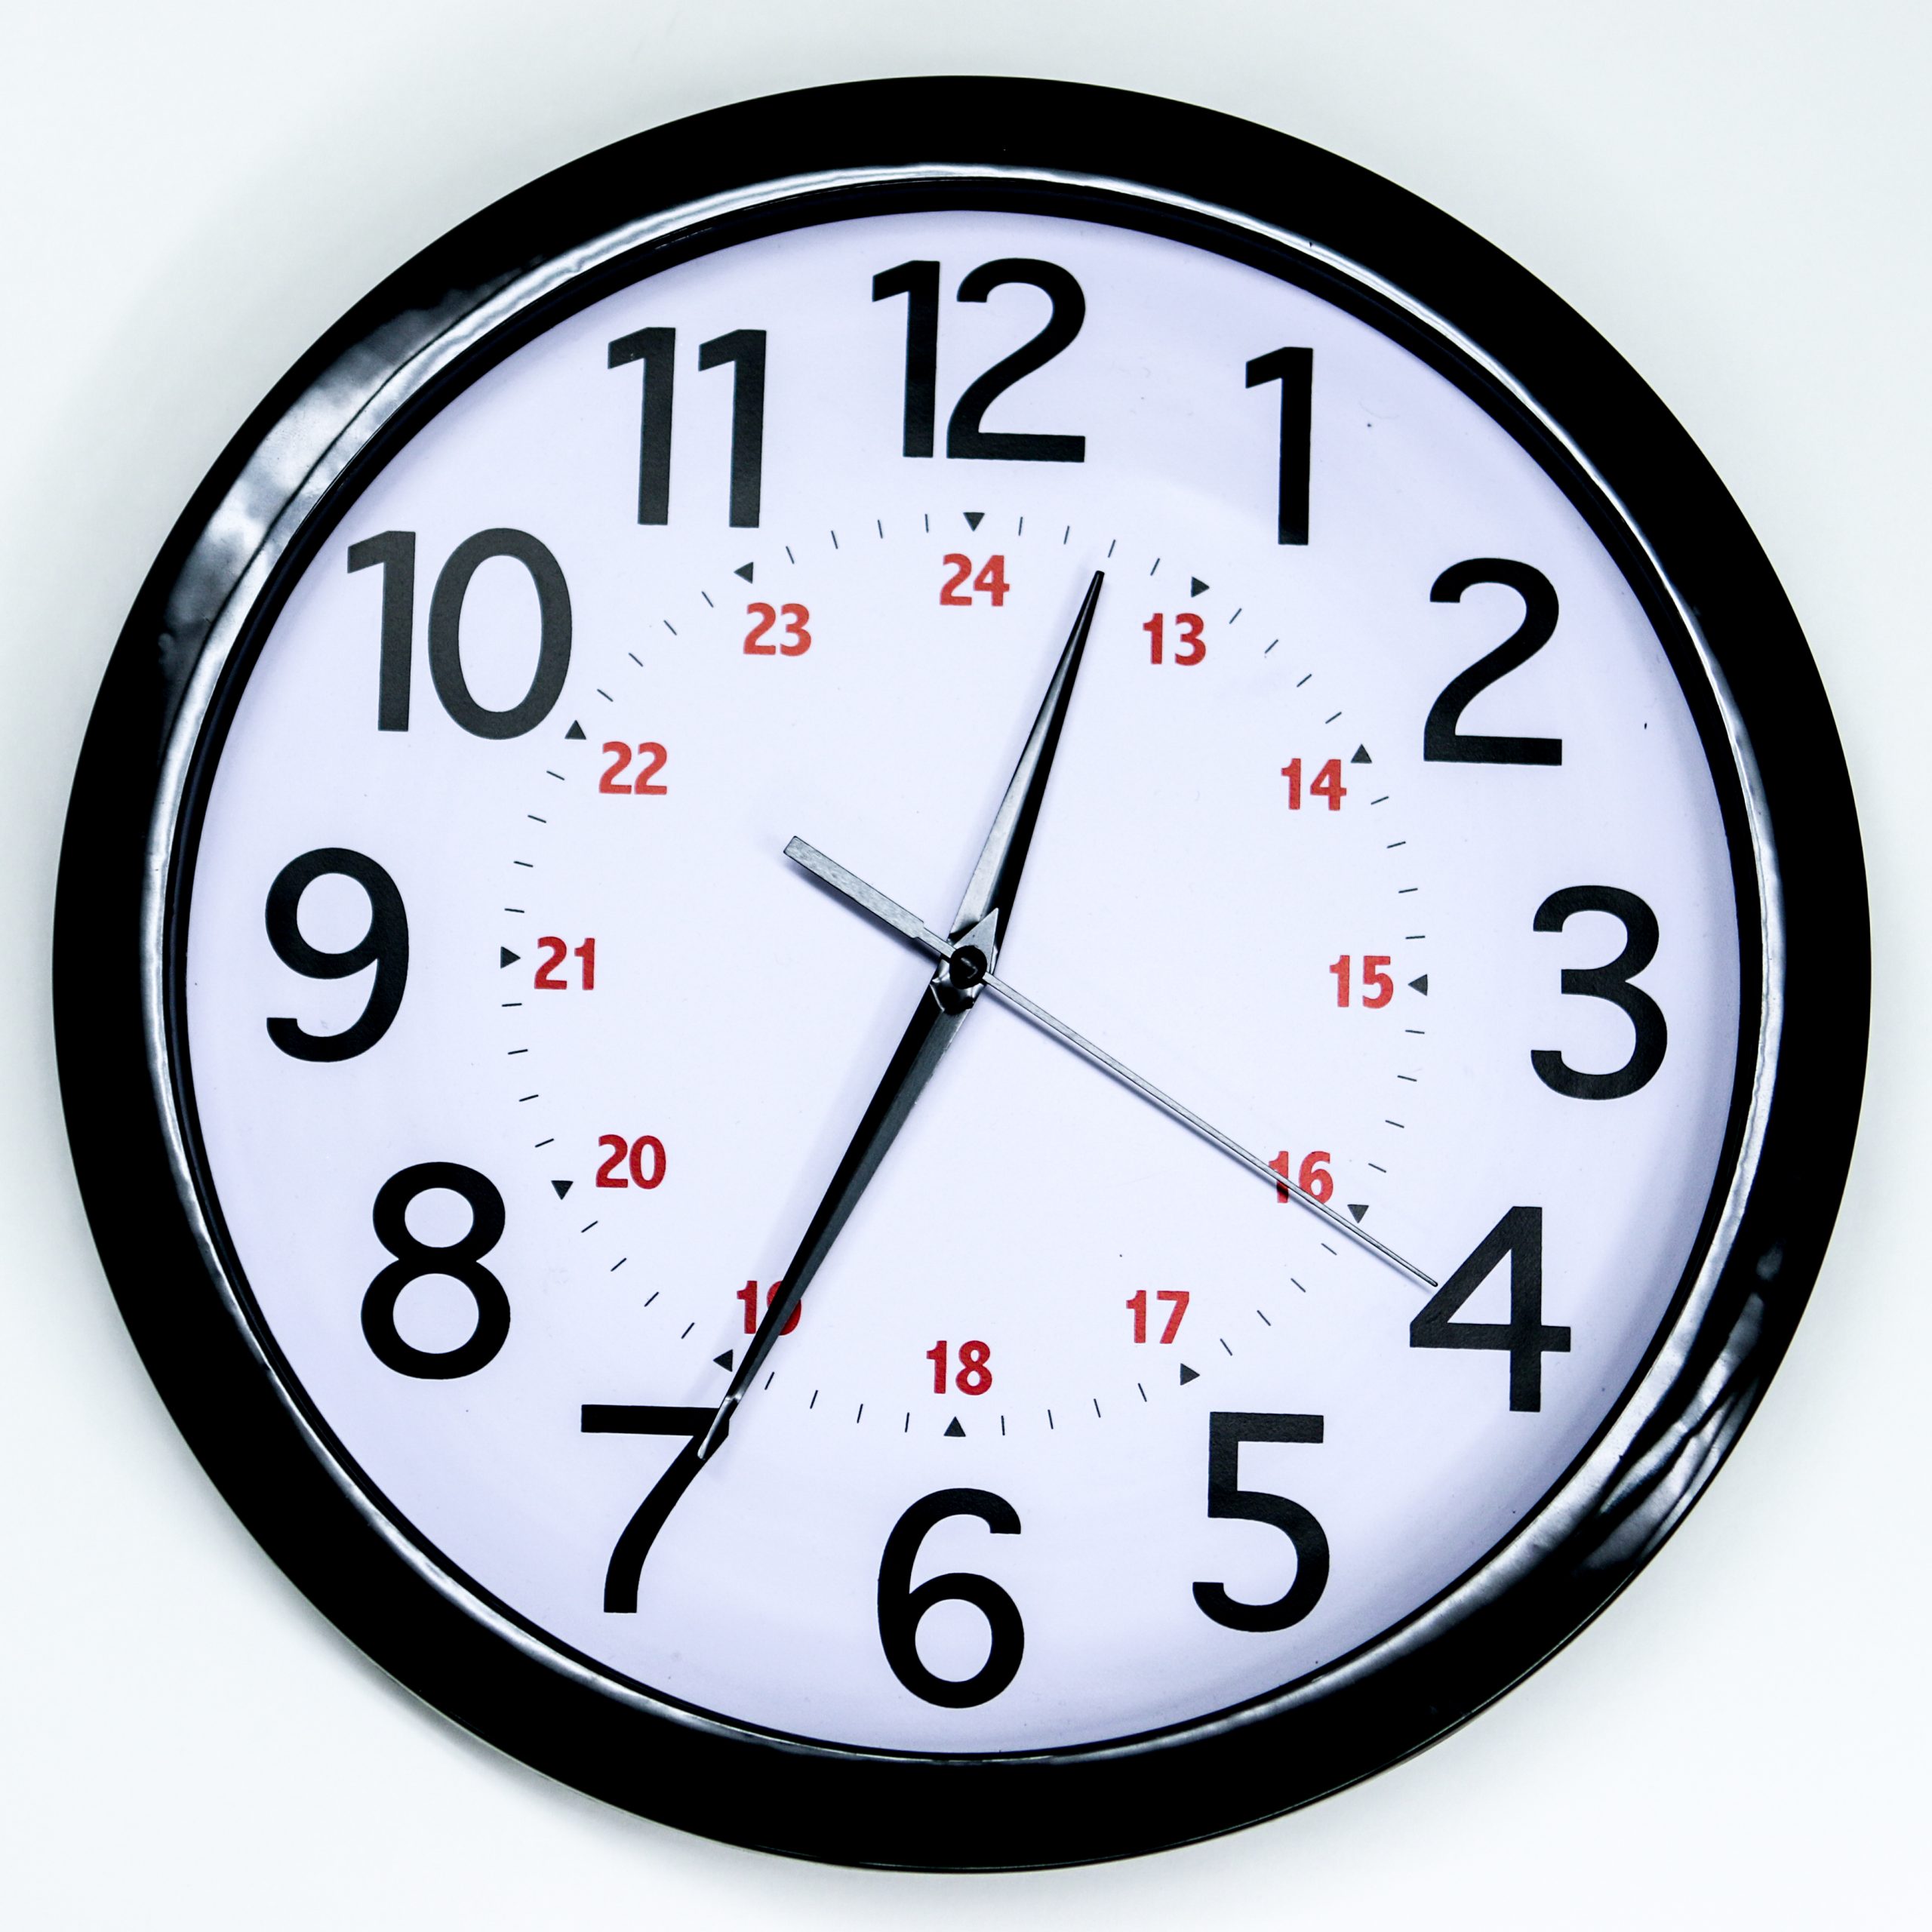
Military time is a method of measuring the time based on the full 24 hours of the day rather than two groups of 12 hours indicated by AM and PM. It is also referred to as using a 24-hour clock. Using military time is the standard method used to indicate time for medication administration. The use of military time reduces potential confusion that may be caused by using AM and PM and also avoids potential duplication when giving scheduled medications. For example, instead of stating medication is due at 7 AM and 7 PM, it is documented on the medication administration record (MAR) as due at 0700 and 1900. See Figure 5.5[25] for an example clock and Table 5.3 for a military time conversion chart.
- Conversion of an AM time to military time simply involves removing the colon and adding a zero to the time. For example, 6:30 AM becomes 0630.
- Conversion of a PM time to military time involves removing the colon and adding 1200 to the time. For example, 7:15 PM becomes 1915.
Table 5.3 Military Time Conversion Chart
| Normal Time | Military Time | Normal Time | Military Time |
|---|---|---|---|
| 12:00 AM | 0000 | 12:00 PM | 1200 |
| 1:00 AM | 0100 | 1:00 PM | 1300 |
| 2:00 AM | 0200 | 2:00 PM | 1400 |
| 3:00 AM | 0300 | 3:00 PM | 1500 |
| 4:00 AM | 0400 | 4:00 PM | 1600 |
| 5:00 AM | 0500 | 5:00 PM | 1700 |
| 6:00 AM | 0600 | 6:00 PM | 1800 |
| 7:00 AM | 0700 | 7:00 PM | 1900 |
| 8:00 AM | 0800 | 8:00 PM | 2000 |
| 9:00 AM | 0900 | 9:00 PM | 2100 |
| 10:00 AM | 1000 | 10:00 PM | 2200 |
| 11:00 AM | 1100 | 11:00 PM | 2300 |
Practice Problems: Military Time
Practice converting military time using the following problems. The answers are found in the Answer Key (Math Calculations Chapter section) at the end of the book.
- A patient has a medication scheduled for 1930. What time does this indicate? Include AM or PM.
- As you prepare to administer a PRN dose of pain medication, you notice the previous dose was administered at 0030. What time does this indicate? Include AM or PM.
- You administer medication to a patient at 9 AM. How should this be documented in military time?
- You administer medication to a patent at 10 PM. How should this be documented in military time?

