18.6 Administering Intramuscular Medications
Open Resources for Nursing (Open RN)
The intramuscular (IM) injection route is used to place medication in muscle tissue. Muscle has an abundant blood supply that allows medications to be absorbed faster than the subcutaneous route.
Factors that influence the choice of muscle to use for an intramuscular injection include the patient’s size, as well as the amount, viscosity, and type of medication. The length of the needle must be long enough to pass through the subcutaneous tissue to reach the muscle, so needles up to 1.5 inches long may be selected. However, if a patient is thin, a shorter needle length is used because there is less fat tissue to advance through to reach the muscle. Additionally, the muscle mass of infants and young children cannot tolerate large amounts of medication volume. Medication fluid amounts up to 0.5-1 mL can be injected in one site in infants and children, whereas adults can tolerate 2-3 mL. Intramuscular injections are administered at a 90-degree angle. Research has found administering medications at 10 seconds per mL is an effective rate for IM injections, but always review the drug administration rate per pharmacy or manufacturer’s recommendations.[1]
Anatomic Sites
Anatomic sites must be selected carefully for intramuscular injections and include the ventrogluteal, vastus lateralis, and the deltoid. The vastus lateralis site is preferred for infants because that muscle is most developed. The ventrogluteal site is generally recommended for IM medication administration in adults, but IM vaccines may be administered in the deltoid site. Additional information regarding injections in each of these sites is provided in the following subsections.
Ventrogluteal
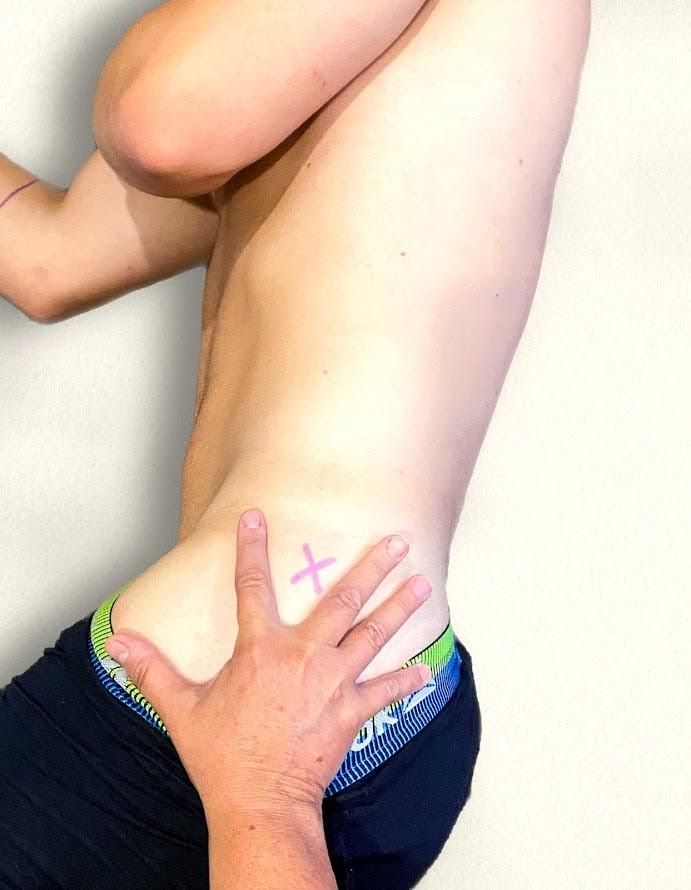
This site involves the gluteus medius and minimus muscle and is the safest injection site for adults and children because it provides the greatest thickness of gluteal muscles, is free from penetrating nerves and blood vessels, and has a thin layer of fat. To locate the ventrogluteal site, place the patient in a supine or lateral position. Use your right hand for the left hip or your left hand for the right hip. Place the heel or palm of your hand on the greater trochanter, with the thumb pointed toward the belly button. Extend your index finger to the anterior superior iliac spine and spread your middle finger pointing towards the iliac crest. Insert the needle into the “V” formed between your index and middle fingers. This is the preferred site for all oily and irritating solutions for patients of any age.[2] See Figure 18.31[3] for an image demonstrating how to accurately locate the ventrogluteal site using your hand.
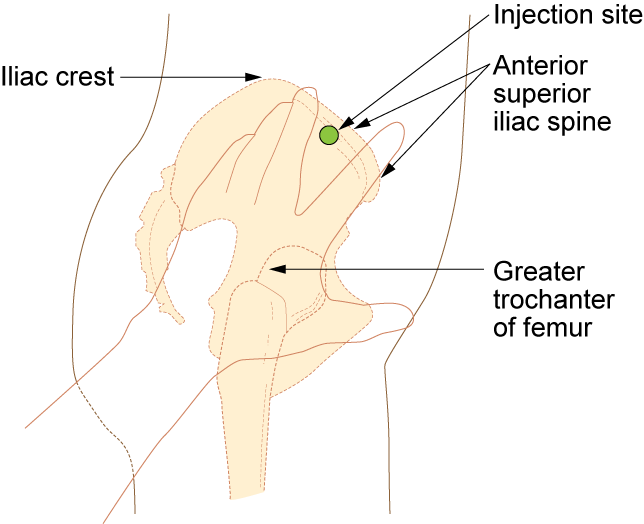
The needle gauge used at the ventrogluteal site is determined by the solution of the medication ordered. An aqueous solution can be given with a 20- to 25-gauge needle, whereas viscous or oil-based solutions are given with 18- to 21-gauge needles. The needle length is based on patient weight and body mass index. A thin adult may require a 5/8-inch to 1-inch (16 mm to 25 mm) needle, while an average adult may require a 1-inch (25 mm) needle, and a larger adult (over 70 kg) may require a 1-inch to 1½-inch (25 mm to 38 mm) needle. Children and infants require shorter needles. Refer to agency policies regarding needle length for infants, children, and adolescents. Up to 3 mL of medication may be administered in the ventrogluteal muscle of an average adult and up to 1 mL in children. See Figure 18.32[4] for an image of locating the ventrogluteal site on a patient.
Vastus Lateralis
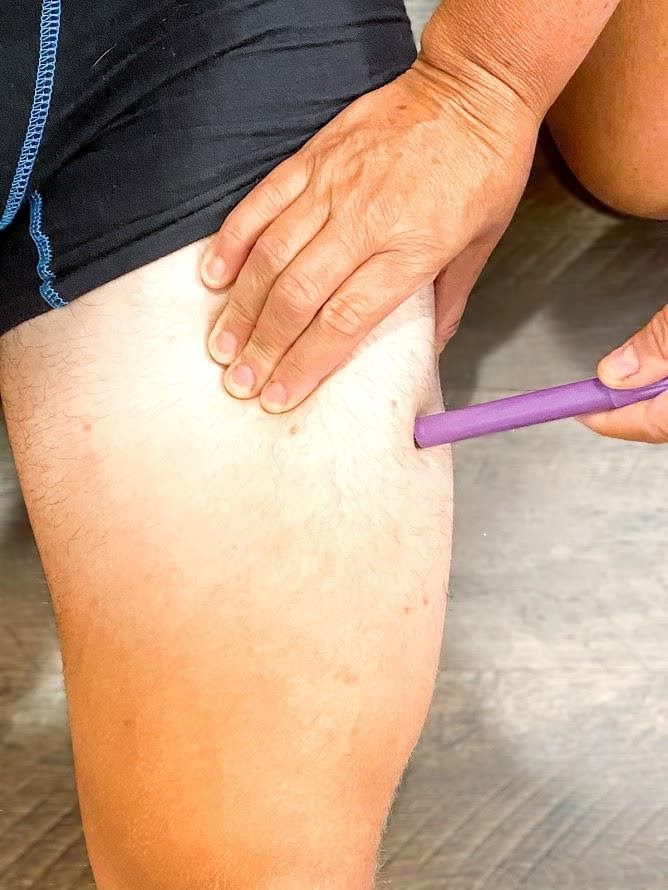
The vastus lateralis site is commonly used for immunizations in infants and toddlers because the muscle is thick and well-developed. This muscle is located on the anterior lateral aspect of the thigh and extends from one hand’s breadth above the knee to one hand’s breadth below the greater trochanter. The outer middle third of the muscle is used for injections. To help relax the patient, ask the patient to lie flat with knees slightly bent or have the patient in a sitting position. See Figure 18.33[5] for an image of the vastus lateralis injection site.
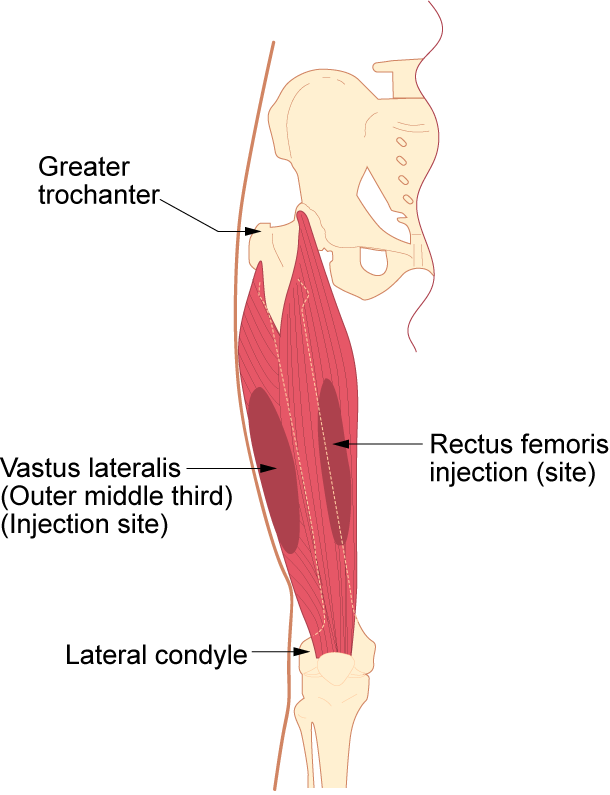
The length of the needle used at the vastus lateralis site is based on the patient’s age, weight, and body mass index. In general, the recommended needle length for an adult is 1 inch to 1 ½ inches (25 mm to 38 mm), but the needle length is shorter for children. Refer to agency policy for pediatric needle lengths. The gauge of the needle is determined by the type of medication administered. Aqueous solutions can be given with a 20- to 25-gauge needle; oily or viscous medications should be administered with 18- to 21-gauge needles. A smaller gauge needle (22 to 25 gauge) should be used with children. The maximum amount of medication for a single injection in an adult is 3 mL. See Figure 18.34[6] for an image of an intramuscular injection being administered at the vastus lateralis site.
Deltoid
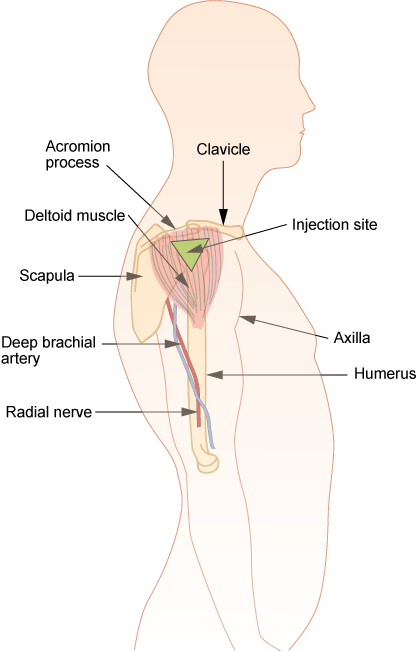
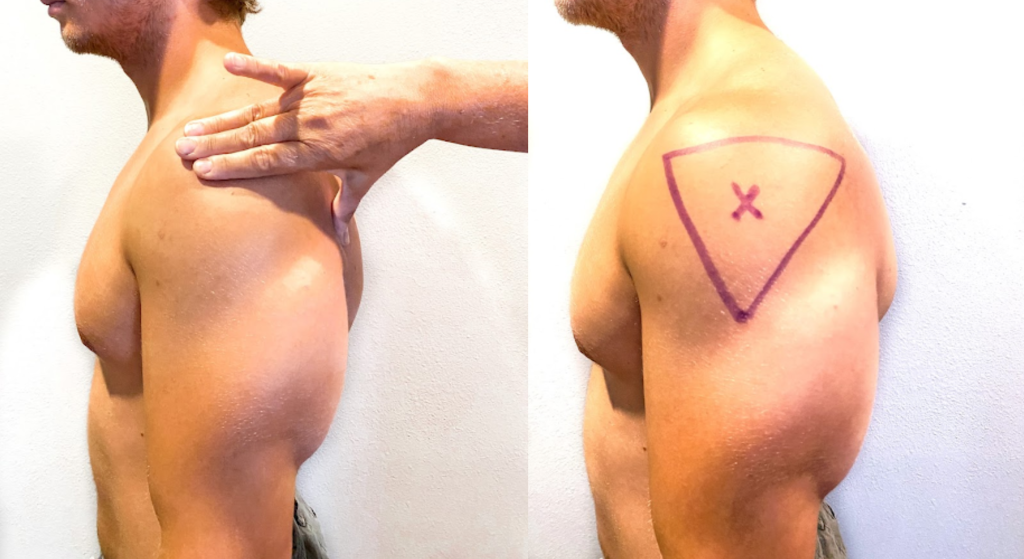
The deltoid muscle has a triangular shape and is easy to locate and access. To locate the injection site, begin by having the patient relax their arm. The patient can be standing, sitting, or lying down. To locate the landmark for the deltoid muscle, expose the upper arm and find the acromion process by palpating the bony prominence. The injection site is in the middle of the deltoid muscle, about 1 inch to 2 inches (2.5 cm to 5 cm) below the acromion process. To locate this area, lay three fingers across the deltoid muscle and below the acromion process. The injection site is generally three finger widths below in the middle of the muscle. See Figure 18.35[7] for an illustration for locating the deltoid injection site.
Select the needle length based on the patient’s age, weight, and body mass. In general, for an adult male weighing 60 kg to 118 kg (130 to 260 lbs), a 1-inch (25 mm) needle is sufficient. For women under 60 kg (130 lbs), a ⅝-inch (16 mm) needle is sufficient, while for women between 60 kg and 90 kg (130 to 200 lbs) a 1-inch (25 mm) needle is required. A 1 ½-inch (38 mm) length needle may be required for women over 90 kg (200 lbs) for a deltoid IM injection. For immunizations, a 22- to 25-gauge needle should be used. Refer to agency policy regarding specifications for infants, children, adolescents, and immunizations. The maximum amount of medication for a single injection is generally 1 mL. See Figure 18.36[8] for an image of locating the deltoid injection site on a patient.
Description of Procedure
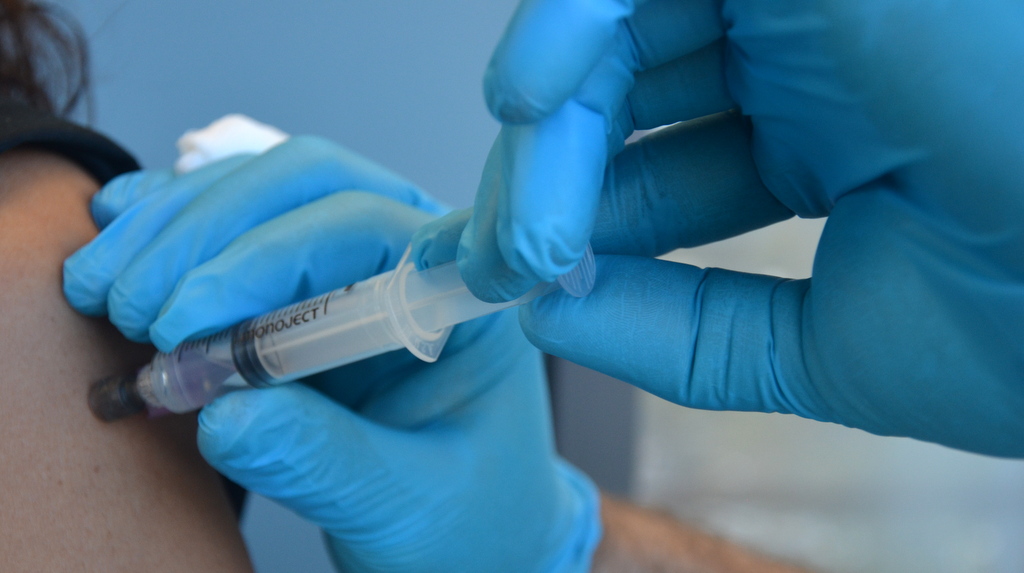
When administering an intramuscular injection, the procedure is similar to a subcutaneous injection, but instead of pinching the skin, stabilize the skin around the injection site with your nondominant hand. With your dominant hand, hold the syringe like a dart and insert the needle quickly into the muscle at a 90-degree angle using a steady and smooth motion. After the needle pierces the skin, use the thumb and forefinger of the nondominant hand to hold the syringe. If aspiration is indicated according to agency policy and manufacturer recommendations, pull the plunger back to aspirate for blood. If no blood appears, inject the medication slowly and steadily. If blood appears, discard the syringe and needle and prepare the medication again. See Figure 18.37[9] for an image of aspirating for blood. After the medication is completely injected, leave the needle in place for ten seconds, and then remove the needle using a smooth, steady motion. Remove the needle at the same angle at which it was inserted. Cover the injection site with sterile gauze using gentle pressure and apply a Band-Aid if needed.[10]
Z-track Method for IM injections
Evidence-based practice supports using the Z-track method for administration of intramuscular injections. This method prevents the medication from leaking into the subcutaneous tissue, allows the medication to stay in the muscles, and can minimize irritation.[12]
The Z-track method creates a zigzag path to prevent medication from leaking into the subcutaneous tissue. This method may be used for all injections or may be specified by the medication.
Displace the patient’s skin in a Z-track manner by pulling the skin down or to one side about 1 inch (2 cm) with your nondominant hand before administering the injection. With the skin held to one side, quickly insert the needle at a 90-degree angle. After the needle pierces the skin, continue pulling on the skin with the nondominant hand, and at the same time, grasp the lower end of the syringe barrel with the fingers of the nondominant hand to stabilize it. Move your dominant hand and pull the end of the plunger to aspirate for blood, if indicated. If no blood appears, inject the medication slowly. Once the medication is given, leave the needle in place for ten seconds. After the medication is completely injected, remove the needle using a smooth, steady motion, and then release the skin. See Figure 18.38[13] for an illustration of the Z-track method.
![“Z-track-process-1.png“ and "Z-track-process-3.png" by British Columbia Institute of Technology (BCIT) is licensed under CC BY 4.0. Access for free at https://opentextbc.ca/clinicalskills/chapter/6-8-iv-push-medications-and-saline-lock-flush/[/footnote] Illustration showing two parts of the Z track method](https://opencontent.ccbcmd.edu/app/uploads/sites/30/2024/08/ztrack-1-1024x409.png)
Special Considerations for IM Injections
- Avoid using sites with atrophied muscle because they will poorly absorb medications.
- If repeated IM injections are given, sites should be rotated to decrease the risk of hypertrophy.
- Older adults and thin patients may only tolerate up to 2 milliliters in a single injection.
- Choose a site that is free from pain, infection, abrasions, or necrosis.
- The dorsogluteal site should be avoided for intramuscular injections because of the risk for injury. If the needle inadvertently hits the sciatic nerve, the patient may experience partial or permanent paralysis of the leg.
View supplementary YouTube videos on Administering Intramuscular Injections:
Z-Track Method[14]
Ventrogluteal Injection[15]
Media Attributions
- Im-ventrogluteal-300×244
- Injection Site Image1
- Im-vastus-lateralis
- intra
- Im-deltoid
- The Deltoid Injection Site
- Sept-22-2015-111
- ztrack
- This work is a derivative of Clinical Procedures for Safer Patient Care by British Columbia Institute of Technology and is licensed under CC BY 4.0 ↵
- This work is a derivative of Clinical Procedures for Safer Patient Care by British Columbia Institute of Technology and is licensed under CC BY 4.0 ↵
- “Im-ventrogluteal-300x244.png” by British Columbia Institute of Technology is licensed under CC BY 4.0. Access for free at https://opentextbc.ca/clinicalskills/chapter/6-8-iv-push-medications-and-saline-lock-flush/ ↵
- “Injection Site Image1.heic” by Meredith Pomietlo for Chippewa Valley Technical College is licensed under CC BY 4.0 ↵
- “Im-vastus-lateralis.png” by British Columbia Institute of Technology is licensed under CC BY 4.0. Access for free at https://opentextbc.ca/clinicalskills/chapter/6-7-intradermal-subcutaneous-and-intramuscular-injections/ ↵
- “Vastus Lateralis Site” by Meredith Pomietlo for Chippewa Valley Technical College is licensed under CC BY 4.0 ↵
- “Im-deltoid.png” by British Columbia Institute of Technology is licensed under CC BY 4.0. Access for free at https://opentextbc.ca/clinicalskills/chapter/6-7-intradermal-subcutaneous-and-intramuscular-injections/ ↵
- “Injection Site Image 3.jpg” and "Injection Site Image 2.jpg" by Meredith Pomietlo for Chippewa Valley Technical College are licensed under CC BY 4.0 ↵
- “Sept-22-2015-111.jpg” by British Columbia Institute of Technology is licensed under CC BY 4.0. Access for free at https://opentextbc.ca/clinicalskills/chapter/6-8-iv-push-medications-and-saline-lock-flush/ ↵
- This work is a derivative of Clinical Procedures for Safer Patient Care by British Columbia Institute of Technology and is licensed under CC BY 4.0 ↵
- Centers for Disease Control and Prevention. (2019, April 15). Vaccine administration. https://www.cdc.gov/vaccines/pubs/pinkbook/vac-admin.html ↵
- Yilmaz, D., Khorshid, L., & Dedeoğlu, Y. (2016). The effect of the z-track technique on pain and drug leakage in intramuscular injections. Clinical Nurse Specialist, 30(6), E7-E12. https://doi.org/10.1097/nur.0000000000000245 ↵
- “Z-track-process-1.png” and “Z-track-process-3.png” by British Columbia Institute of Technology are licensed under CC BY 4.0. Access for free at https://opentextbc.ca/clinicalskills/chapter/6-8-iv-push-medications-and-saline-lock-flush/ ↵
- RegisteredNurseRN. (2018, November 19). Intramuscular injection in deltoid muscle with z-track technique [Video]. YouTube. All rights reserved. Video used with permission. https://youtu.be/DBHnd3N-5Ns ↵
- RegisteredNurseRN. (2014, August 8). How to give an IM intramuscular injection ventrogluteal buttock muscle [Video]. YouTube. All rights reserved. Video used with permission. https://youtu.be/wKCPiSnYqwA ↵
The scope of practice regarding a nurse’s ability to legally dispense and administer medication is based on each state’s Nurse Practice Act. Registered Nurses (RNs) and Licensed Practical Nurses (LPNs/LVNs) may legally administer medications that are prescribed by a health care provider, such as a physician, nurse practitioner, or physician’s assistant. Prescriptions are “orders, interventions, remedies, or treatments ordered or directed by an authorized primary health care provider.”[1]
For more information about the state Nurse Practice Act, visit the "Legal/Ethical" chapter in Open RN Nursing Pharmacology.
Types of Orders
Prescriptions are often referred to as orders in clinical practice. There are several types of orders, such as routine orders, PRN orders, standing orders, one-time orders, STAT orders, and titration orders.
- A routine order is a prescription that is followed until another order cancels it. An example of a routine order is “Lisinopril 10 mg PO daily.”
- A PRN order is a prescription for medication to be administered when it is requested by, or as needed, by the patient. PRN orders are typically administered based on patient symptoms, such as pain, nausea, or itching. An example of a PRN order for pain medication is “Acetaminophen 500 mg PO every 4-6 hours as needed for pain.”
- A standing order is also referred to in practice as an “order set” or a “protocol.” Standing orders are standardized prescriptions for nurses to implement to any patient in clearly defined circumstances without the need to initially notify a provider. An example of a standing order set/protocol for patients visiting an urgent care clinic reporting chest pain is to immediately administer four chewable aspirin, establish intravenous (IV) access, and obtain an electrocardiogram (ECG).
- A one-time order is a prescription for a medication to be administered only once. An example of a one-time order is a prescription for an IV dose of antibiotics to be administered immediately prior to surgery.
- A STAT order is a one-time order that is administered without delay due to the urgency of the circumstances. An example of a STAT order is “Benadryl 50 mg PO stat” for a patient having an allergic reaction.
- A titration order is an order in which the medication dose is either progressively increased or decreased by the nurse in response to the patient's status. Titration orders are typically used for patients in critical care as defined by agency policy. The Joint Commission requires titration orders to include the medication name, medication route, initial rate of infusion (dose/unit of time), incremental units to which the rate or dose can be increased or decreased, how often the rate or dose can be changed, the maximum rate or dose of infusion, and the objective clinical measure to be used to guide changes. An example of a titration order is "Norepinephrine 2-12 micrograms/min, start at 2 mcg/min and titrate upward by 1 mcg/min every 5 minutes with continual blood pressure monitoring until systolic blood pressure >90 mm Hg."
Components of a Medication Order
According to the Centers for Medicare & Medicaid Services, all orders for the administration of drugs and biologicals must contain the following information[2]:
- Name of the patient
- Age or date of birth
- Date and time of the order
- Drug name
- Dose, frequency, and route
- Name/Signature of the prescriber
- Weight of the patient to facilitate dose calculation when applicable. (Note that dose calculations are based on metric weight: kilograms for children/adults or grams for newborns)
- Dose calculation requirements, when applicable
- Exact strength or concentration, when applicable
- Quantity and/or duration of the prescription, when applicable
- Specific instructions for use, when applicable
When reviewing a medication order, the nurse must ensure these components are included in the prescription before administering the medication. If a pertinent piece of information is not included, the nurse must contact the prescribing provider to clarify and correct the order.
Drug Name
The name of the drug may be ordered by the generic name or brand name. The generic name is considered the safest method to use and allows for substitution of various brand medications by the pharmacist.
Dose
The dosage of a drug is prescribed using either the metric or the household system. The metric system is the most commonly accepted system internationally. Examples of standard dosage are 5 mL (milliliters) or 1 teaspoon. Standard abbreviations of metric measurement are frequently used regarding the dosage, such as mg (milligram), kg (kilogram), mL (milliliter), mcg (microgram), or L (liter). However, it is considered safe practice to avoid other abbreviations and include the full words in prescriptions to avoid errors. In fact, several abbreviations have been deemed unsafe by the Joint Commission and have been put on a “do not use” list. See the box below to view The Joint Commission's “Do Not Use List” and the Institute of Safe Medication Practices' (ISMP) list of abbreviations to avoid. If a dosage is unclear or written in a confusing manner in a prescription, it is always best to clarify the order with the prescribing provider before administering the medication.
Frequency
Frequency in prescriptions is indicated by how many times a day the medication is to be administered or how often it is to be administered in hours or minutes. Examples of frequency include verbiage such as once daily, twice daily, three times daily, four times daily, every 30 minutes, every hour, every four hours, or every eight hours. Medication times are typically indicated using military time (i.e., using a 24-hour clock). For example, 11 p.m. is indicated as “2300.” Read more about military time in the "Math Calculations" chapter.
Some types of medications may be ordered "around the clock (ATC)." An around-the-clock frequency order indicates they should be administered at regular time intervals, such as every six hours, to maintain consistent levels of the drug in the patient's bloodstream. For example, pain medications administered at end of life are often prescribed ATC instead of PRN (as needed) to maintain optimal pain relief.
Route of Administration
Common routes of administration and standard abbreviations include the following:
- Oral (PO) - the patient swallows a tablet or capsule
- Sublingual (SL) - applied under the tongue
- Enteral (NG or PEG) - administered via a tube directly into the GI tract
- Rectal (PR) - administered via rectal suppository
- Inhalation (INH) - the patient breathes in medication from an inhaler
- Intramuscular (IM) - administered via an injection into a muscle
- Subcutaneous - administered via injection into the fat tissue beneath the skin (Note that “subcutaneous” is on ISMP’s recommended list of abbreviations to avoid due to common errors.)
- Transdermal (TD) - administered by applying a patch on the skin
For more information about routes of administration and considerations regarding absorption, visit the "Kinetics and Dynamics" chapter in Open RN Nursing Pharmacology.
Provider Name/Signature
The signature of the prescribing provider is required on the order and can be electronic or handwritten. Verbal orders from a prescriber are not recommended but may be permitted in some agencies for urgent situations. Verbal orders require the nurse to "repeat back" the order to the prescriber for confirmation.
Rights of Medication Administration
Each year in the United States, 7,000 to 9,000 people die as a result of a medication error. Hundreds of thousands of other patients experience adverse reactions or other complications related to a medication. The total cost of caring for patients with medication-associated errors exceeds $40 billion each year. In addition to the monetary cost, patients experience psychological and physical pain and suffering as a result of medication errors.[3] Nurses play a vital role in reducing the number of medication errors that occur by verifying several rights of medication.
The Centers for Medicare & Medicaid Services requires nurses to verify specific information prior to the administration of medication to avoid errors, referred to as verifying the rights of medication administration.[4] These rights of medication administration are the vital last safety check by nurses to prevent errors in the chain of medication administration that includes the prescribing provider, the pharmacist, the nurse, and the patient.
It is important to remember that if a medication error occurs resulting in harm to a patient, a nurse can be held liable even if “just following orders.” It is absolutely vital for nurses to use critical thinking and clinical judgment to ensure each medication is safe for each specific patient before administering it. The consequences of liability resulting from a medication error can range from being charged with negligence in a court of law, to losing one’s job, to losing one’s nursing license.
The six rights of medication administration must be verified by the nurse at least three times before administering a medication to a patient. These six rights include the following:
- Right Patient
- Right Drug
- Right Dose
- Right Time
- Right Route[5]
- Right Documentation
Recent literature indicates that up to ten rights should be completed as part of a safe medication administration process. These additional rights include Right History and Assessment, Right Drug Interactions, Right to Refuse, and Right Education and Information. Information for each of these rights is further described below.[6],[7]
Right Patient
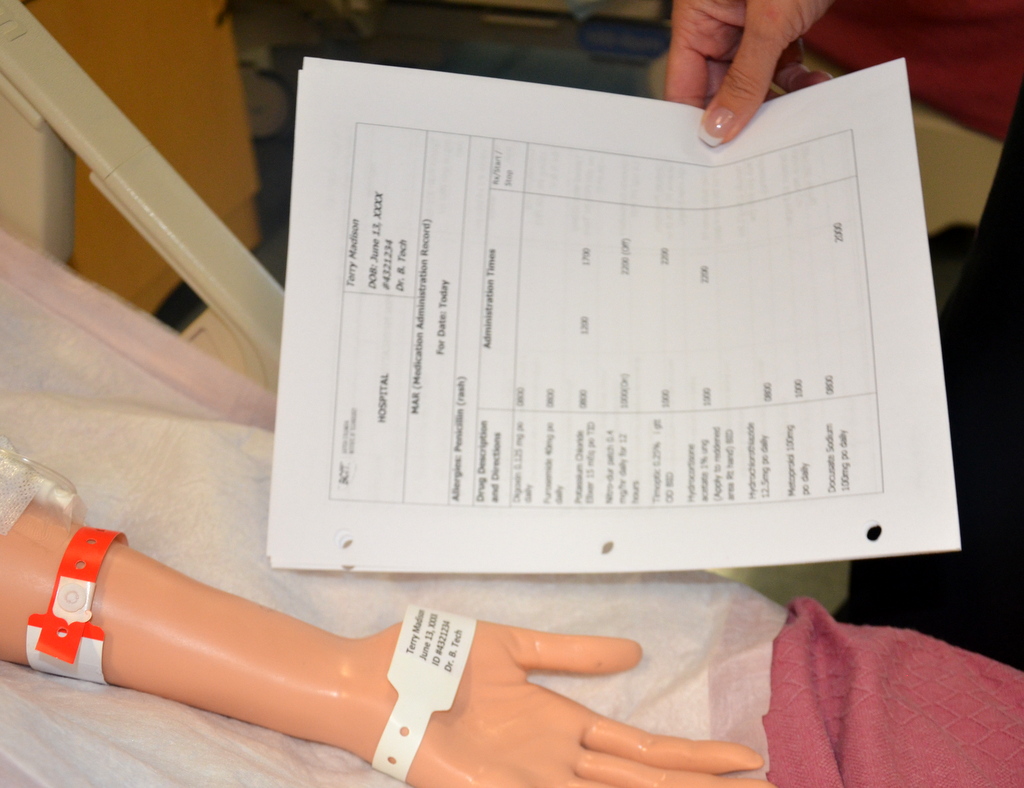
Acceptable patient identifiers include, but are not limited to, the patient’s full name, an identification number assigned by the hospital, or date of birth. A patient’s room number must never be used as an identifier because a patient may change rooms. Identifiers must be confirmed by the patient wristband, patient identification card, patient statement (when possible), or other means outlined in the agency policy such as a patient picture included on the MAR. The nurse must confirm the patient’s identification matches the medication administration record (MAR) and medication label prior to administration to ensure that the medication is being given to the correct patient.[8] See Figure 15.1[9] for an illustration of the nurse verifying the patient’s identify by scanning their identification band and asking for their date of birth. See Figure 15.2[10] for a close-up image of a patient identification wristband.
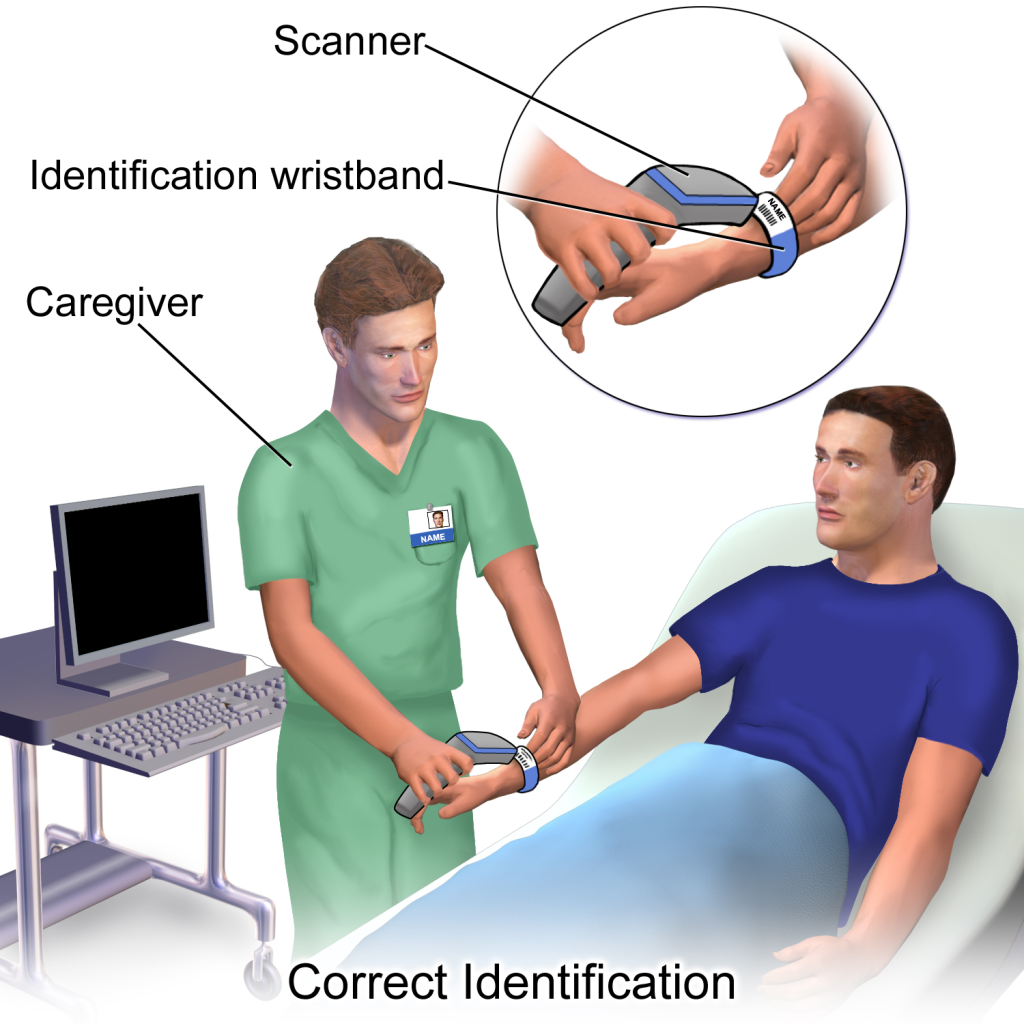
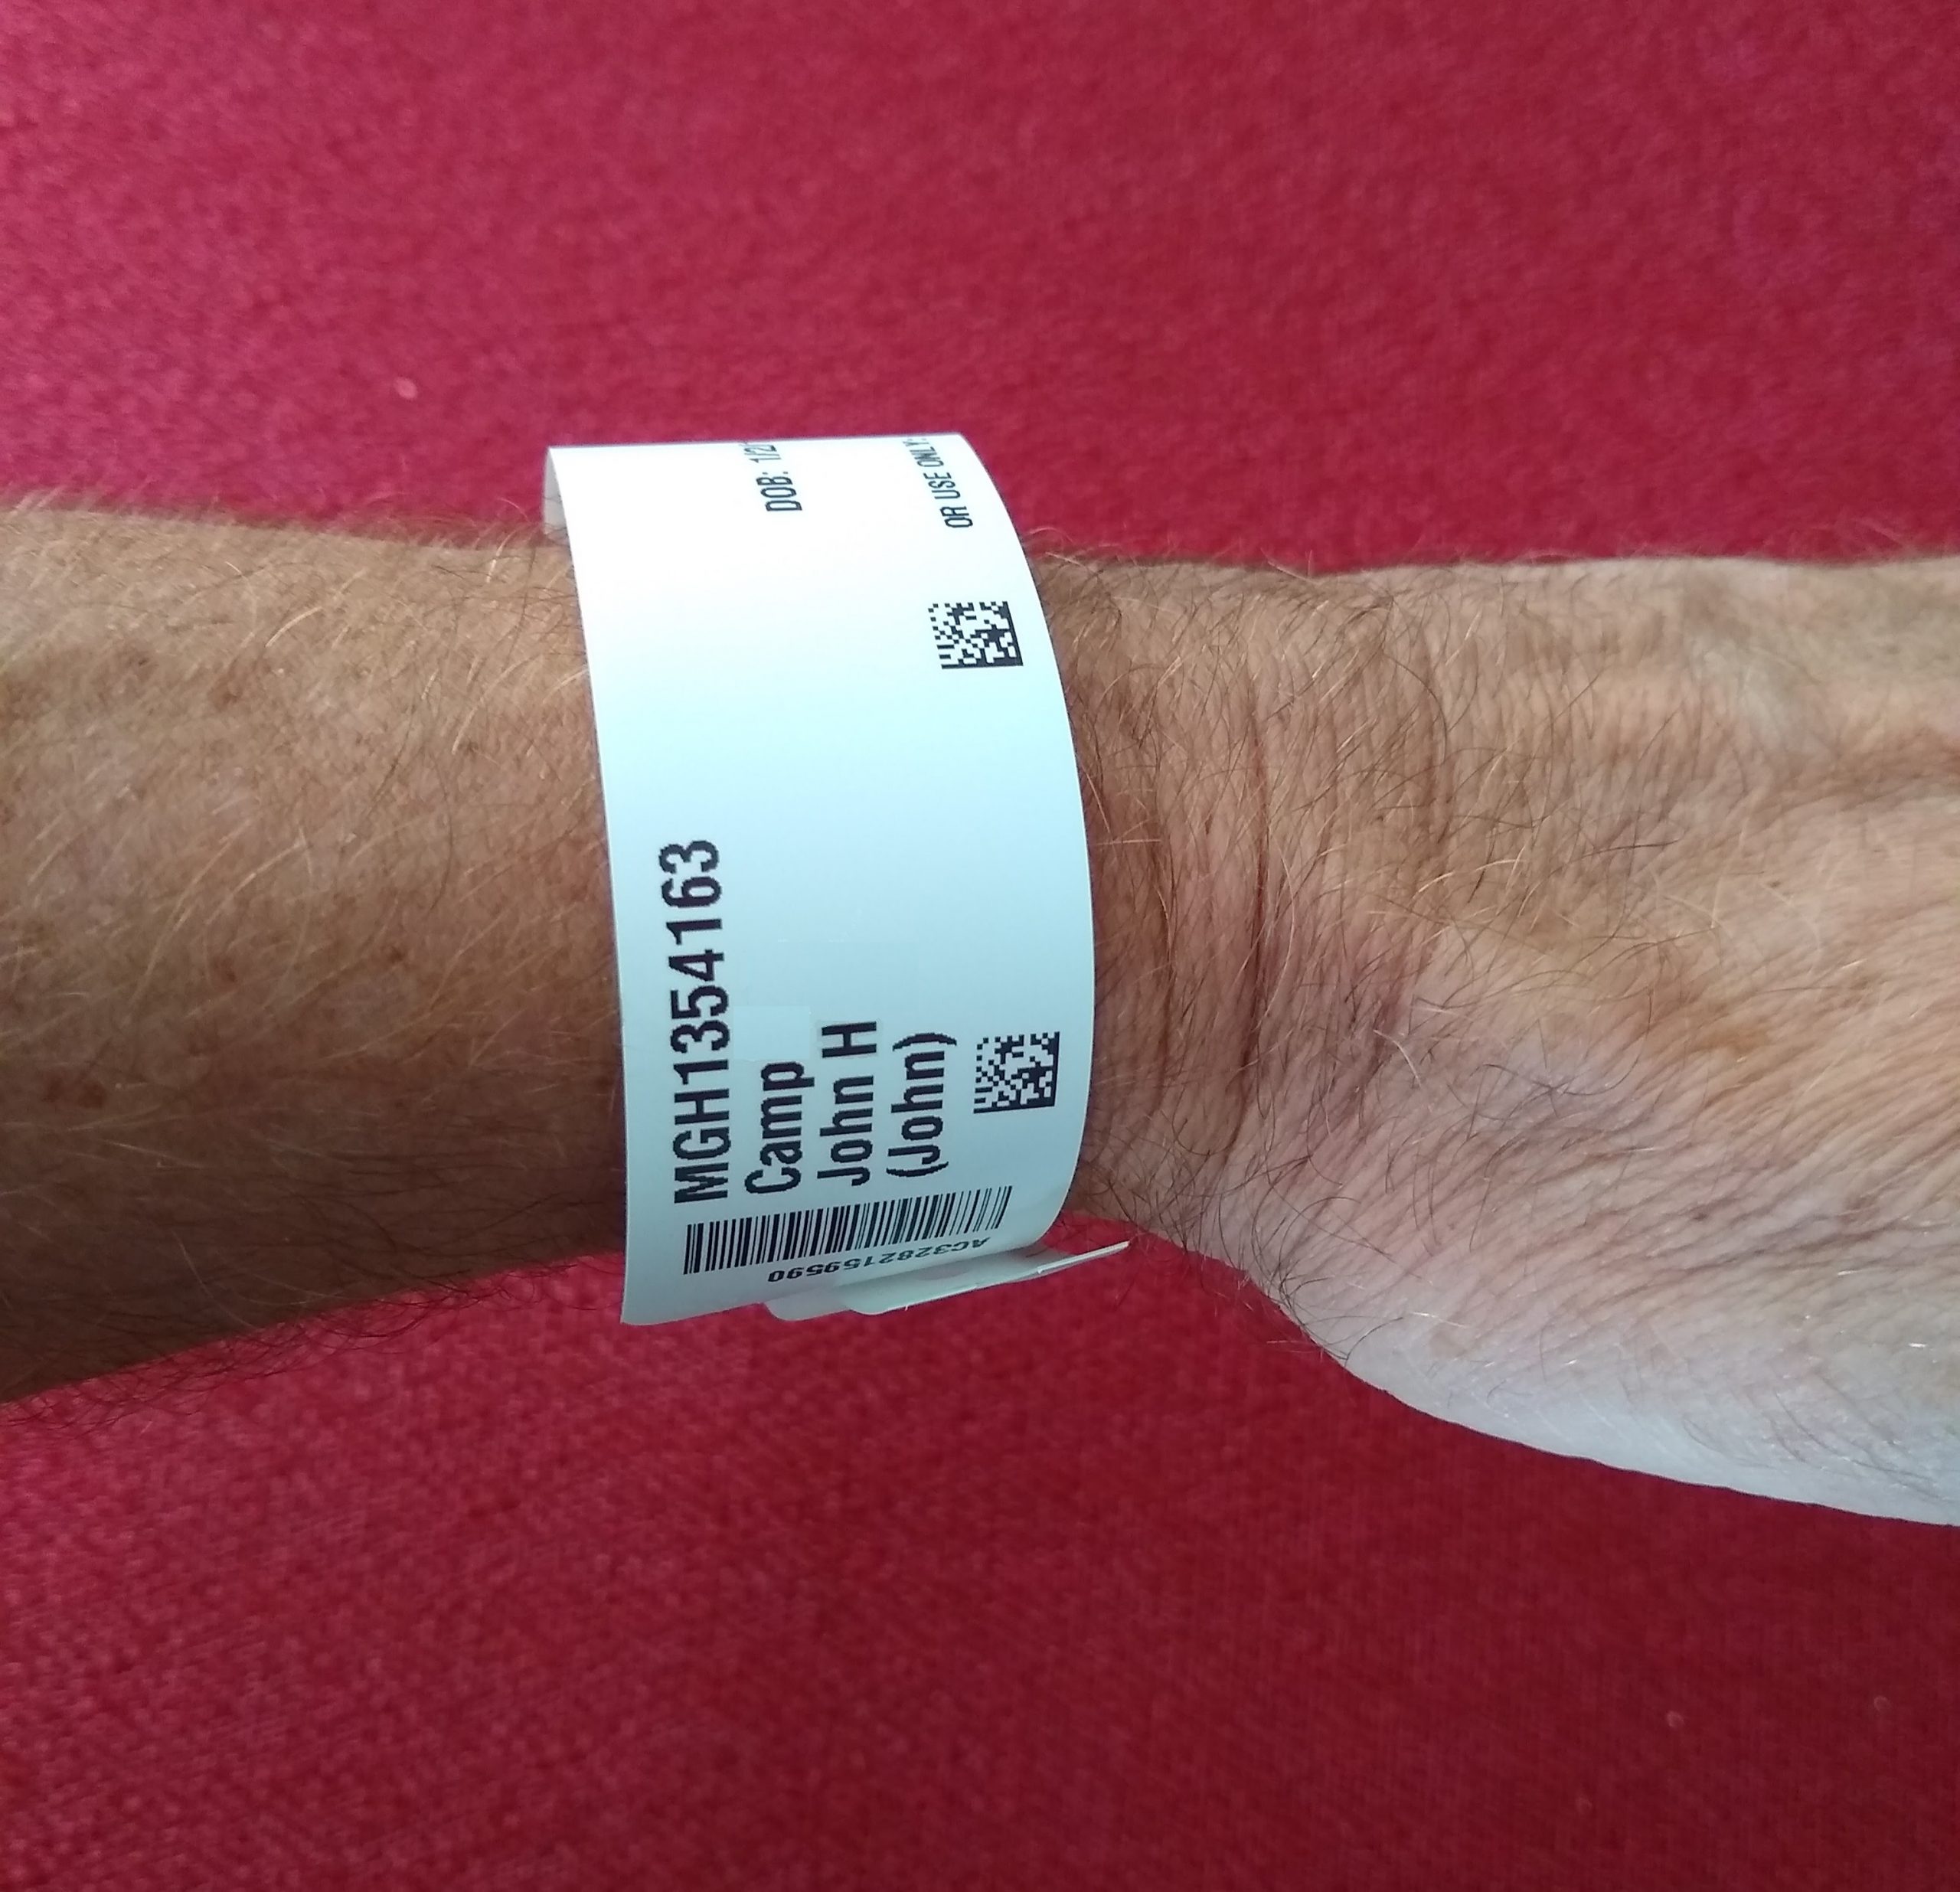
If barcode scanning is used in an agency, this scanning is not intended to take the place of confirming two patient identifiers but is intended to add another layer of safety to the medication administration process. The National Patient Safety Goals established by The Joint Commission state that whenever administering patient medications, at least two patient identifiers should be used.[11]
Right Drug
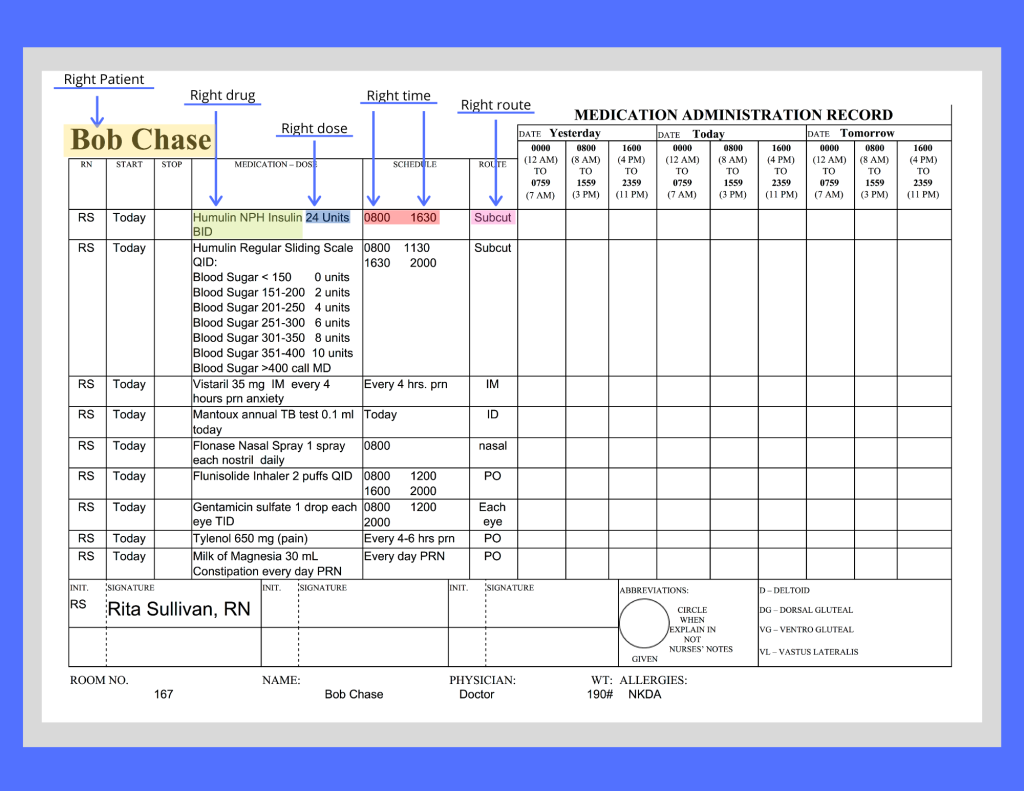
During this step, the nurse ensures the medication to be administered to the patient matches the order or Medication Administration Record (MAR) and that the patient does not have a documented allergy to it. Also, check the expiration date of the medication.[12] The Medication Administration Record (MAR), or eMAR, an electronic medical record, is a specific type of documentation found in a patient’s chart. See Figure 15.3[13] for an image of an MAR and its components. Beware of look-alike and sound-alike medication names, as well as high-alert medications that bear a heightened risk of causing significant patient harm if they are used in error. The nurse should also be aware of what medication can be crushed and those that cannot be crushed. Read more information about these concerns using the box below.
View the ISMP Frequently Confused Medication List.
View a PDF of the ISMP High-Alert Medications List.
View the ISMP Do Not Crush List.
Right Dose
During this step, the nurse ensures the dosage of the medication matches the prescribed dose, verifies the correct dosage range for the age and medical status of the patient, and also confirms that the prescription itself does not reflect an unsafe dosage level (i.e., a dose that is too high or too low).[14] For example, medication errors commonly occur in children, who typically receive a lower dose of medication than an adult. Medication errors also commonly occur in older patients who have existing kidney or liver disease and are unable to metabolize or excrete typical doses of medications.
Right Time and Frequency
During this step, the nurse verifies adherence to the prescribed frequency and scheduled time of administration of the medication.[15] This step is especially important when PRN medications are administered because it is up to the nurse to verify the time of the previous dose and compare it to the ordered frequency.
Medications should be administered on time whenever possible. However, when multiple patients are scheduled to receive multiple medications at the same time, this goal of timeliness can be challenging. Most facilities have a policy that medications can be given within a range of 30 minutes before or 30 minutes after the medication is scheduled. For example, a medication ordered for 0800 could be administered anytime between 0730 and 0830. However, some medications must be given at their specific ordered time due to pharmacokinetics of the drug. For example, if an antibiotic is scheduled every eight hours, this time frame must be upheld to maintain effective bioavailability of the drug, but a medication scheduled daily has more flexibility with time of actual administration.
Right Route
During this step, the nurse ensures the route of administration is appropriate for the specific medication and also for the patient.[16] Many medications can potentially be administered via multiple routes, whereas other medications can only be given safely via one route. Nurses must administer medications via the route indicated in the order. If a nurse discovers an error in the order or believes the route is unsafe for a particular patient, the route must be clarified with the prescribing provider before administration. For example, a patient may have a PEG tube in place, but the nurse notices the medication order indicates the route of administration as PO. If the nurse believes this medication should be administered via the PEG tube and the route indicated in the order is an error, the prescribing provider must be notified, and the order must be revised indicating via PEG tube before the medication is administered.
Right Documentation
After administering medication, it is important to immediately document the administration to avoid potential errors from an unintended repeat dose.
In addition to checking the basic rights of medication administration and documenting the administration, it is also important for nurses to verify the following information to prevent medication errors.
Right History and Assessment
The nurse should be aware of the patient’s allergies, as well as any history of any drug interactions. Additionally, nurses collect appropriate assessment data regarding the patient’s history, current status, and recent lab results to identify any contraindications for the patients to receive the prescribed medication.[17]
Right Drug Interactions
The patient’s history should be reviewed for any potential interactions with medications previously given or with the patient’s diet. It is also important to verify the medication’s expiration date before administration.
Right Education and Information
Information should be provided to the patient about the medication, including the expected therapeutic effects, as well as the potential adverse effects. The patient should be encouraged to report suspected side effects to the nurse and/or prescribing provider. If the patient is a minor, the parent may also have a right to know about the medication in many states, depending upon the circumstances.
Right of Refusal
After providing education about the medication, the patient has the right to refuse to take medication in accordance with the nursing Code of Ethics and respect for individual patient autonomy. If a patient refuses to take the medication after proper education has been performed, the event should be documented in the patient chart and the prescribing provider notified.
Medication Dispensing
Medications are dispensed for patients in a variety of methods. During inpatient care, unit dose packaging is a common method for dispensing medications. See Figure 15.4[18] for an image of unit dose packaging.

Unit dose dispensing is typically used in association with a medication dispensing system, sometimes referred to in practice with brand names such as “Pyxis” or "Omnicell." Medication dispensing systems help keep medications secure by requiring a user sign-in and password. They also reduce medication errors by only allowing medications prescribed for a specific patient to be removed unless additional actions are taken. However, it is important to remember that medication errors can still occur when using a medication dispensing system if the incorrect medication is erroneously stocked in a compartment. See Figure 15.5[19] for an image of a medication dispensing system.
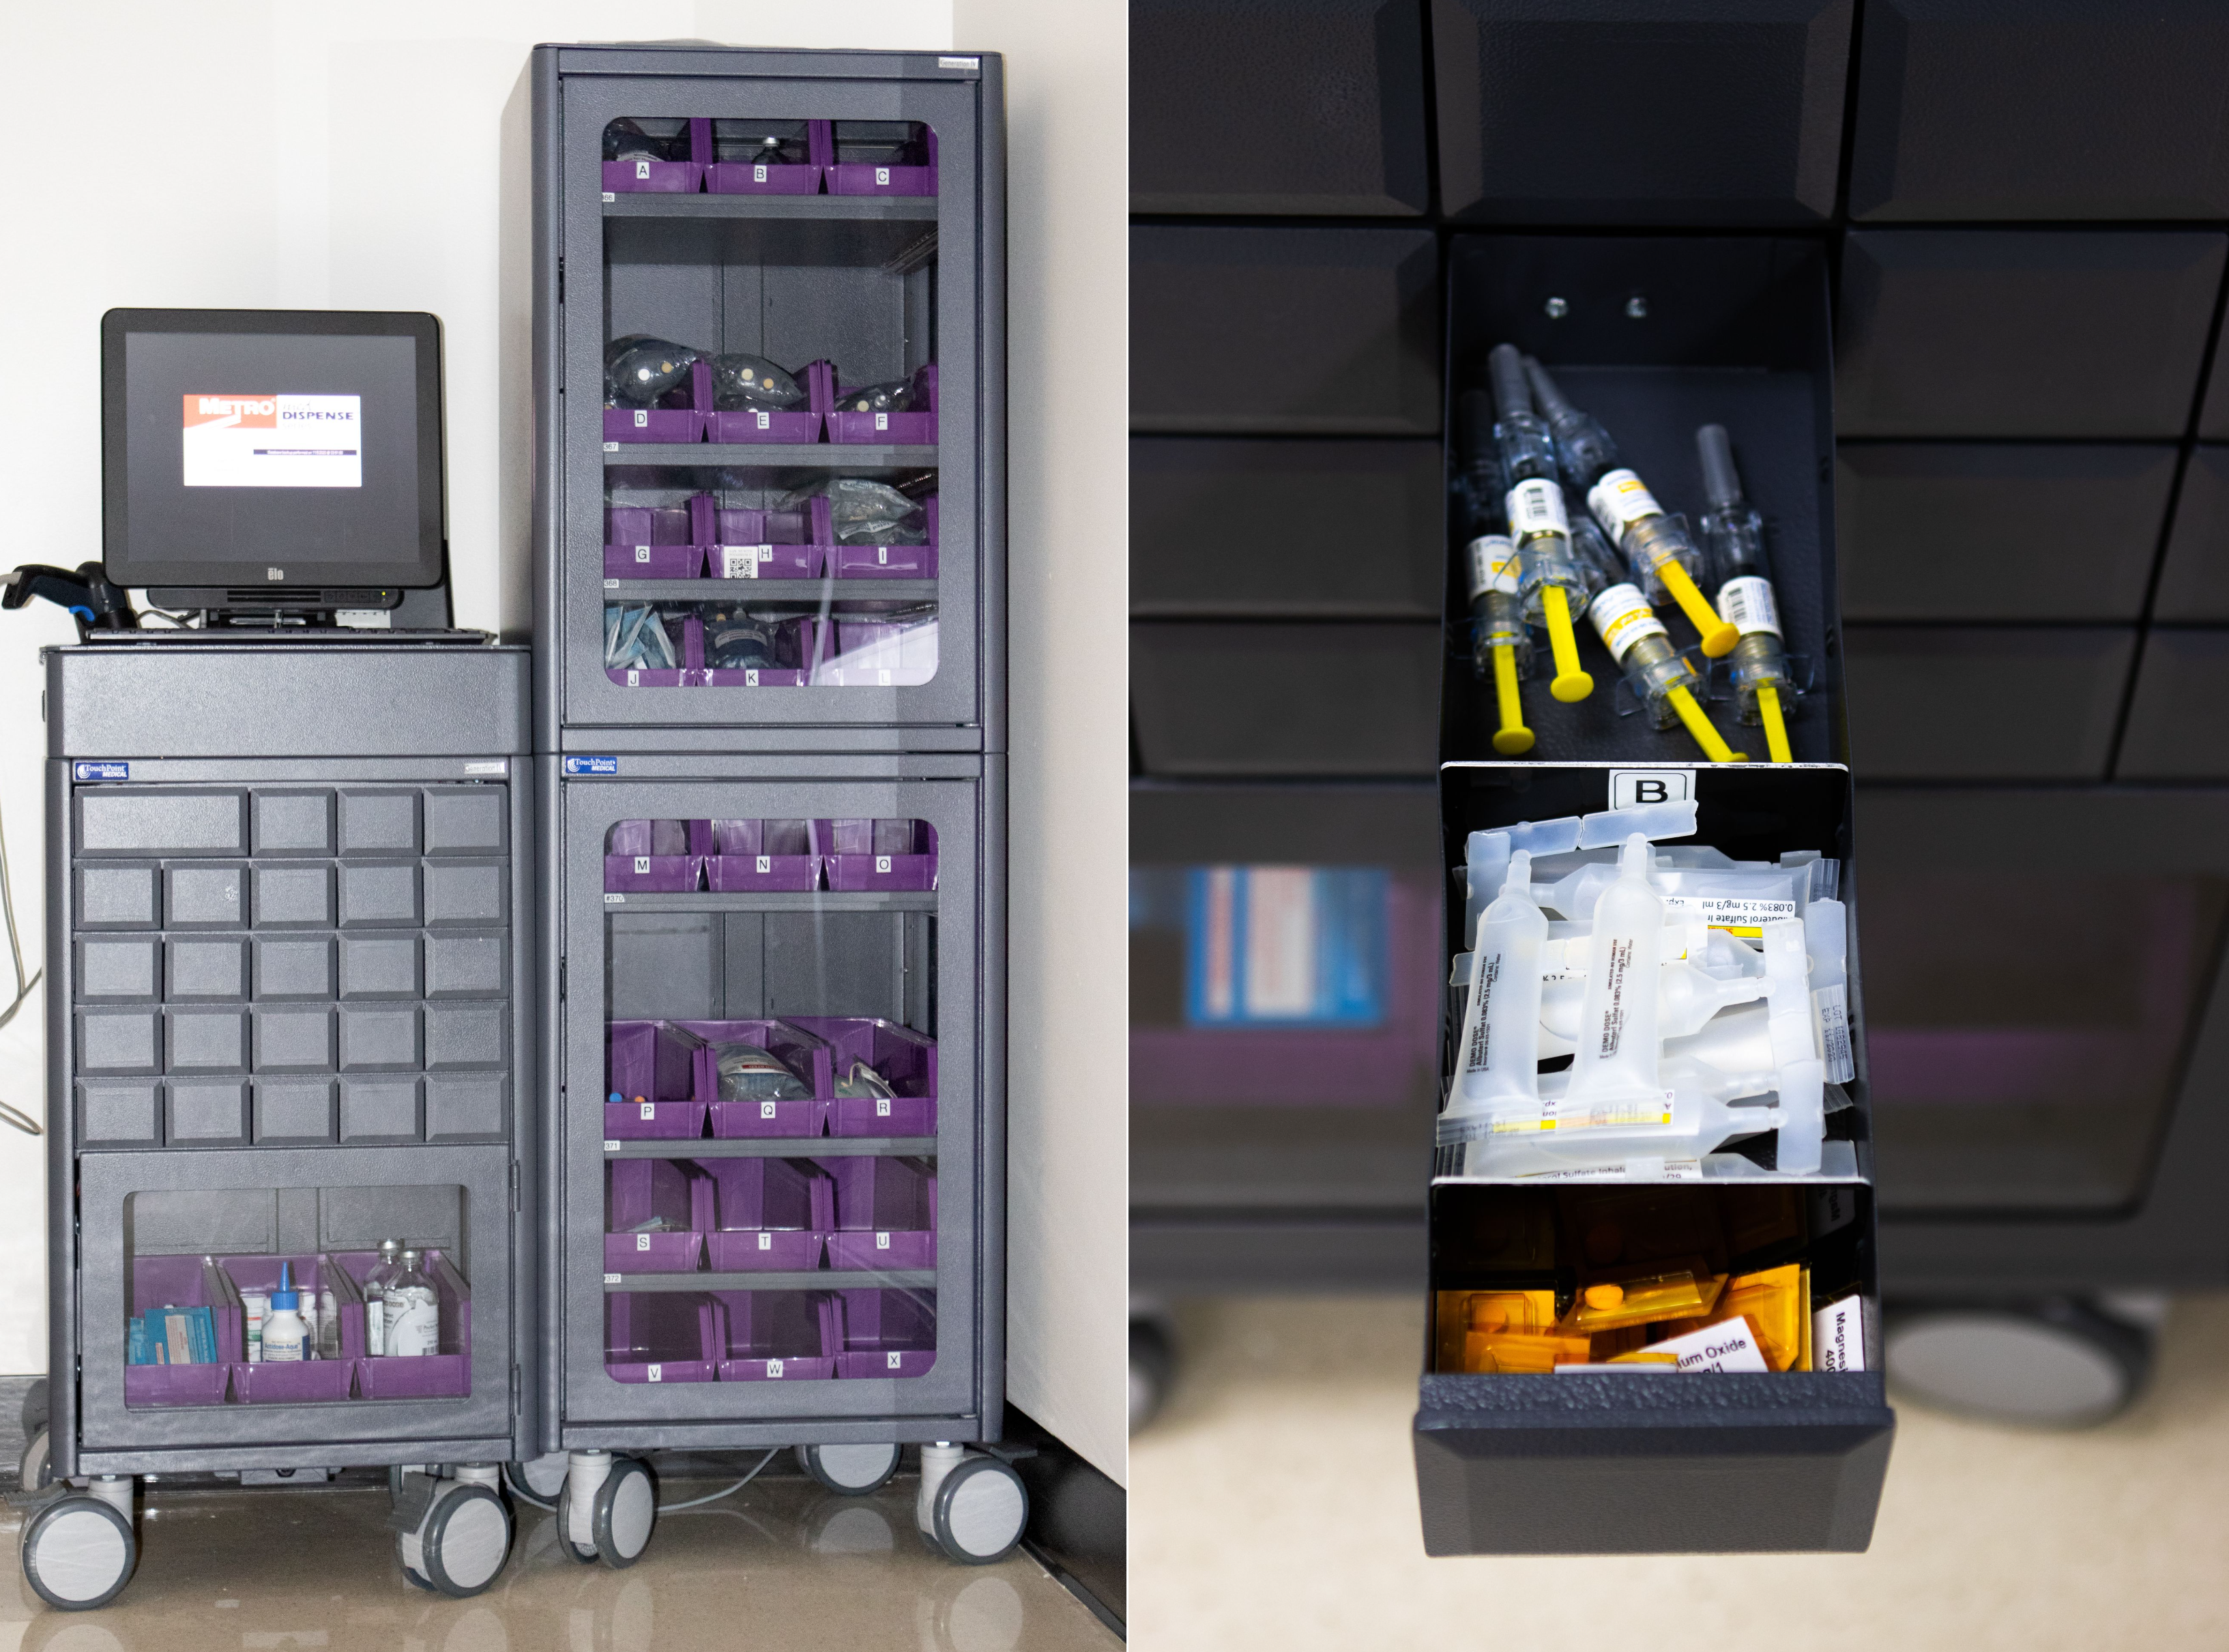
Barcodes are often incorporated with unit dose medication dispensing as an additional layer of safety to prevent medication errors. Each patient and medication is identified with a unique bar code. The nurse scans the patient’s identification wristband with a bedside portable device and then scans each medication to be administered. The portable device will display error messages if an incorrect medication is scanned or if medication is scanned at an incorrect time. It is vital for nurses to stop and investigate the medication administration process when an error is received. The scanning device is typically linked to an electronic MAR and the medication administered is documented immediately in the patient’s chart.
In long-term care agencies, weekly blister cards may be used that contain a specific patient’s medications for each day of the week. See Figure 15.6[20] for an image of a blister pack.

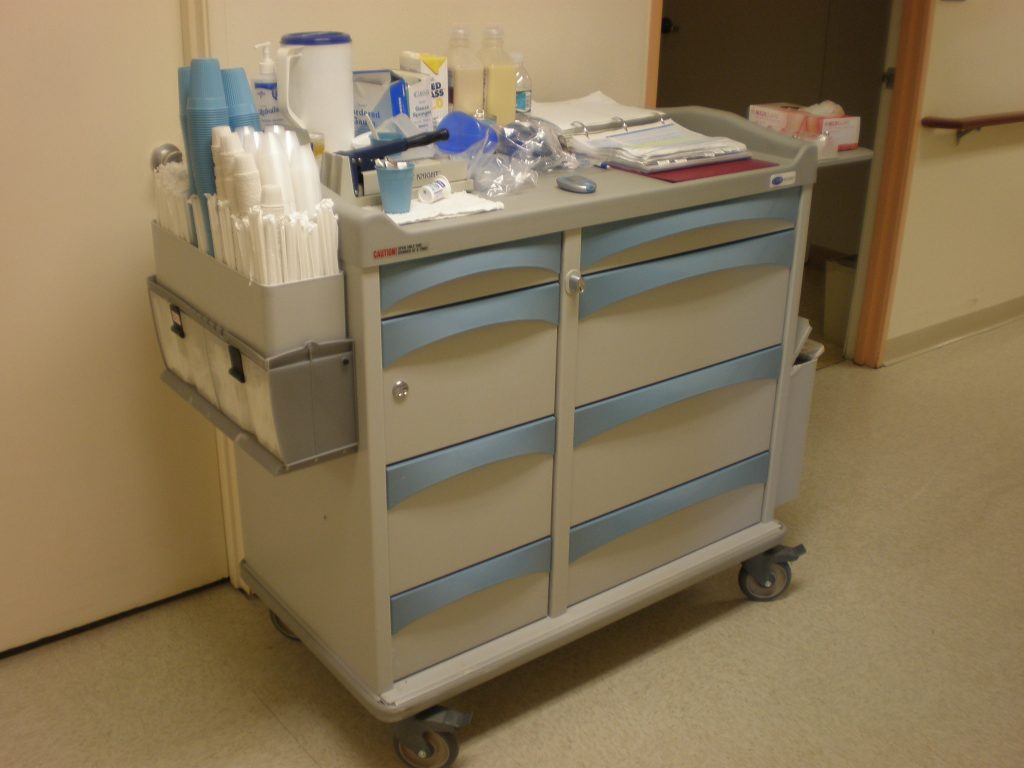
Agencies using blister cards or pill bags typically store medications in a locked medication cart to keep them secure. Supplies used to administer medications are also stored on the cart. The MAR is available in printed format or electronically with a laptop computer. See Figure 15.7[21] for an image of a medication cart.
Process of Medication Administration
No matter what method of medication storage and dispensing is used in a facility, the nurse must continue to verify the rights of medication administration to perform an accurate and safe medication pass. Using a medication dispensing system or barcoding does not substitute for verifying the rights but is used to add an additional layer of safety to medication administration. Nurses can also avoid medication errors by creating a habitual process of performing medication checks when administering medication. The rights of medication administration should be done in the following order:
- Perform the first check as the unit dose package, blister pack, or pill bag is removed from the dispensing machine or medication cart. Also, check the expiration date of the medication.
- A second check should be performed after the medication is removed from the dispensing machine or medication cart. This step should be performed prior to pouring or removing from a multidose container. Note: Some high-alert medications, such as insulin, require a second nurse to perform a medication check at this step due to potentially life-threatening adverse effects that can occur if an error is made.
- The third check should be performed immediately before administering the medication to the patient at the bedside or when replacing the multidose container back into the drawer.
See Figure 15.8[22] for an image of a nurse comparing medication information on the medication packet to information on the patient's MAR.
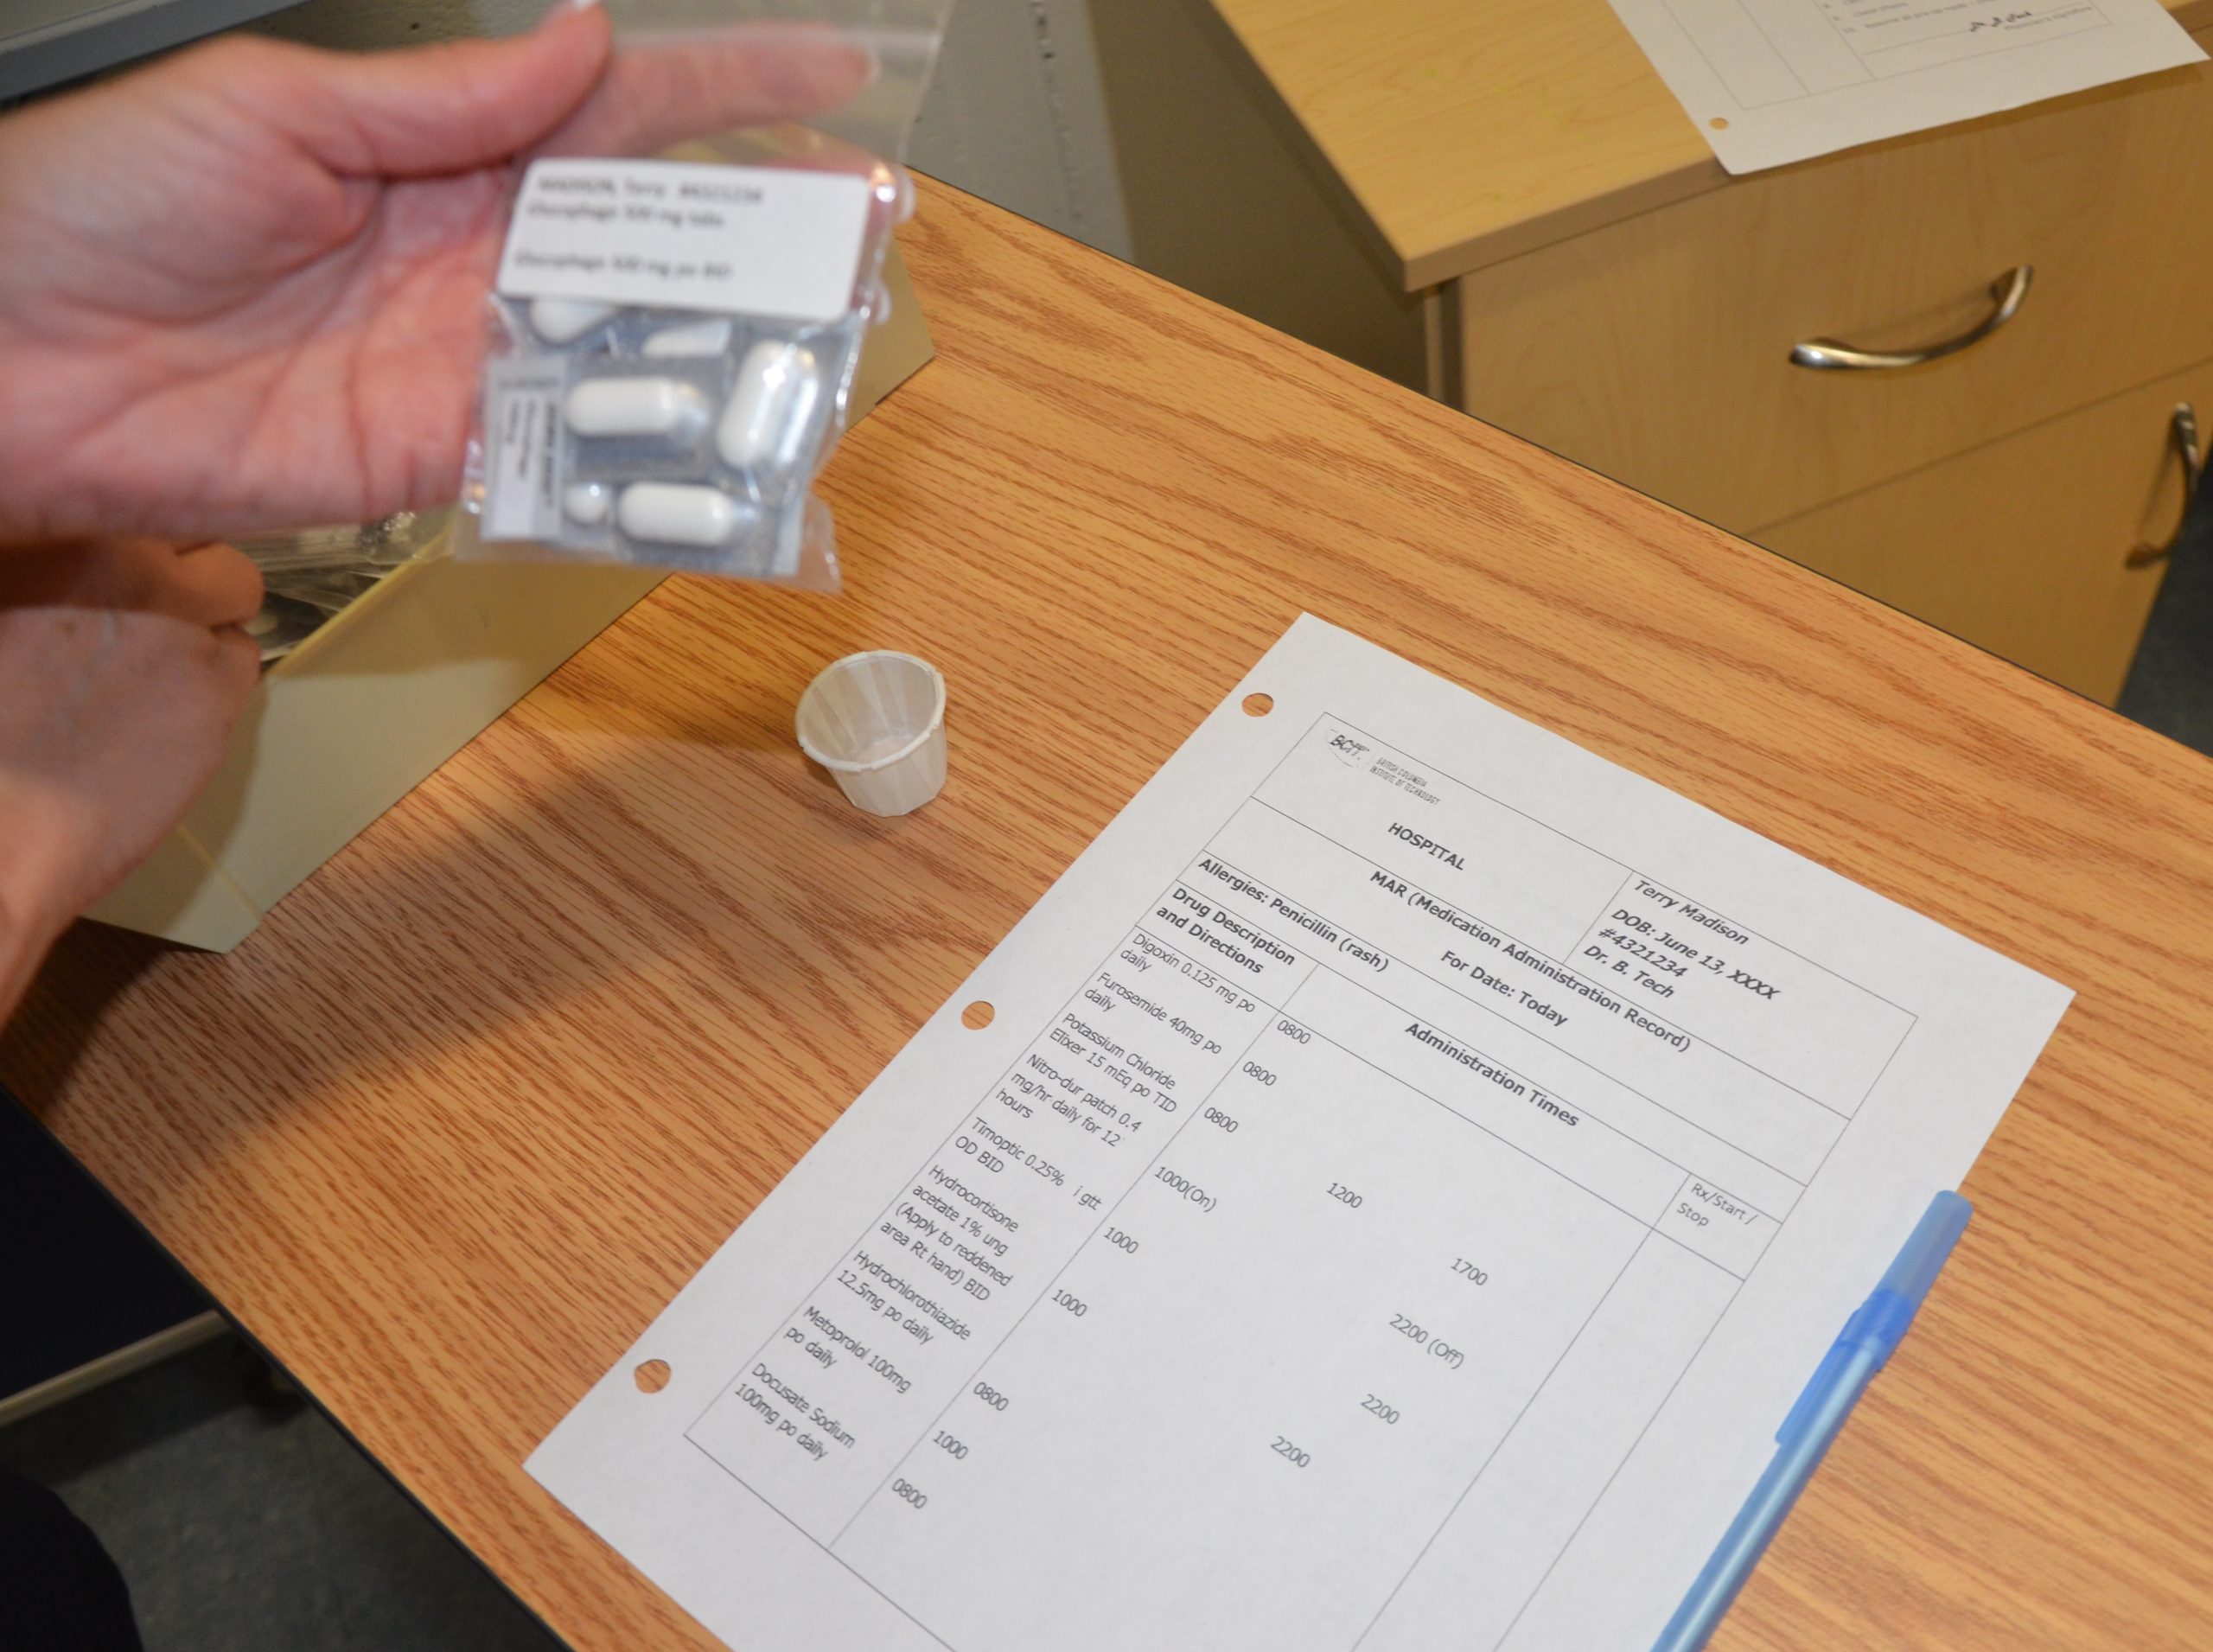
When performing these three checks, the nurse should ensure this is the right medication, right patient, right dosage, right route, and right time. See Figure 15.9[23] for an image of the nurse performing patient identification prior to administering the medication. The sixth right, correct documentation, should be done immediately after the medication is administered to the patient to avoid an error from another nurse inadvertently administering the dose a second time. These six rights completed three times have greatly reduced medication errors.
As discussed earlier, other rights to consider during this process are as follows:
- Is the patient receiving this medication for the right reason?
- Have the right assessments been performed prior to giving the medication?
- Has the patient also received the right education regarding the medications?
- Is the patient exhibiting the right response to the medication?
- Is the patient refusing to take the medication? Patients have the right to refuse medication. The patient’s refusal and any education or explanation provided related to the attempt to administer the medication should be documented by the nurse and the prescribing provider should be notified.
![]()
- Listen to the patient if they verbalize any concerns about medications. Explore their concerns, verify the order, and/or discuss their concerns with the prescribing provider before administering the medication to avoid a potential medication error.
- If a pill falls on the floor, it is contaminated and should not be administered. Dispose the medication according to agency policy.
- Be aware of absorption considerations of the medications you are administering. For example, certain medications such as levothyroxine should be administered on an empty stomach because food and other medications will affect its absorption.
- Nurses are often the first to notice when a patient has difficulty swallowing. If you notice a patient coughs immediately after swallowing water or has a “gurgling” sound to their voice, do not administer any medications, food, or fluid until you have reported your concerns to the heath care provider. A swallow evaluation may be needed, and the route of medication may need to be changed from oral to another route to avoid aspiration.
- If your patient has a nothing by mouth (NPO) order, verify if this includes all medications. This information may be included on the MAR or the orders, and if not, verify this information with the provider. Some medications, such as diabetes medication, may be given with a sip of water in some situations where the patient has NPO status.
- If the route of administration is not accurately listed on the MAR, contact the prescribing provider before administering the medication. For example, a patient may have a PEG tube, but the medication is erroneously listed as “PO” on the order.
For more information regarding classes of medications, administration considerations, and adverse effects to monitor, visit Open RN Nursing Pharmacology.
For information about specific medications, visit DailyMed, a current, evidence-based medication reference.
Special Considerations for Administering Controlled Substances
Controlled substances, also called Scheduled Medications, are kept in a locked system and accounted for using a checks and balance system. Removal of a controlled substance from a medication dispensing system must be verified and documented by a second nurse witness. Removal of a controlled substance from a medication cart needs to be documented on an additional controlled substance record with the patient’s name, the actual amount of substance given, the time it was given, associated pre-assessment data, and the name of the nurse administering the controlled substance.
Controlled substances stored in locked areas of medication carts must also be counted at every shift change by two nurses and then compared to the controlled substance administration record. If the count does not match the documentation record, the discrepancy must be reported immediately according to agency policy.
Additionally, if a partial dose of a controlled substance is administered, the remainder of the substance must be discarded in front of another nurse witness to document the event. This process is called “wasting.” Follow agency policy regarding wasting of controlled substances.
These additional safety measures help to prevent drug diversion, the use of a prescription medication for other than its intended purpose.
For more information about scheduled medications, drug diversion, and substance abuse in health care personnel, visit the "Legal/Ethical" chapter in Open RN Nursing Pharmacology.
Oral Medication Administration
Most medications are administered orally because it is the most convenient and least invasive route for the patient. Medication given orally has a slower onset, typically about 30-60 minutes. Prior to oral administration of medications, ensure the patient has no contraindications to receiving oral medication, is able to swallow, and is not on gastric suction. If the patient has difficulty swallowing (dysphagia), tablets are typically crushed and placed in a substance like applesauce or pudding for easier swallowing (based on the patient's prescribed diet). However, it is important to verify that a tablet may be crushed by consulting a drug reference or a pharmacist. For example, medications such as enteric-coated tablets, capsules, and sustained-release or long-acting drugs should never be crushed because doing so will affect the intended action of the medication. In this event, the provider must be contacted for a change in route.[24]
View the ISMP Do Not Crush List.
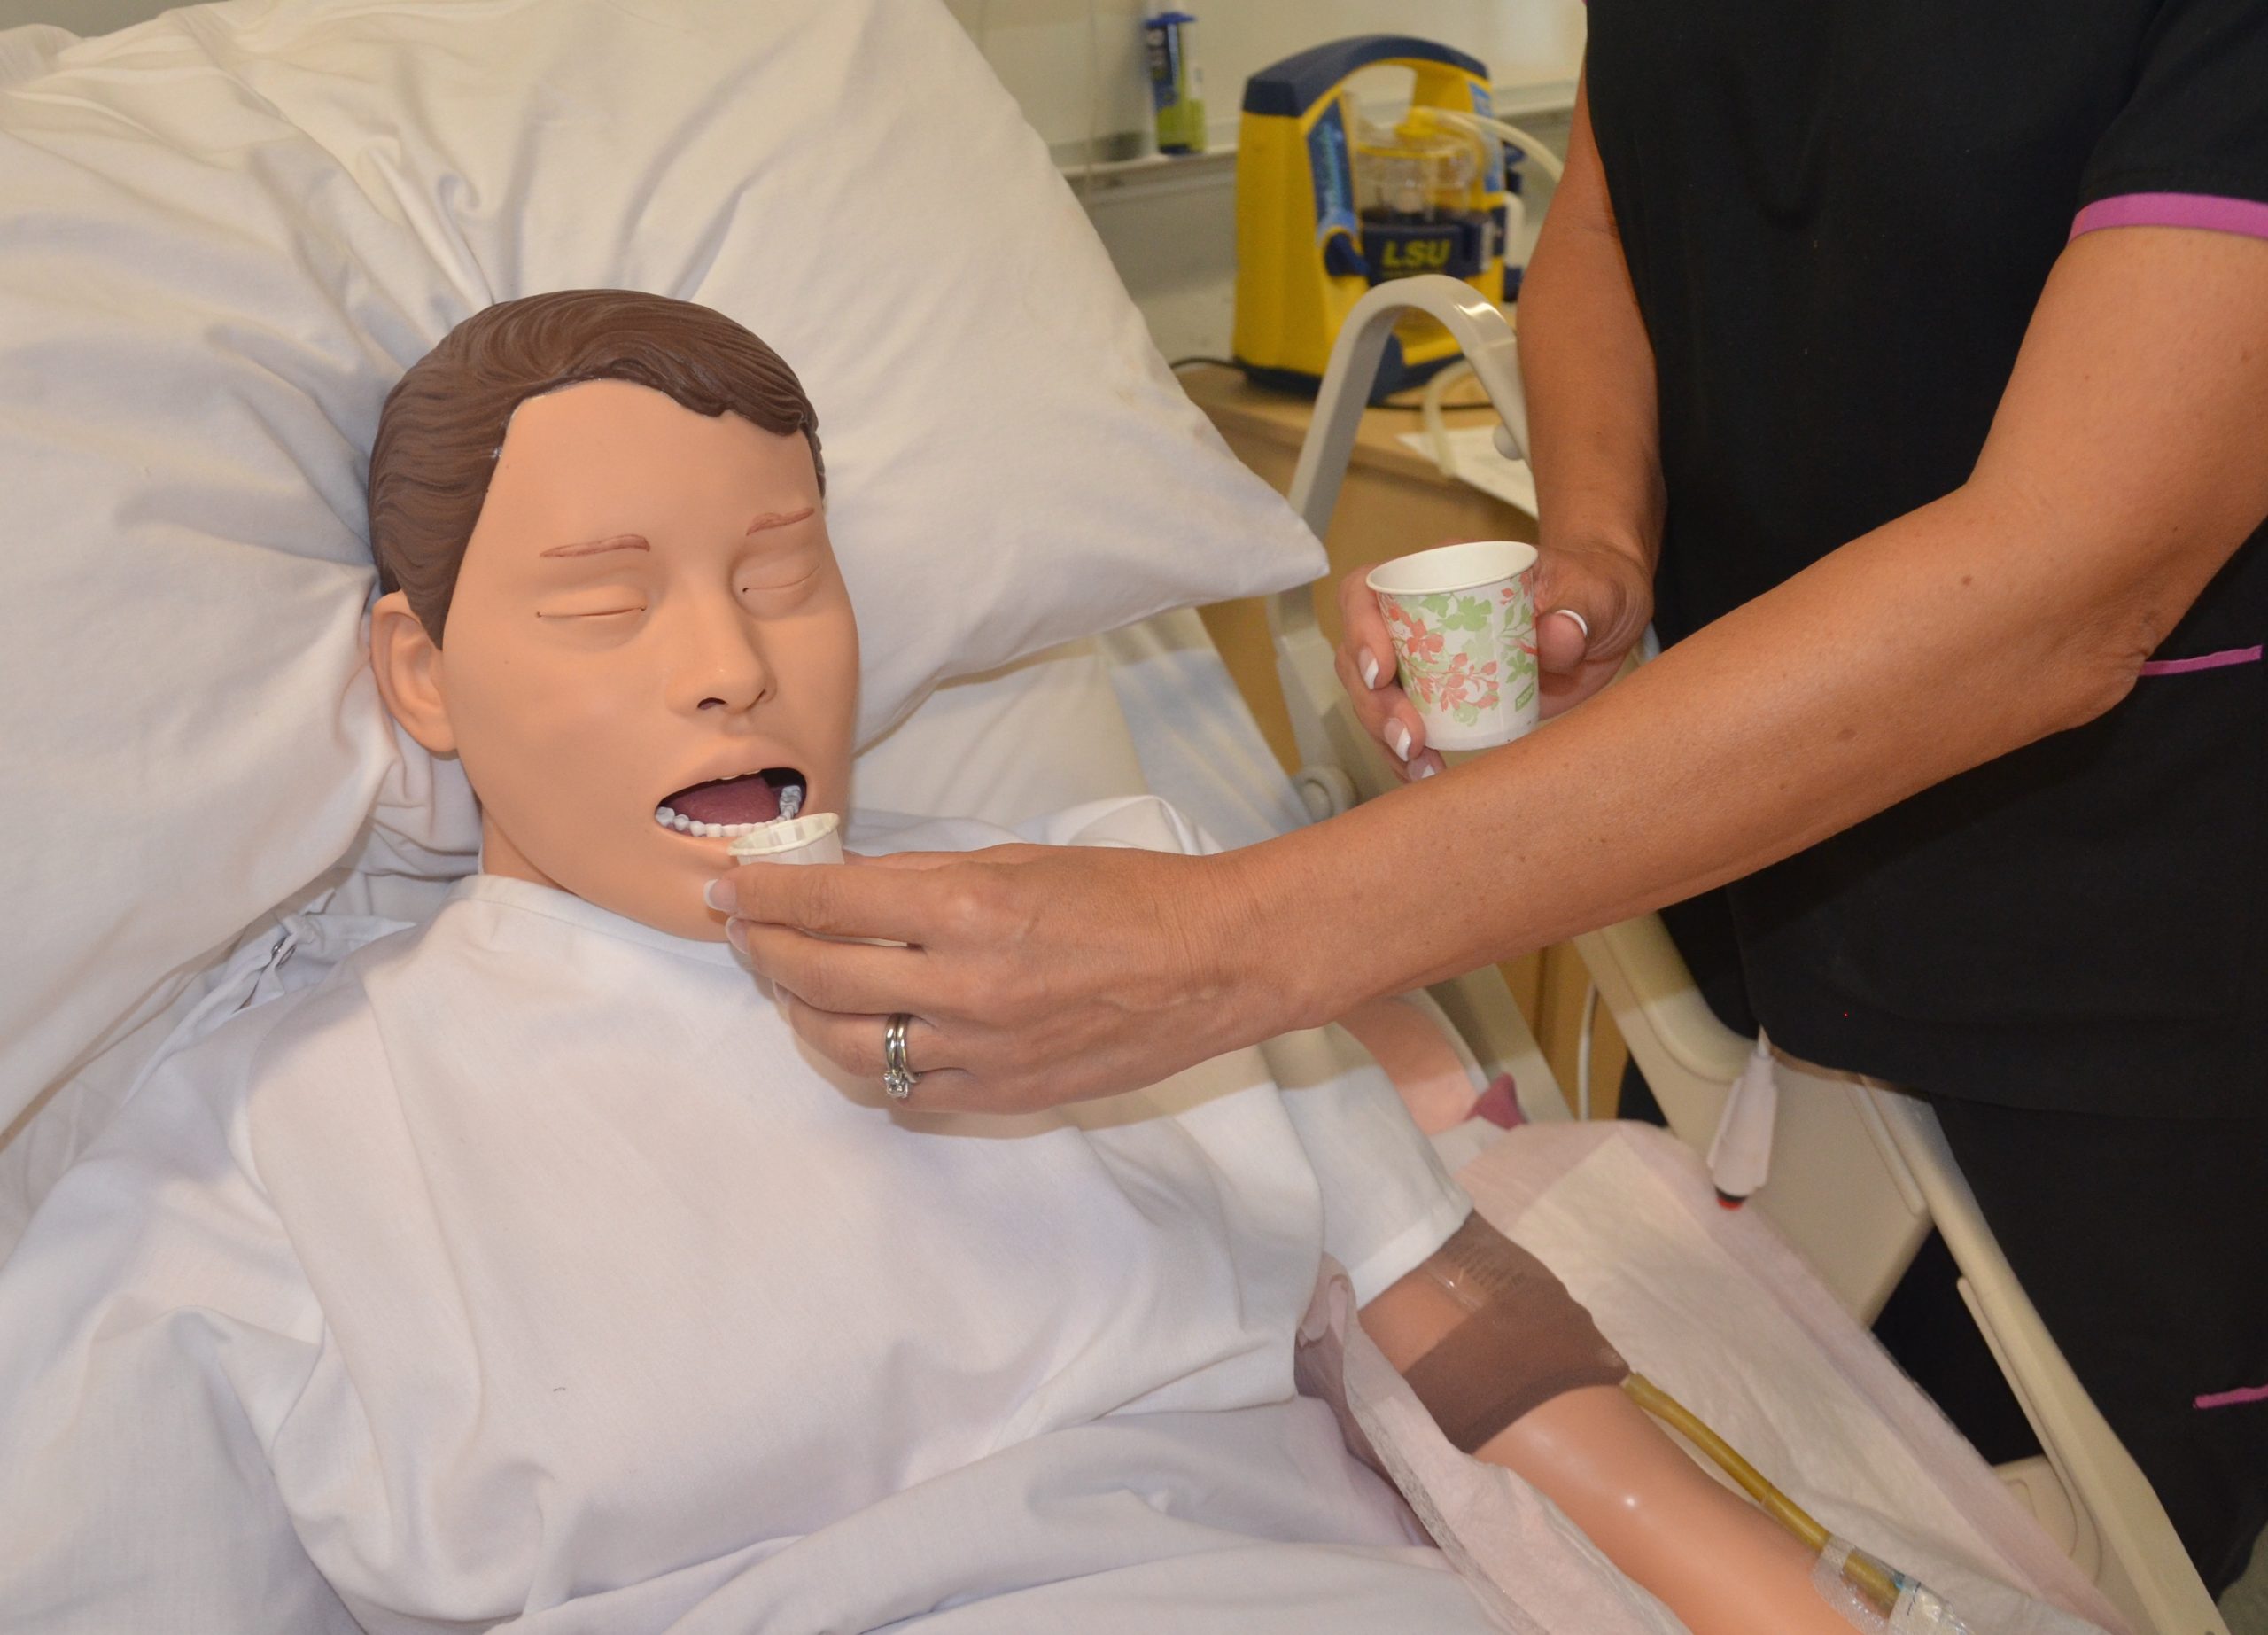
Position the patient receiving oral medication in an upright position to decrease the risk of aspiration. Patients should remain in this position for 30 minutes after medication administration, if possible. If a patient is unable to sit, assist them into a side-lying position. See Figure 15.10[25] for an image of a nurse positioning the patient in an upright position prior to medication administration. Offer a glass of water or other oral fluid (that is not contraindicated with the medication) to ease swallowing and improve absorption and dissolution of the medication, taking any fluid restrictions into account.[26]
Remain with the patient until all medication has been swallowed before documenting to verify the medication has been administered.[27]
If any post-assessments are required, follow up in the appropriate time frame. For example, when administering oral pain medication, follow up approximately 30 minutes to an hour after medication is given to ensure effective pain relief.
If medication is given sublingual (under the tongue) or buccal (between the cheek and gum), the mouth should be moist. Offering the patient a drink of water prior to giving the medication can help with absorption. Instruct the patient to allow the medication to completely dissolve and reinforce the importance of not swallowing or chewing the medication.
Liquid medications are available in multidose vials or single-dose containers. It may be necessary to shake liquid medications if they are suspensions prior to pouring. Make sure the label is clearly written and easy to read. When pouring a liquid medication, it is ideal to place the label in the palm of your hand so if any liquid medication runs down the outside of the bottle it does not blur the writing and make the label unidentifiable. When pouring liquid medication, read the dose at eye level measuring at the meniscus of the poured fluid. Always follow specific agency policy and procedure when administering oral medications.
Rectal Medication Administration
Drugs administered rectally have a faster action than the oral route and a higher bioavailability, meaning a higher amount of effective drug in the bloodstream because it has not been influenced by upper gastrointestinal tract digestive processes. Rectal administration also reduces side effects of some drugs, such as gastric irritation, nausea, and vomiting. Rectal medications may also be prescribed for their local effects in the gastrointestinal system (e.g., laxatives) or their systemic effects (e.g., analgesics when oral route is contraindicated). Rectal medications are contraindicated after rectal or bowel surgery, with rectal bleeding or prolapse, and with low platelet counts.[28]
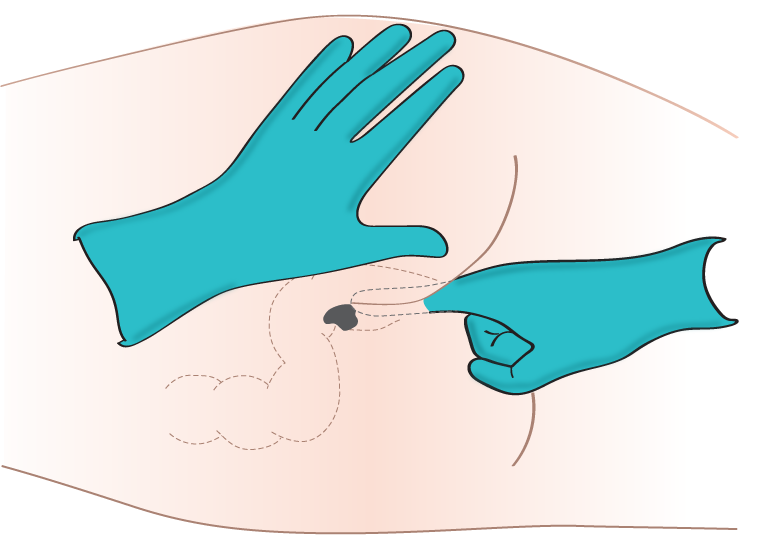
Rectal medications are often formulated as suppositories. Suppositories are small, cone-shaped objects that melt inside the body and release medication. When administering rectal suppositories, the patient should be placed on their left side in the Sims position. See Figure 15.11[29] for an image of patient positioning during rectal medication administration. The suppository and gloved index finger placing the suppository should be lubricated for ease of placement. Suppositories are conical and should be placed into the rectum rounded side first. The suppository should be inserted past the sphincter along the wall of the rectum. After placement, the patient should remain on their side while the medication takes effect. This time period is specific to each medication, but typically is at least 5 minutes. Make sure to avoid placing the suppository into stool. It is also important to monitor for a vasovagal response when placing medications rectally. A vasovagal response can occur when the vagus nerve is stimulated, causing the patient’s blood pressure and heart rate to drop, and creating symptoms of dizziness and perspiration. Sometimes the patient can faint or even have a seizure. Patients with a history of cardiac arrhythmias should not be administered rectal suppositories due to the potential for a vasovagal response. Always follow agency policy and procedure when administering rectal medications.[30],[31]
Another type of rectal medication is an enema. An enema is the administration of a substance in liquid form into the rectum. Many enemas are formulated in disposable plastic containers. Warming the solution to body temperature prior to administration may be beneficial because cold solution can cause cramping. It is also helpful to encourage the patient to empty their bladder prior to administration to reduce feelings of discomfort. Place an incontinence pad under the patient and position them on their left side in the Sims position. Lubricate the nozzle of the container and expel air. Insert the lubricated nozzle into the rectum slowly and gently expel the contents into the rectum. Ask the patient to retain the enema based on manufacturer’s recommendations.
Enteral Tube Medication Administration
Medication is administered via an enteral tube when the patient is unable to orally swallow medication. Medications given through an enteral feeding tube (nasogastric, nasointestinal, percutaneous endoscopic gastrostomy {PEG}, or jejunostomy {J} tube) should be in liquid form whenever possible to avoid clogging the tube. If a liquid form is not available, medications that are safe to crush should be crushed finely and dissolved in water to keep the tube from becoming clogged. If a medication is not safe to crush, the prescribing provider should be notified and a prescription for alternative medication obtained. Capsules should be opened and emptied into liquid as indicated prior to administration, and liquids should be administered at room temperature. Keep in mind that some capsules are time-released and should not be opened. In this case, contact the provider for a change in order.[32],[33]
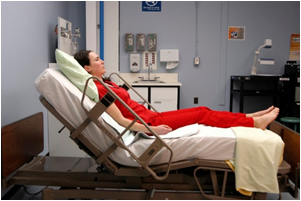
As always, follow agency policy for this medication administration procedure. Position the patient to at least 30 degrees and in high Fowler’s position when feasible. If gastric suctioning is in place, turn off the suctioning. See Figure 15.12[34] for an image of a nurse positioning the patient prior to administration of medications via a PEG tube. Follow the tube to the point of entry into the patient to ensure you are accessing the correct tube.[35],[36]
Prior to medication administration, verify tube placement. Placement is initially verified immediately after the tube is placed with an X-ray, and the nurse should verify these results. Additionally, bedside placement is verified by the nurse before every medication pass. There are multiple evidence-based methods used to check placement. One method includes aspirating tube contents with a 60-mL syringe and observing the fluid. Fasting gastric secretions appear grassy-green, brown, or clear and colorless, whereas secretions from a tube that has perforated the pleural space typically have a pale yellow serous appearance. A second method used to verify placement is to measure the pH of aspirate from the tube. Fasting gastric pH is usually 5 or less, even in patients receiving gastric acid inhibitors. Fluid aspirated from a tube in the pleural space typically has a pH of 7 or higher.[37],[38] Note that installation of air into the tube while listening over the stomach with a stethoscope is no longer considered a safe method to check tube placement according to evidence-based practices.[39]
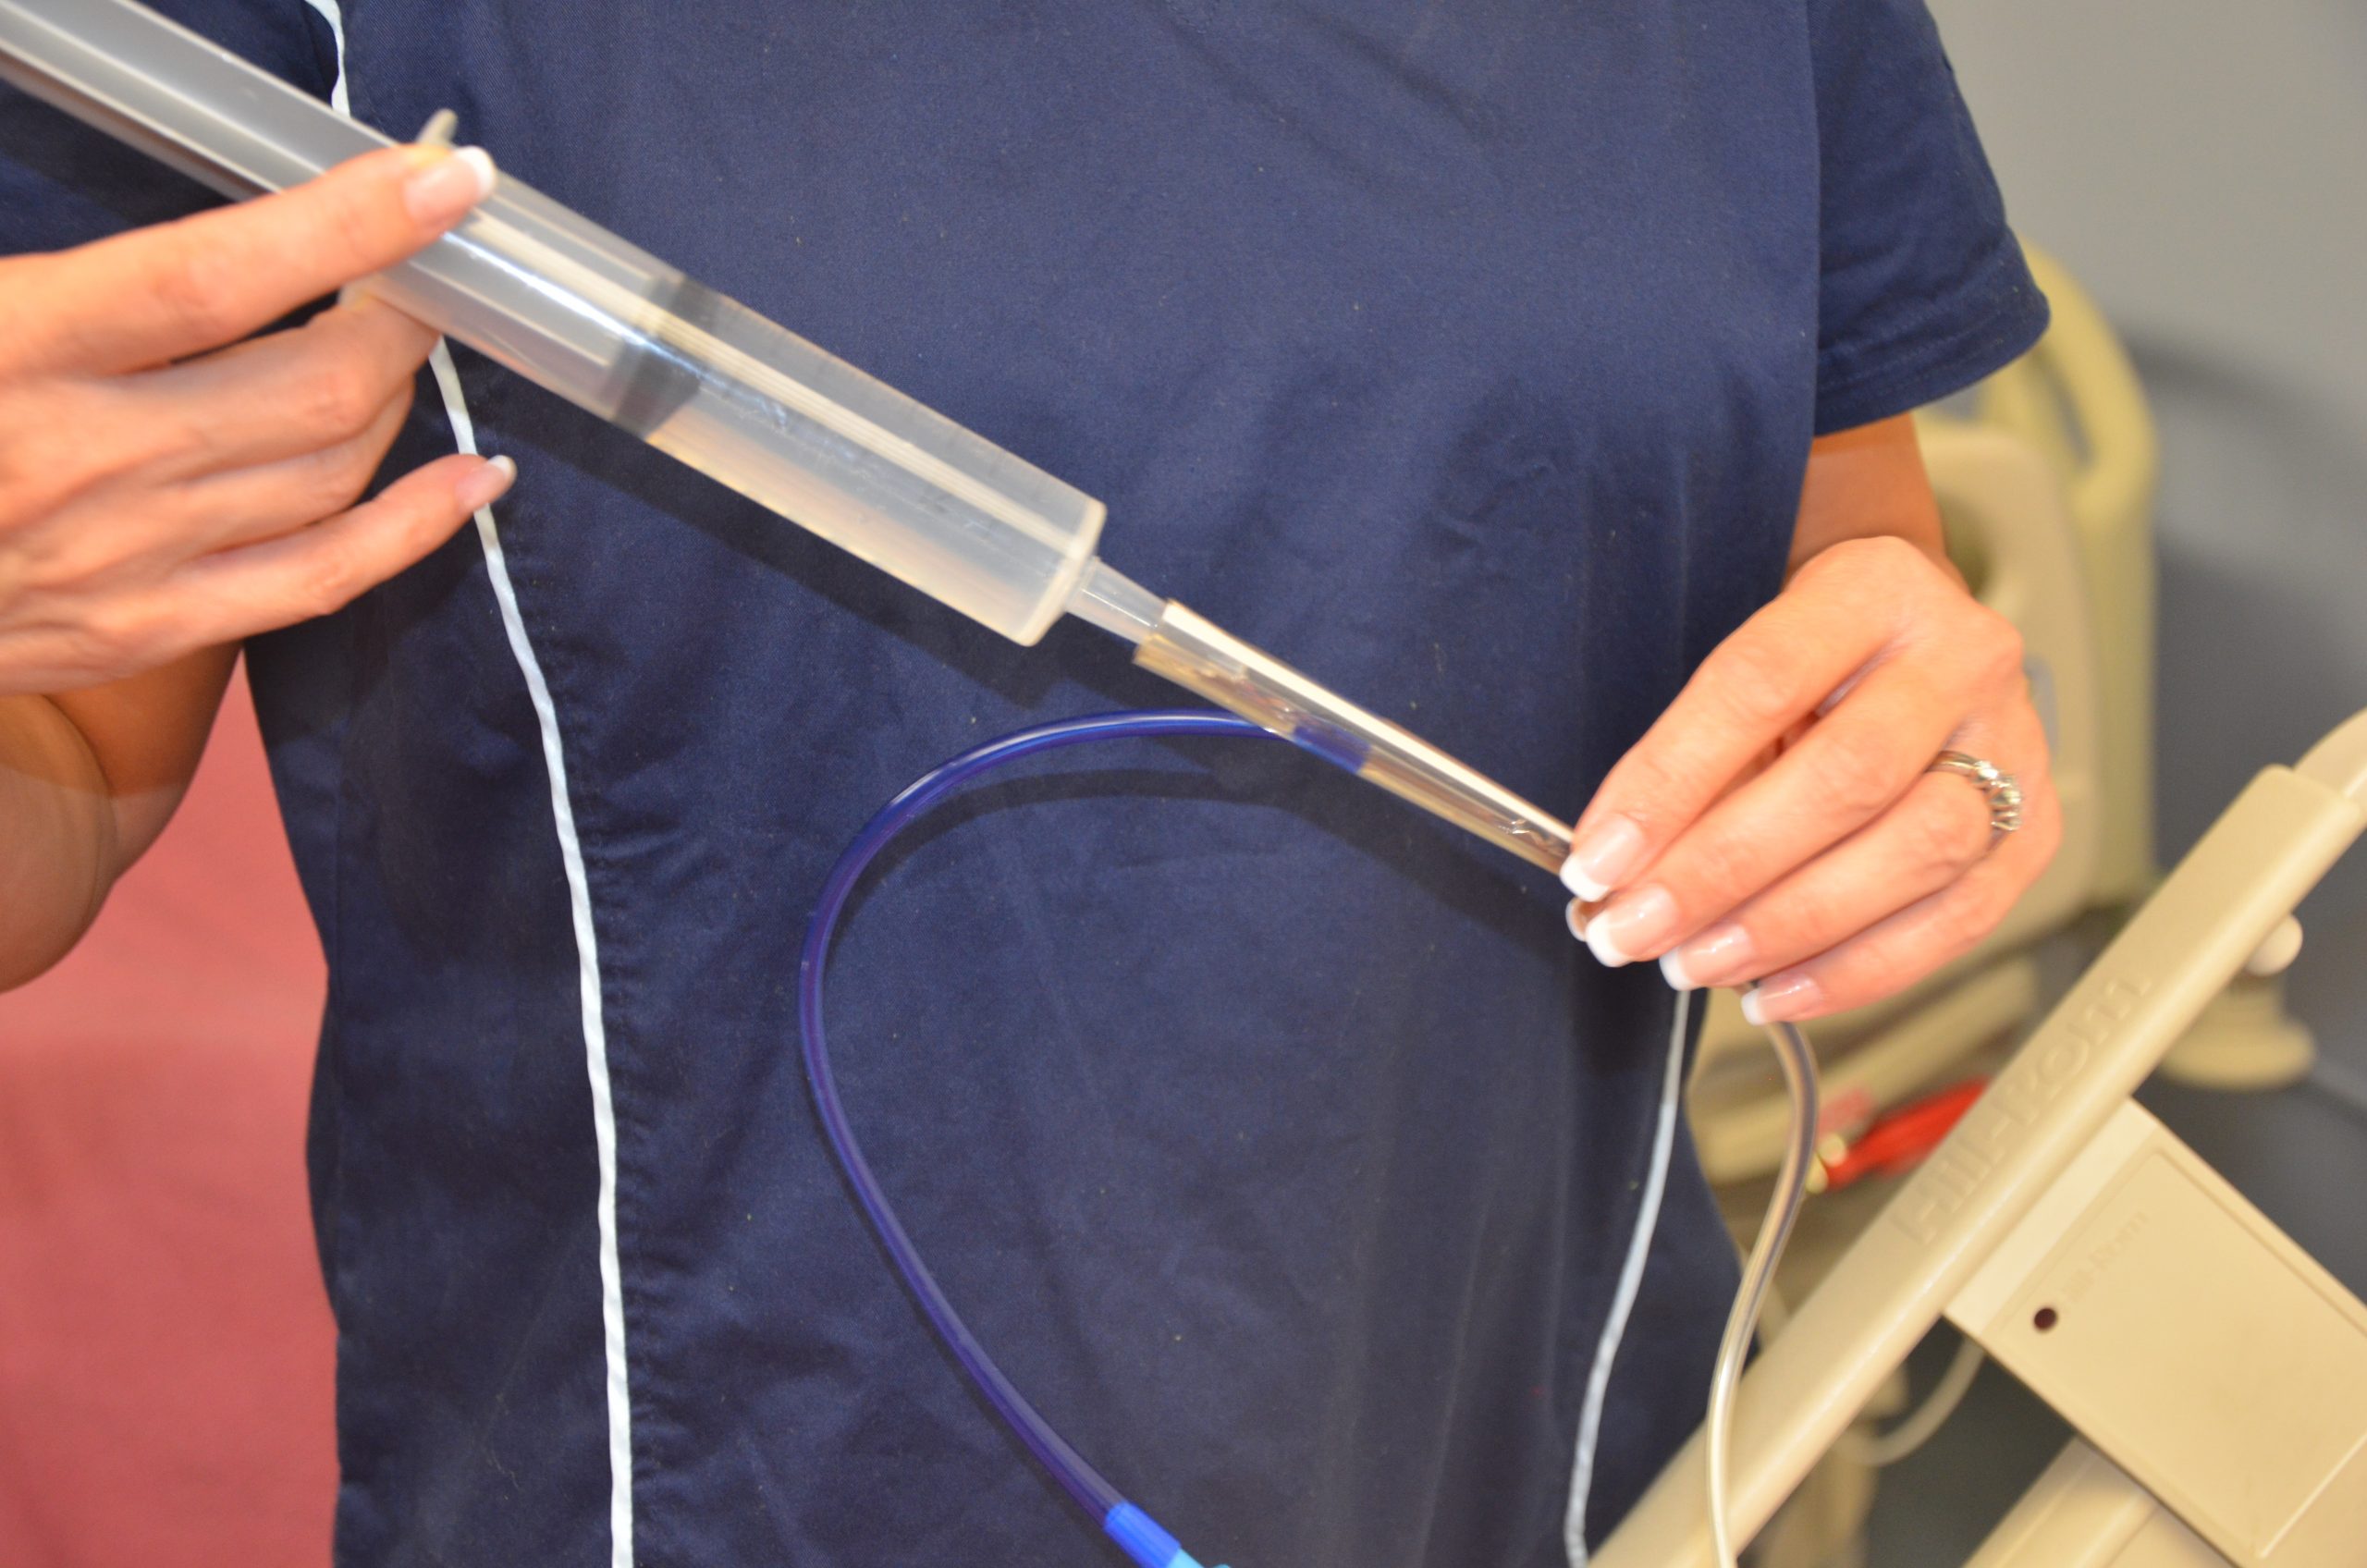
After tube placement is checked, a clean 60-mL syringe is used to flush the tube with a minimum of 15 mL of water (5-10 mL for children) before administering the medication. Follow agency policy regarding flushing amount. Liquid medication, or appropriately crushed medication dissolved in water, is administered one medication at a time. Medication should not be mixed because of the risks of physical and chemical incompatibilities, tube obstruction, and altered therapeutic drug responses. Between each medication, the tube is flushed with 15 mL of water, keeping in mind the patient’s fluid volume status. After the final medication is administered, the tube is flushed with 15 mL of water. The tube is then clamped, or if the patient is receiving tube feeding, it can be restarted. If the patient is receiving gastric suctioning, it can be restarted 30 minutes after medication administration.[40],[41],[42] See Figure 15.13[43] for an image of a nurse administering medication via an enteral tube.
Special considerations during this procedure include the following:
- If the patient has fluid restrictions, the amount of fluid used to flush the tube between each medication may need to be modified to avoid excess fluid intake.
- If the tube is attached to suctioning, the suctioning should be left off for 20 to 30 minutes after the medication is given to promote absorption of the medication.
- If the patient is receiving tube feedings, review information about the drugs that are being administered. If they cannot be taken with food or need to be taken on an empty stomach, the tube feeding running time will need to be adjusted.
- Be sure to document the amount of water used to flush the tube during the medication pass on the fluid intake record.
- If the patient has a chronic illness or is immunosuppressed, sterile water is suggested for use of mixing and flushing instead of tap water.
- Enteric-coated medications and other medications on the “Do Not Crush List” should not be crushed for this procedure. Instead, the prescribing provider must be notified and an order for a different form of the medication must be obtained.
- If the tube becomes clogged, attempt to flush it with water. If unsuccessful, notify the provider and a pancreatic enzyme solution or kit may be ordered before a new tube is placed.[44]
View a supplementary YouTube video on Crushing Medications[45]
Preventing Medication Errors
Medication errors can occur at various stages of the medication administration process, beginning with the prescribing provider, to the pharmacist preparing the medication, to the pharmacy technician stocking the medication, to the nurse administering the medication. Medication errors are most common at the ordering or prescribing stage. Typical errors include the prescribing provider writing the wrong medication, wrong route or dose, or the wrong frequency. These ordering errors account for almost 50% of medication errors. Data shows that nurses and pharmacists identify anywhere from 30% to 70% of medication-ordering errors.[46]
One of the major causes for medication errors is a distraction. Nearly 75% of medication errors have been attributed to this cause.[47] To minimize distractions, hospitals have introduced measures to reduce medication errors. For example, some hospitals set a “no-interruption zone policy” during medication dispensing and preparation and ask health care team members to only disrupt the medication administration process for emergencies. To reduce medication errors, agencies are also adopting many initiatives developed by the World Health Organization (WHO),[48] Institute for Safe Medication Practices (ISMP), Institute of Medicine (IOM),[49] and several other organizations. Initiatives include measures such as avoiding error-prone abbreviations, being aware of commonly confused medication names, and instituting additional safeguards for high-alert medications. Student nurses must also be aware of conditions that may contribute to making a medication error during their clinical courses. Read more about initiatives to prevent medication errors in the boxes and videos provided below.
For more information about preventing medication errors as a student nurse, visit IMSP’s Error-Prone Conditions that Lead to Student Nurse-Related Errors.
When you prepare to administer medications to your patients during clinical, your instructor will ask you questions to ensure safe medication administration. View a supplementary YouTube video of a nursing instructor asking a student typical medication questions.
View a supplementary YouTube video from the WHO on Administering Medications Without Harm[50]
Reporting Medication Errors
Despite multiple initiatives that have been instituted to prevent medication errors, including properly checking the rights of medication administration, medication errors happen. Examples of common errors include administering the wrong dose or an unsafe dose, giving medication to the wrong patient, administering medication by the wrong route or at the incorrect rate, and giving a drug that is expired. If a medication error occurs, the nurse must follow specific steps of reporting according to agency policy. In the past when medication errors occurred, the individual who caused it was usually blamed for the mishap and disciplinary action resulted. However, this culture of blame has shifted, and many medication errors by well-trained and careful nurses and other health care professions are viewed as potential symptoms of a system-wide problem. This philosophy is referred to as an institution’s safety culture. Thus, rather than focusing on disciplinary action, agencies are now trying to understand how the system failed causing the error to occur. This approach is designed to introduce safeguards at every level so that a mistake can be caught before the drug is given to the patient, which is often referred to as a “near miss.” For an agency to effectively institute a safety culture, all medication errors and near misses must be reported.
When a medication error occurs, the nurse’s first response should be to immediately monitor the patient’s condition and watch for any side effects from the medication. Secondly, the nurse must notify the nurse manager and prescribing provider of the error. The provider may provide additional orders to counteract the medication’s effects or to monitor for potential adverse reactions. In some situations, family members of the patient who are legal guardians or powers of attorney should also be notified. Lastly, a written report should be submitted documenting the incident, often referred to as an incident report. Incident reports are intended to identify if patterns of errors are occurring due to system-wide processes that can be modified to prevent future errors.
For more information about safety culture, visit the following section of the "Legal/Ethical" chapter in Open RN Nursing Pharmacology.
Life Span Considerations
Children
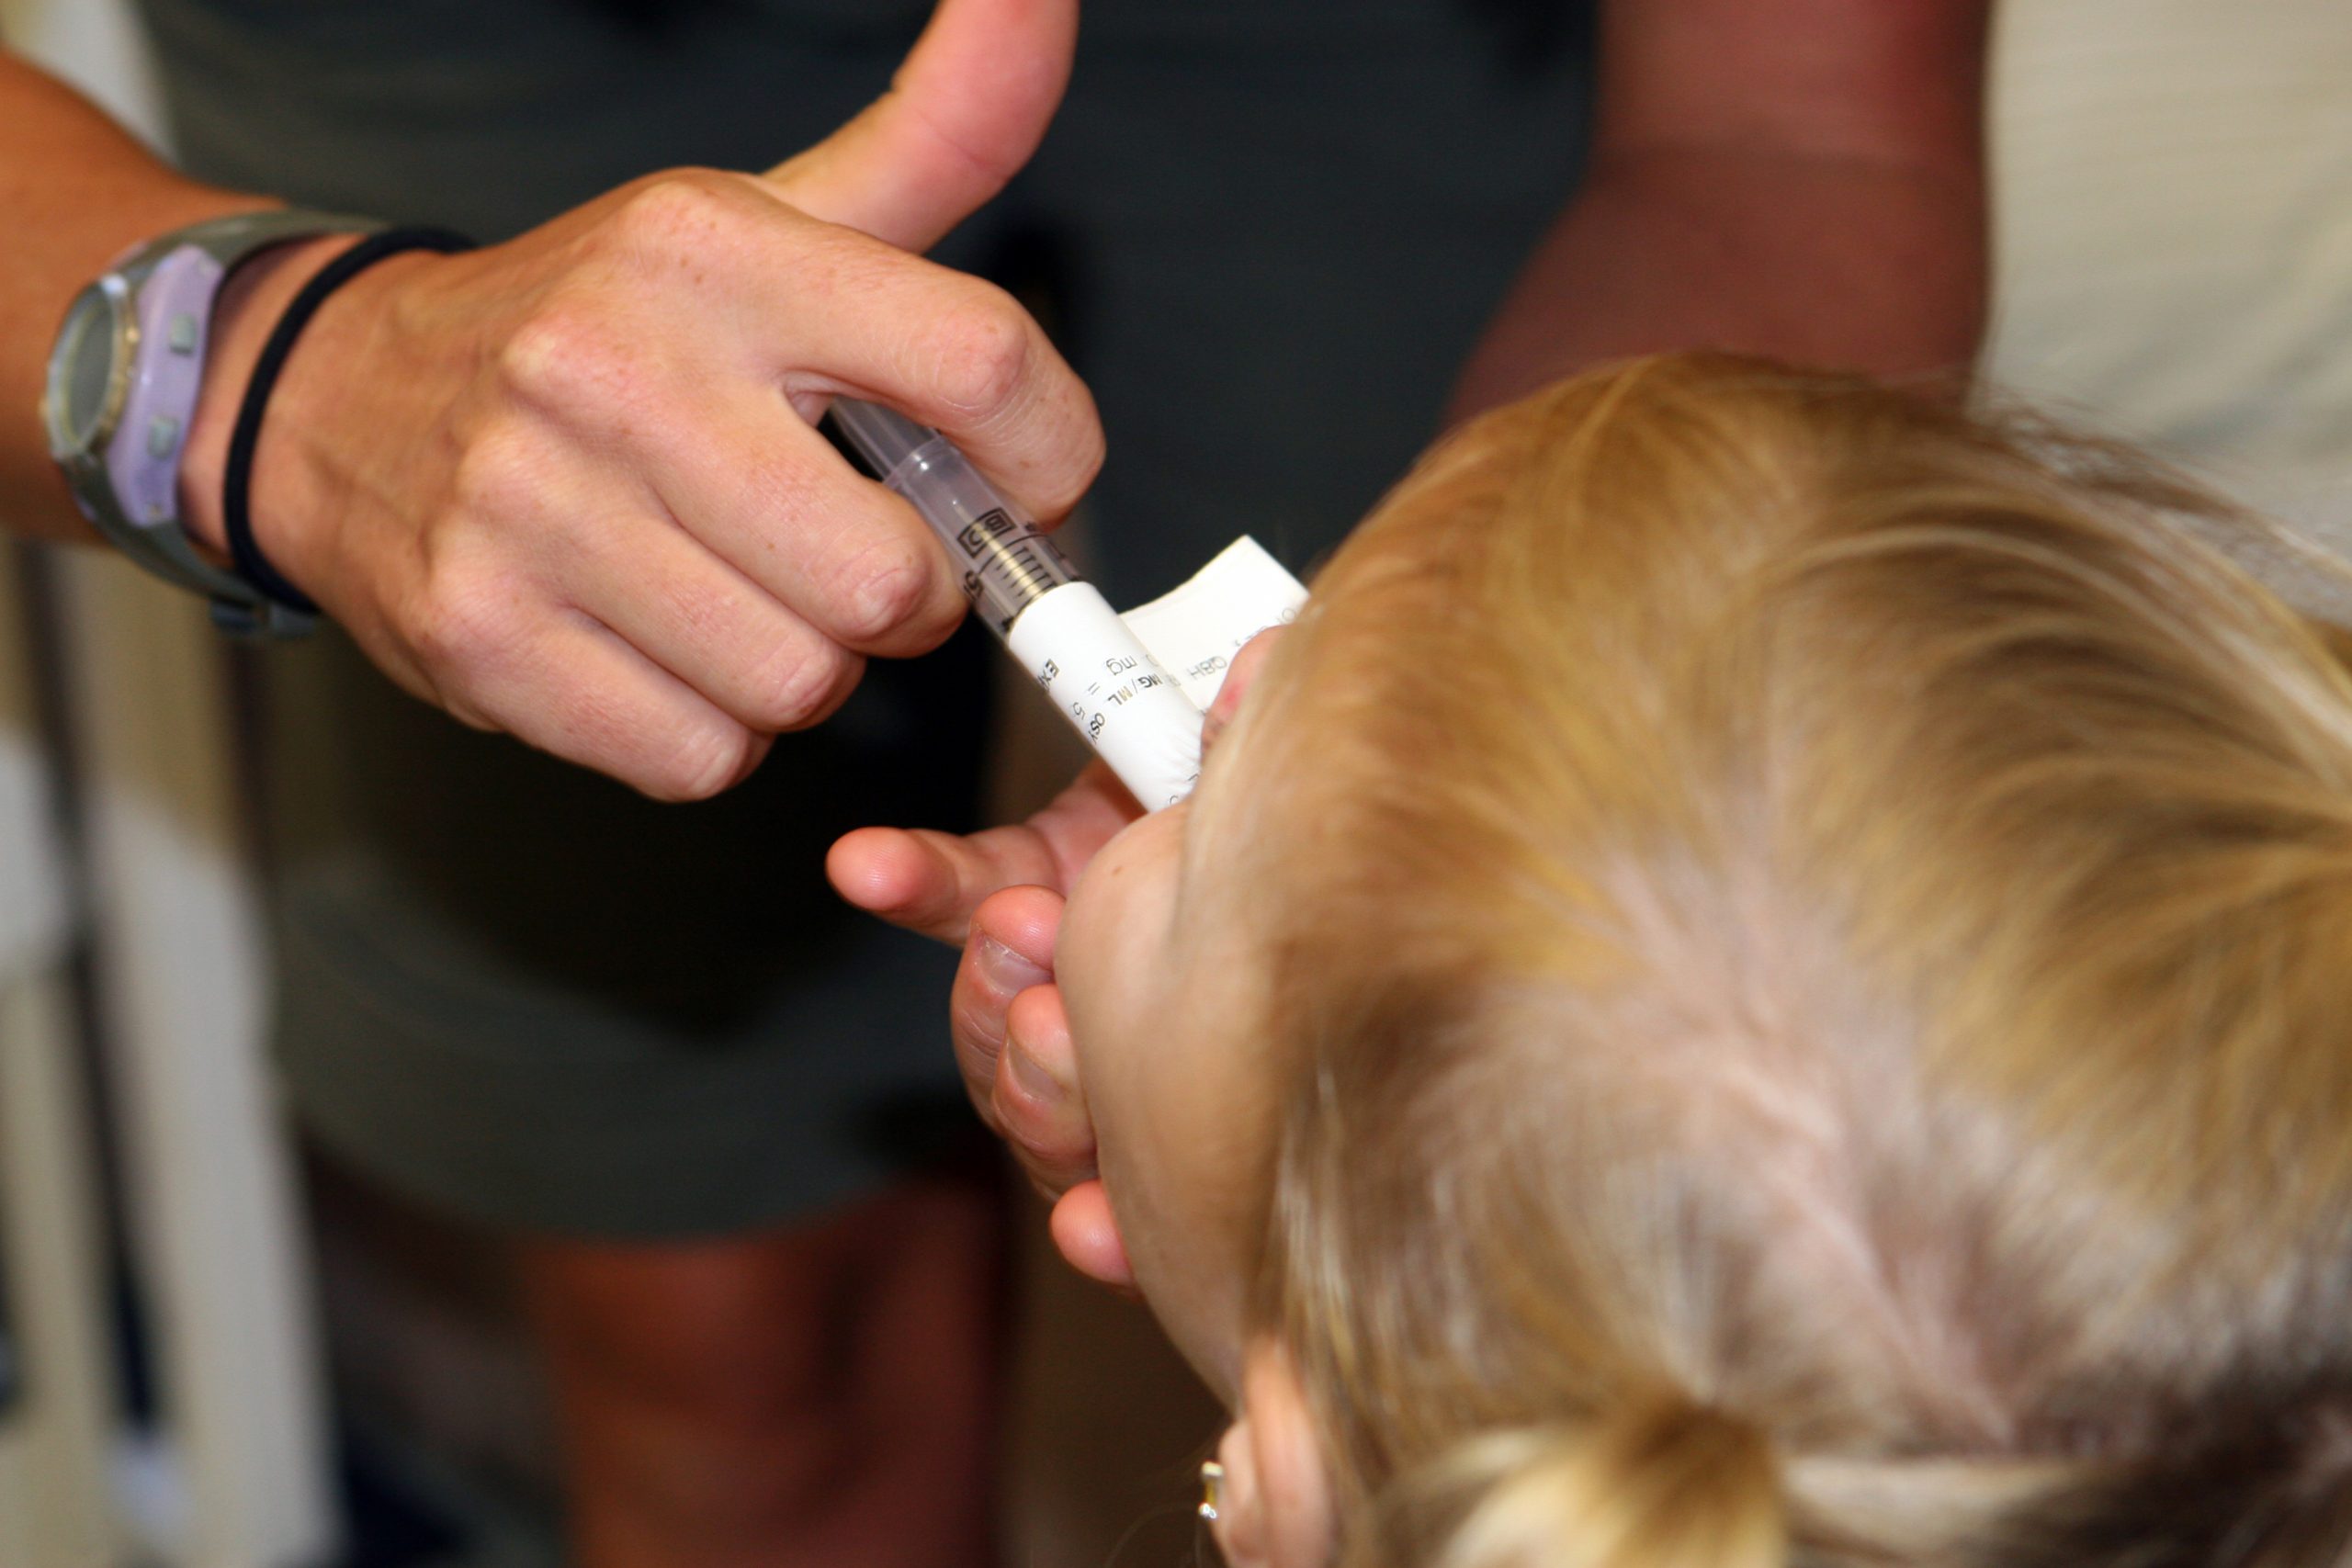
It can be difficult to persuade children to take medications. It is often helpful for medications to be prescribed in liquid or chewable form. For example, droppers are used for infants or very young children; the medication should be placed between the gum and cheek to prevent aspiration. Mixing medication with soft foods can also be helpful to encourage the child to swallow medications, but it is best to avoid mixing the medication with a staple food in the child's diet because of potential later refusal of the food associated with medication administration. It can be helpful to offer the child a cool item, such as a popsicle or frozen fruit bar, prior to medication administration to numb the child's tongue and decrease the taste of the medication. Other clinical tips for medication administration include asking the caregiver how the child takes medications at home and mimicking this method or asking the caregiver to administer the medication if the child trusts them more than the nurse. Oral syringes (without needles attached) may be used to administer precise dosages of medication to children. See Figure 15.14[51] of a nurse administering oral medication to a child with an oral syringe. When administering medication with an oral syringe, remember to remove the cap prior to administration because this could be a choking hazard. It is also important to educate the caregiver of the child how to properly administer the medication at the correct dosage at home.
Older Adults
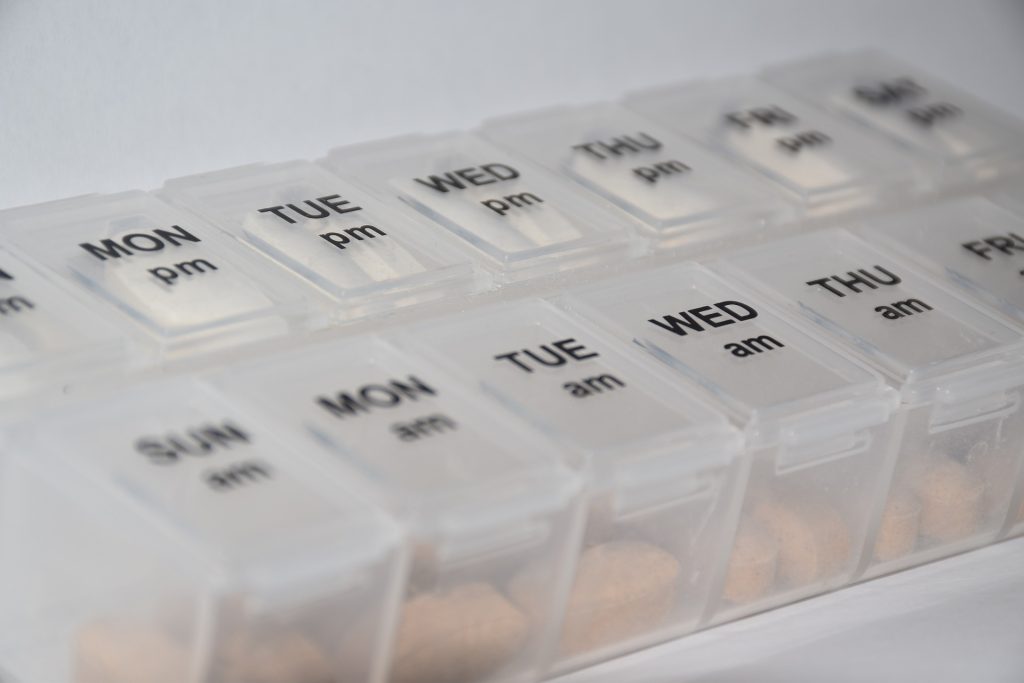
Many older adults have a “polypharmacy,” meaning many medications to keep track of and multiple times these medications need to be taken per day. Nurses should help patients set up a schedule to remember when to take the medications. Organizing medications in medication boxes by day and time is a very helpful strategy. See Figure 15.15[52] of a medication box. Nurses can suggest to patients to have all medications filled at the same pharmacy to avoid drug-drug interactions that can occur when multiple providers are prescribing medications.
Older adults often have difficulty swallowing, so obtaining a prescription for liquid medication or crushing the medication when applicable and placing it in applesauce or pudding is helpful. Allow extra time when administering medication to an older adult to give them time to ask questions and to swallow multiple pills. Monitor for adverse effects and drug interactions in older adults, who are often taking multiple medications and may have preexisting kidney or liver dysfunction.
Be sure to address the economic needs of an older adult as it relates to their medications. Medications can be expensive, and many older adults live on a strict budget. Nurses often advocate for less expensive alternatives for patients, such as using a generic brand instead of a name brand or a less expensive class of medication. Be aware that an older adult with financial concerns may try to save money by not taking medications as frequently as prescribed. Also, the older adult may “feel good” on their medications and think they don’t need to monitor or take medications because they are “cured.” Reinforce that “feeling good” usually means the medication is working as prescribed and should continue to be taken. Finally, empower patients to take control of managing their health by providing education and ongoing support.
This section will review assessments to be performed prior to, during, and after a medication pass to ensure safe medication administration.
Pre-Administration
In addition to verifying the rights of medication administration three times, the nurse should also perform focused assessments of the patient’s current status and anticipate actions of the medications and potential side effects. Here are some examples of pre-assessments before administering medication:
- Check Vital Signs. Before administering cardiac medication, the patient’s blood pressure and heart rate are typically assessed to ensure they are within range of parameters for administration. For example, a patient is scheduled to receive a blood pressure medication, but their current blood pressure is 90/50, so the medication is withheld based on parameters stated on the MAR to withhold the medication if the systolic blood pressure is less than 100. If parameters are not provided, it is the nurse's responsibility to use clinical judgment and follow up with the prescribing provider with concerns before administering the medication.
- Perform a Focused Respiratory Assessment. Before administering inhaled respiratory medications such as albuterol for asthma or chronic pulmonary disease, the O2 saturation, heart rate, respiratory rate, and lungs sounds are typically assessed. The patient’s response to the medication is then compared to pre-assessment data to determine effectiveness.
- Review Lab Results. Before administering a diuretic such as furosemide, the nurse assesses the patient’s potassium level in recent lab work results. If the potassium level is lower than normal range, the nurse withholds the medication and notifies the prescribing provider.
- Perform a Pain Assessment. Before administering pain medication, the nurse performs a thorough pain assessment based on the mnemonic PQRSTU. (See more information about the PQRSTU mnemonic in the "Health History" chapter.) The patient’s response to the medication after it is received is then compared to pre-assessment data to determine effectiveness.
During Administration
The nurse continues to assess safety during administration of medication, such as sudden changes in condition or difficulty swallowing. For example, if a patient suddenly becomes dizzy, the administration of cardiac medication is postponed until further assessments are performed. If a patient starts to cough, choke, or speak in a gurgly voice during oral or tube administration of medication, the procedure should be stopped and further assessments performed.
Table 15.1 Summary of Safe Medication Administration Guidelines
| Guidelines | Additional Information |
|---|---|
| Be cautious and focused when preparing medications. | Avoid distractions. Some agencies have a no-interruption zone (NIZ) where health care providers can prepare medications without interruptions.[53] |
| Check and verify allergies. | Always ask the patient about their medication allergies, types of reactions, and severity of reactions. Verify the patient’s medical record for documented allergies. |
| Use two patient identifiers and follow agency policy for patient identification. | Use at least two patient identifiers before administration and compare information against the medication administration record (MAR).[54] |
| Perform appropriate patient assessments before medication administration. | Assess the patient prior to administering medications to ensure the patient is receiving the correct medication, for the correct reason, and at the correct time. For example, a nurse reviews lab values and performs a cardiac assessment prior to administering cardiac medication. See more information regarding specific patient assessments during parenteral medication administration in the “Applying the Nursing Process” section. |
| Be diligent and perform medication calculations accurately. | Double-check and verify medication calculations. Incorrect calculation of medication dosages causes medication errors that can compromise patient safety. |
| Use standard procedures and evidence-based references. | Follow a standardized procedure when administering medication for every patient. Look up current medication information in evidence-based sources because information changes frequently. |
| Communicate with the patient before and after administration. | Provide information to the patient about the medication before administering it. Answer their questions regarding usage, dose, and special considerations. Give the patient an opportunity to ask questions and include family members if appropriate. |
| Follow agency policies and procedures regarding medication administration. | Avoid work-arounds. A work-around is a process that bypasses a procedure or policy in a system. For example, a nurse may “borrow” medication from one patient’s drawer to give to another patient while waiting for an order to be filled by the pharmacy. Although performed with a good intention to prevent delay, these work-arounds fail to follow policies in place that ensure safe medication administration and often result in medication errors. |
| Ensure medication has not expired. | Check all medications’ expiration dates before administering them. Medications can become inactive after their expiration date. |
| Always clarify an order or procedure that is unclear. | Always verify information whenever you are uncertain or unclear about an order. Consult with the pharmacist, charge nurse, or health care provider, and be sure to resolve all questions before proceeding with medication administration. |
| Use available technology to administer medications. | Use available technology, such as barcode scanning, when administering medications. Barcode scanning is linked to the patient’s eMAR and provides an extra level of patient safety to prevent wrong medications, incorrect doses, or wrong timing of administration. If error messages occur, it is important to follow up appropriately according to agency policy and not override them. Additionally, it is important to remember that this technology provides an additional layer of safety and should not be substituted for the checking the five rights of medication administration. |
| Be a part of the safety culture. | Report all errors, near misses, and adverse reactions according to agency policy. Incident reports improve patient care through quality improvement identification, analysis, and problem solving. |
| Be alert. | Be alert to error-prone situations and high-alert medications. High-alert medications are those that can cause significant harm. The most common high-alert medications are anticoagulants, opiates, insulins, and sedatives. Read more about high-alert medications in the “Basic Concepts of Administering Medications" section. |
| Address patient concerns. | If a patient questions or expresses concern regarding a medication, stop the procedure and do not administer it. Explore the patient’s concerns, review the provider’s order, and, if necessary, notify the provider. |
Post-Administration: Right Response
In addition to documenting the medication administration, the nurse evaluates the patient after medications have been administered to monitor the efficacy of the drug. For example, if a patient reported a pain level of “8” before PRN pain medication was administered, the nurse evaluates the patient’s pain level after administration to ensure the pain level is decreasing and the pain medication was effective. This evaluation data is documented in the patient’s chart.
Additionally, the nurse continually monitors for adverse effects from all of a patient’s medications. For example, the first dose of an antibiotic was administered to a patient during a previous shift, but the nurse notices the patient has developed a rash. The nurse notifies the prescribing provider of the change in condition and anticipates new orders or changes in the existing orders.
Use the checklist below to review the steps for completion of “Oral Medication Administration.”[55]
Steps
Disclaimer: Always review and follow agency policy regarding this specific skill.
Special Considerations:
- Plan medication administration to avoid disruption.
- Dispense medication in a quiet area.
- Avoid conversation with others.
- Follow agency’s no-interruption zone policy.
- Perform hand hygiene prior to medication preparation.
- Prepare medications for ONE patient at a time.
- Gather supplies: MAR/eMAR.
- Know the actions, special nursing considerations, safe dose ranges, purpose of administration, and potential adverse effects of the medications to be administered. Consider the appropriateness of the medication for this patient at this time.
- Read the eMAR/MAR and select the proper medication from the medication supply system or the patient’s medication drawer. Perform the first of three checks of the six rights of medication administration plus two (allergies and expiration dates). Perform necessary calculations to verify correct dosage.
- The right patient: Check that you have the correct patient using two patient identifiers (e.g., name and date of birth).
- The right medication (drug): Check that you have the correct medication and that it is appropriate for the patient in the current context.
- The right dose: Check that the dose is safe for the age, size, and condition of the patient. Different dosages may be indicated for different conditions.
- The right route: Check that the route is appropriate for the patient’s current condition.
- The right time: Adhere to the prescribed dose and schedule.
- The right documentation: Always verify any unclear or inaccurate documentation prior to administering medications.
- The medication label must be checked for name, dose, and route, and compared with the MAR at least three different times:
- When the medication is taken out of the drawer.
- When the medication is being prepared.
- At the bedside, prior to medication administration to the patient.
- Prepare the required medications:
- Unit dose packages: Do not open the wrapper until you are at the patient’s bedside. Keep opioids and medications that require special nursing assessments separate from other medication packages.
- Multi-dose containers: When removing tablets or capsules from a multi-dose bottle, pour the necessary number into the bottle cap and then place the tablets or capsules in a medication cup. Cut scored tablets, if necessary, to obtain the proper dosage. If it is necessary to touch the tablets, wear gloves.
- Liquid medication in a multi-dose bottle: When pouring liquid medications out of a multi-dose bottle, hold the bottle so the label is against the palm to avoid dripping on the label. Use an appropriate measuring device when pouring liquids and read the amount of medication at the bottom of the meniscus at eye level. Wipe the lip of the bottle with a paper towel.
- Depending on agency policy, the third check of the label may occur at this point. If so, after all medications for one patient have been prepared, recheck the medication labels against the eMAR/MAR before taking the medications to the patient. However, many agencies require the third check to be performed at the bedside after obtaining two patient identifiers and scanning the barcode of the patient.
- Replace any multi-dose containers in the patient’s drawer or medication supply system. Lock the medication supply system before leaving it.
- Transport the medications to the patient’s bedside carefully and keep the medications in sight at all times.
- Perform safety steps:
- Perform hand hygiene.
- Check the room for transmission-based precautions.
- Introduce yourself, your role, the purpose of your visit, and an estimate of the time it will take.
- Confirm patient ID using two patient identifiers (e.g., name and date of birth).
- Explain the process to the patient and ask if they have any questions.
- Be organized and systematic.
- Use appropriate listening and questioning skills.
- Listen and attend to patient cues.
- Ensure the patient’s privacy and dignity.
- Assess ABCs.
- When identifying the patient, compare the information with the eMAR/MAR. The patient should be identified using at least two of the following methods:
- Check the name on the patient’s identification band.
- Check the identification number on the patient’s identification band.
- Check the birth date on the patient’s identification band.
- Ask the patient to state their name and birth date, based on facility policy.
- If a patient is unable to verbalize their name and date of birth and patient identification bands are not used, use alternative methods of identification such as a second staff member and/or a patient picture in the MAR.
- Complete all necessary assessments before administering the medications. Check the patient’s allergy bracelet or ask the patient about allergies. Explain the purpose and action of each medication to the patient.
- Based on facility policy, the third check of the medication label typically occurs at this point. If so, recheck the label with the eMAR/MAR before administering the medications to the patient. Scan the patient’s barcode on the identification band, if bar scanning is used. If an error occurs during barcode scanning, obtain assistance before administering the medication. Most error messages are intended to warn the nurse of a potential medication error.
- Assist the patient to an upright (or a side-lying) position if they are unable to be positioned upright:
- Offer water or other permitted fluids with pills, capsules, tablets, and some liquid medications.
- Ask if the patient prefers to take the medications by hand or in a cup and if they prefer all medications at once or individually.
- Remain with the patient until each medication is swallowed. Never leave medication at the patient’s bedside.
- Note: If the patient is confused or has been known to hoard pills, have the patient open their mouth and check under the tongue.
- Assist the patient to a comfortable position, ask if they have any questions, and thank them for their time.
- Ensure safety measures when leaving the room:
- CALL LIGHT: Within reach
- BED: Low and locked (in lowest position and brakes on)
- SIDE RAILS: Secured
- TABLE: Within reach
- ROOM: Risk-free for falls (scan room and clear any obstacles)
- Perform hand hygiene.
- Document medication administration and related assessment findings. Report any concerns according to agency policy.
- Evaluate the patient’s response to the medication within the appropriate time frame. Note: Most sublingual medications act in 15 minutes, and most oral medications act in 30 minutes. If patient presents with any adverse effects:
-
- Withhold further doses.
- Assess vital signs.
- Notify prescriber.
- Notify pharmacy.
- Document as per agency policy.
ABCDE: A mnemonic for assessing for melanoma developing in moles: Asymmetrical, Borders are irregular in shape, Color is various shades of brown or black, Diameter is larger than 6 mm., and the shape of the mole is Evolving.
Acne: A skin disturbance that typically occurs on areas of the skin that are rich in sebaceous glands, such as the face and back.
Apocrine sweat gland: Sweat glands associated with hair follicles in densely hairy areas that release organic compounds subject to bacterial decomposition causing odor.
Blanching: To make white or pale by applying pressure.
Cyanosis: A bluish discoloration caused by lack of oxygenation of the tissue.
Dermis: The inner layer of skin with connective tissue, blood vessels, sweat glands, nerves, hair follicles, and other structures.
Diaphoretic: Excessive, abnormal sweating.
Ecchymosis: Bruising.
Eccrine sweat gland: Sweat gland that produces hypotonic sweat for thermoregulation.
Epidermis: The thin, uppermost layer of skin.
Erythema: A red color of the skin.
First-degree burn: A superficial burn that affects only the epidermis.
Fourth-degree burn: Severe burn damaging the dermis and the underlying muscle and bone.
Hypodermis: The layer of skin beneath the dermis composed of connective tissue and used for fat storage.
Jaundice: A yellowing of the skin or sclera caused by underlying medical conditions.
Keloid: A raised scar caused by overproduction of scar tissue.
Lesion: An area of abnormal tissue.
Lymphedema: A type of swelling that occurs when lymph fluid builds up in the body's soft tissues due to damage to the lymph system.
Melanin: Skin pigment produced by melanocytes scattered throughout the epidermis.
Melanoma: Skin cancer characterized by the uncontrolled growth of melanocytes that commonly develops from a mole. Melanoma is the most fatal of all skin cancers because it is highly metastatic. Melanomas usually appear as asymmetrical brown and black patches with uneven borders and a raised surface.
Pallor: A reduced amount of oxyhemoglobin the skin or mucous membranes. Skin and mucous membranes present with a pale skin color.
Petechiae: Tiny red dots caused by bleeding under the skin.
Pressure injury: Skin breakdown caused when a patient’s skin and soft tissue press against a hard surface for a prolonged period of time, causing reduced blood supply and resulting in damaged tissue.
Rule of Nines: A tool used in the emergency department to assess the total body surface area burned to quickly estimate intravenous fluid requirements.
Second-degree burn: Burn affecting both the epidermis and a portion of the dermis, resulting in swelling and a painful blistering of the skin.
Skin turgor: The skin's elasticity and its ability to change shape and return to normal when gently grasped between two fingers.
Third-degree burn: Severe burn that fully extends into the epidermis and dermis, destroying the tissue and affecting the nerve endings and sensory function.

